Prop Weapon - Tumblr Posts

3 years ago
Starting Assembly On The Test Print Of This Laspistol Sculpt - Step 1, Remove Supports And Clean Up Any

Starting assembly on the test print of this Laspistol Sculpt - Step 1, remove supports and clean up any particularly rough edges with 240 grit sandpaper

Starting Assembly On The Test Print Of This Laspistol Sculpt - Step 1, Remove Supports And Clean Up Any

Next, glue the main body and the power cell together using superglue

Starting Assembly On The Test Print Of This Laspistol Sculpt - Step 1, Remove Supports And Clean Up Any

Then, add the smaller detail pieces, again with superglue - any big gaps get filled with body filler and sanded flat-ish

Starting Assembly On The Test Print Of This Laspistol Sculpt - Step 1, Remove Supports And Clean Up Any

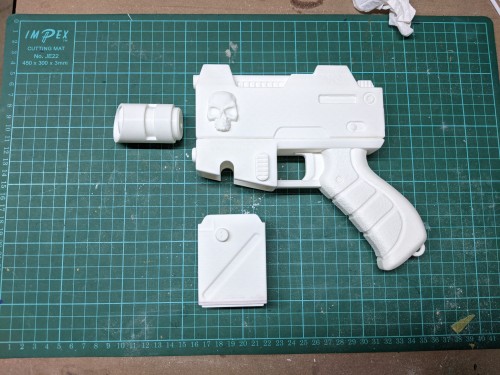
The assembled body, power cell & barrel are ready for the next step


Tags :
3 years ago
Time To Magnetise The Power Cell Into The Mag Well

Time to magnetise the power cell into the mag well

The magnets are 6mm x 3mm cylindrical neodynium magnets, held in place with superglue.

Time To Magnetise The Power Cell Into The Mag Well

Step 1 is to glue the magnets into the power cell

Time To Magnetise The Power Cell Into The Mag Well

Then, use the magnets on the power cell to position the magnets in the main gun

Time To Magnetise The Power Cell Into The Mag Well

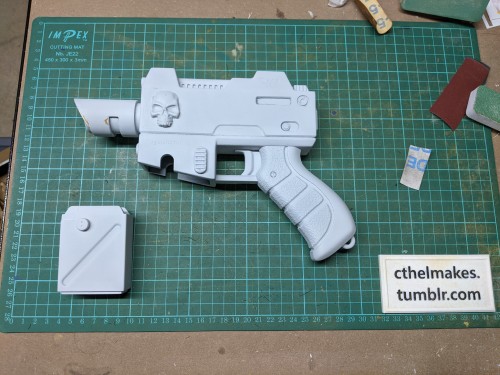
Test assembly to see what it looks like in one piece


Tags :
3 years ago
Next Step - Spray With Filler-primer To Fill In Most Of The Layer Lines From The Printing Process

Next step - spray with filler-primer to fill in most of the layer lines from the printing process

Next Step - Spray With Filler-primer To Fill In Most Of The Layer Lines From The Printing Process

Then came another load of sanding with 240grit, followed by a coat of black primer

Next Step - Spray With Filler-primer To Fill In Most Of The Layer Lines From The Printing Process

Once the primer had dried, more sanding with both 240 & 400 grit sandpaper. The deepest groves also got filled with body filler

Next Step - Spray With Filler-primer To Fill In Most Of The Layer Lines From The Printing Process

Finally, the barrel was superglued to the rest of the pistol


Tags :
3 years ago
Everything Gets A Coat Of Grey Primer (greybecause It Makes It Easy To See When I've Covered The Previous

Everything gets a coat of grey primer (greybecause it makes it easy to see when I've covered the previous black primer coat)

Everything Gets A Coat Of Grey Primer (greybecause It Makes It Easy To See When I've Covered The Previous

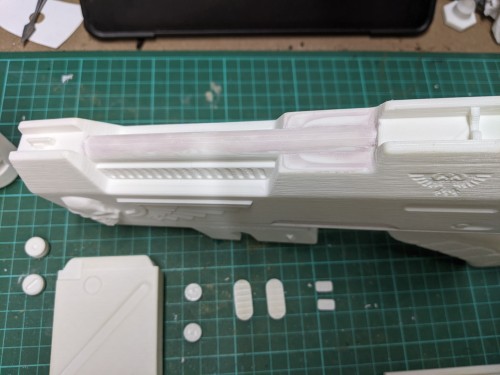
First lesson from this test print - the D & M in the Departmento Munitorum need to be tweaked to print better

Everything Gets A Coat Of Grey Primer (greybecause It Makes It Easy To See When I've Covered The Previous

Gave the body of the pistol a coat of green, followed by drybrushing with a lighter green

Everything Gets A Coat Of Grey Primer (greybecause It Makes It Easy To See When I've Covered The Previous

The body got masked off, then the metallic parts got a coat of gloss black primer followed by gunmetal.

The handle got a coat of matte black primer, then the trigger, trigger guard & lanyard ring got a paint of gunmetal with a regular paintbrush.

Everything Gets A Coat Of Grey Primer (greybecause It Makes It Easy To See When I've Covered The Previous

The best bit of masking is the big reveal at the end when you peel the masking off


Tags :
3 years ago
All The Details Get A Coat Of Gloss Black Paint By Hand

All the details get a coat of gloss black paint by hand

All The Details Get A Coat Of Gloss Black Paint By Hand

Then gunmetal/gold/black metal as appropriate, followed by drybrush highlights.

Weathering was done with a mixture of blue & black water-thinnable oil paints

All The Details Get A Coat Of Gloss Black Paint By Hand

Once the weathering was done, the muzzle lens & ammo indicators were painted by hand

All The Details Get A Coat Of Gloss Black Paint By Hand

Finally, everything got a couple of coats of satin varnish with an airbrush, followed by some gloss varnish by hand on the ammo indicators and muzzle lens - All that's left now are the beauty photos!


Tags :
3 years ago
All Finished! More Photos & Lessons Learned Below The Break

All finished! More photos & lessons learned below the break

All Finished! More Photos & Lessons Learned Below The Break

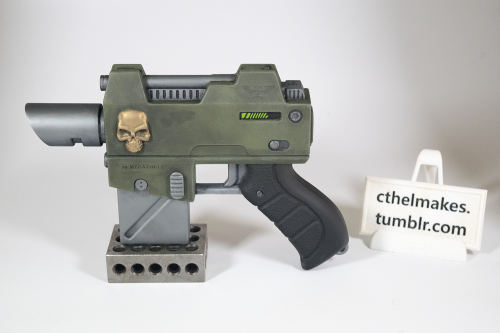
Good news - Everything fits together

Changes needed:

1) The "19 MEGATHULE" text is too shallow and some of the strokes are too thin to survive the filler primer & sanding - Switched to a different font & slightly deeper engraving

2) The knurling on the laser sight is a bit too fine - it survived the filler primer but fewer, deeper cuts would be better

3) The Departmento Munitorum stamp on the charging handle is a little small - made bigger

If you want to make your own version, .STL files are available for sale HERE


Tags :
3 years ago
First Impressions Of Using A Rotary Tool To Shape Foam - I Miss The Undo Button!

First impressions of using a rotary tool to shape foam - I miss the undo button!

Hopefully I can clear up the worst of the mistakes with sandpaper...

First Impressions Of Using A Rotary Tool To Shape Foam - I Miss The Undo Button!

The front part is starting to come together - the back part still needs work though


Tags :
3 years ago
Carved The Chamfers On The Upper Bit With A Knife Then Cleaned It Up With Sanding Blocks

carved the chamfers on the upper bit with a knife then cleaned it up with sanding blocks

Carved The Chamfers On The Upper Bit With A Knife Then Cleaned It Up With Sanding Blocks

That wonky barrel is looking worrying - might need to stick a rod down the middle to straighten it out. Probably my fault for screwing up the laminating the foam together to make it in the first place

Carved The Chamfers On The Upper Bit With A Knife Then Cleaned It Up With Sanding Blocks

Added some thin strips of foam to extend the upper barrel guard slightly


Tags :
3 years ago
Time To Make The Grip

Time to make the grip

Time To Make The Grip

The chequered texture was made by cutting part-way through with a knife then heating with a heat gun to open up the cuts

Time To Make The Grip

Tags :
3 years ago
Carving The Grooves Into The Foam With A Rotary Tool Was... Difficult. Hopefully It Won't Look Too Bad

Carving the grooves into the foam with a rotary tool was... difficult. Hopefully it won't look too bad when it's painted

Carving The Grooves Into The Foam With A Rotary Tool Was... Difficult. Hopefully It Won't Look Too Bad

The foam work is almost finished - time for the 3D printed bits


Tags :
3 years ago
Printing The Cylinder Took 3 Attempts - First Print Came Loose From The Print Bed; Second Print I Forgot

Printing the cylinder took 3 attempts - first print came loose from the print bed; second print I forgot that you need panel gaps if you want details to be visible from a distanct.

Luckily I modelled it in Fusion360 so I could tweak individual settings without too much difficulty

Printing The Cylinder Took 3 Attempts - First Print Came Loose From The Print Bed; Second Print I Forgot

Drilled a shallow hole in the rear half to hold the spindle

Printing The Cylinder Took 3 Attempts - First Print Came Loose From The Print Bed; Second Print I Forgot

Starting to look like a revolver now


Tags :
3 years ago
For The Muzzle & Front Cap, I Printed Them With A Raised Chamfered Lip So I Could Sharpen The Edge And

For the muzzle & front cap, I printed them with a raised chamfered lip so I could sharpen the edge and then use them to cut slightly into the foam.

For The Muzzle & Front Cap, I Printed Them With A Raised Chamfered Lip So I Could Sharpen The Edge And

Then they got superglued into place

For The Muzzle & Front Cap, I Printed Them With A Raised Chamfered Lip So I Could Sharpen The Edge And

For the round details, I wanted to try and cut them out with a sharpened tube because I didn't want to try freehanding a circle with a knife. It turns out you can 3d print cutters from PLA and after sharpening with sandpaper they work ok! They do need frequent re-sharpening though.

For The Muzzle & Front Cap, I Printed Them With A Raised Chamfered Lip So I Could Sharpen The Edge And

Cut out part of 2 of the big circles, glued to the other big circles, then added the small circles on the other side - and the hinge details are done

For The Muzzle & Front Cap, I Printed Them With A Raised Chamfered Lip So I Could Sharpen The Edge And

Propped up like this for a progress shot because I don't want to glue the cylinder in before painting.

Not much left to actually make before painting either...


Tags :
3 years ago
First A Coat Of Grey Rattlecan Primer To Try And Seal The Foam, Then A Coat Of Yellow Filler-primer Followed

First a coat of grey rattlecan primer to try and seal the foam, then a coat of yellow filler-primer followed by sanding to try and smooth out the texture (especially on the 3D printed parts)

First A Coat Of Grey Rattlecan Primer To Try And Seal The Foam, Then A Coat Of Yellow Filler-primer Followed

Following a final priming with black polyurethane primer, the pieces were basecoated by hand

First A Coat Of Grey Rattlecan Primer To Try And Seal The Foam, Then A Coat Of Yellow Filler-primer Followed

I did edge highlighting, because I didn't want drybrusing to pick up on the mistakes made when I was making the foam pieces. The wood texture was done with a thin brush.

First A Coat Of Grey Rattlecan Primer To Try And Seal The Foam, Then A Coat Of Yellow Filler-primer Followed

Finally, weathering with water-thinnable oil paint.

All that's left now is sealing and the final photos!


Tags :
3 years ago
And It's Finished!
And It's Finished!
And It's Finished!
And It's Finished!
And It's Finished!

And it's finished!

Drawings and STLs to make your own are available for free HERE

Lessons learned:

1) I should have sealed it with modpodge before priming - sealing with rattlecan primer worked, but there's an obvious difference in finish depending on face or edge of foam sheet.

2) Trying to cut perpendicular curves with a knife is HARD


Tags :
3 years ago
Time For A Hellpistol To Provide A Bit More Firepower (from The Same Forgeworld As The Laspistol)

Time for a hellpistol to provide a bit more firepower (from the same forgeworld as the laspistol)

Time For A Hellpistol To Provide A Bit More Firepower (from The Same Forgeworld As The Laspistol)

I'm not glueing any of the small details on until after the first coat of filler primer, to make access easier for sanding

Time For A Hellpistol To Provide A Bit More Firepower (from The Same Forgeworld As The Laspistol)

Another tip - put some body filler on the areas that show the most layer stepping and sand it down before the filler primer. I'm sure I'll be adding some more filler, but it's good to get the worst areas a bit tidied up first


Tags :
3 years ago
First Coat Of Filler Primer

First coat of filler primer

First Coat Of Filler Primer

and after sanding

First Coat Of Filler Primer

Followed by a coat of regular grey primer to see where more sanding was needed


Tags :
3 years ago
Big Pieces Got Another Coat Of Filler Primer, Then A Final Sanding And Assembly

Big pieces got another coat of filler primer, then a final sanding and assembly

Big Pieces Got Another Coat Of Filler Primer, Then A Final Sanding And Assembly

Once everything was glued together, a final light coat of filler primer to fill any sanding marks

Big Pieces Got Another Coat Of Filler Primer, Then A Final Sanding And Assembly

Then a coat of light grey primer, followed by black primer (using an airbrush) and then the nooks and crannies got primed with a paintbrush.


Tags :
3 years ago
Step 1 - Green Basecoat For The Body Trying With An Airbrush, Followed By A Drybrush Highlight

Step 1 - green basecoat for the body trying with an airbrush, followed by a drybrush highlight

Step 1 - Green Basecoat For The Body Trying With An Airbrush, Followed By A Drybrush Highlight

Step 2 - mask off the large metal areas for a coat of gloss black primer, followed by gunmetal.

Step 1 - Green Basecoat For The Body Trying With An Airbrush, Followed By A Drybrush Highlight

Drybrush highlight with the masking still in place, then peel in preparation for brush-painting the other details.


Tags :
3 years ago
All The Details Got A Coat Of Gloss Black Primer With A Paintbrush To Cover Up Any Green. Even The Handle,

All the details got a coat of gloss black primer with a paintbrush to cover up any green. Even the handle, which I meant to use matte black on 🙃

All The Details Got A Coat Of Gloss Black Primer With A Paintbrush To Cover Up Any Green. Even The Handle,

The gold skull and wing got an undercoat of copper, followed by a topcoat of gold

All The Details Got A Coat Of Gloss Black Primer With A Paintbrush To Cover Up Any Green. Even The Handle,

The other metal details got a coat of gunmetal, followed by a drybrush with steel. This is the point I realised if I hadn't glued all the details on I could have done this a lot easier with an airbrush 🤦‍♂️

All The Details Got A Coat Of Gloss Black Primer With A Paintbrush To Cover Up Any Green. Even The Handle,

The little radiator fins got a coat of black metallic paint, then a drybrush with gunmetal.


Tags :
3 years ago
Fire Selection Indicators Get A Coat Of Red Paint

Fire selection indicators get a coat of red paint

Fire Selection Indicators Get A Coat Of Red Paint

rear sight - two white dots; front sight - one red dot (there are little dimples in the sculpt)

Fire Selection Indicators Get A Coat Of Red Paint

The muzzle lens was painted by hand with a simple gem highlighting scheme. Finally, the power indicator was handpainted with a couple of bits of masking tape to keep the borders clean.

Painting is now complete!


Tags :