
• she/they dykefag • disabled artist • all original artwork has been deleted • I will no longer post my own art here • ☠️ AI is not art ☠️
278 posts
Embroidered Fossils North Carolina-basedself-taught Artist Rachel Crisp Creates Stunning Embroidery Of


Embroidered Fossils North Carolina-based self-taught artist Rachel Crisp creates stunning embroidery of Dinosaur fossils surrounded by lush greens.
-
 hannicrow reblogged this · 8 months ago
 -
 losyanya reblogged this · 8 months ago
 -
losyanya liked this · 8 months ago
-
 superimaginativecat liked this · 9 months ago
 -
 deltastars reblogged this · 10 months ago
 -
deltastars liked this · 10 months ago
-
 cartoon-aragorn reblogged this · 10 months ago
 -
 stardustdetective reblogged this · 11 months ago
 -
 salmonfordesire reblogged this · 11 months ago
 -
 urmusicwasstolen liked this · 1 year ago
 -
 gothkrispies liked this · 1 year ago
 -
 hotpocketmakemehappy liked this · 1 year ago
 -
 artandotherprettystuff reblogged this · 1 year ago
 -
 saphicrebel3 reblogged this · 1 year ago
 -
 exactlymellowphantom reblogged this · 1 year ago
 -
 feralfinch liked this · 1 year ago
 -
 zw57 liked this · 1 year ago
 -
 thestrangestwatermelonofall reblogged this · 1 year ago
 -
 sunkentowers reblogged this · 1 year ago
 -
 maverick-ornithography liked this · 1 year ago
 -
 alicepallis reblogged this · 1 year ago
 -
 floatinginthelights reblogged this · 1 year ago
 -
 agirlnamedhagrid liked this · 1 year ago
 -
 ereborne reblogged this · 1 year ago
 -
 delicateninjatriumph liked this · 1 year ago
 -
 jennytrex liked this · 1 year ago
 -
 mylifeisadeceit liked this · 1 year ago
 -
 firstservantmurdered liked this · 1 year ago
 -
 diemarysues reblogged this · 1 year ago
 -
 danielsmountain liked this · 1 year ago
 -
 chocolatecupcakesandlavender reblogged this · 1 year ago
 -
 dopepoisonivyoncrack reblogged this · 1 year ago
 -
dopepoisonivyoncrack liked this · 1 year ago
-
 yami268 reblogged this · 1 year ago
 -
yami268 liked this · 1 year ago
-
 yincira reblogged this · 1 year ago
 -
mousicat liked this · 1 year ago
-
 angelicegodeath liked this · 1 year ago
 -
 theelegantrubble liked this · 1 year ago
 -
 kittydoom reblogged this · 1 year ago
 -
 zelda-pairings reblogged this · 1 year ago
 -
 starlit-goose liked this · 1 year ago
 -
 paintingspiders reblogged this · 1 year ago
 -
 beckab liked this · 1 year ago
More Posts from Doodlesarethewindowtothesoul
ok so let me start by saying that I don't have the slightest idea what I'm doing or if this is in any way helpful but @forceofconviction and @spiciestmarinara asked for a pattern for the ace dragon embroidery so here's my attempt at explaining what I did

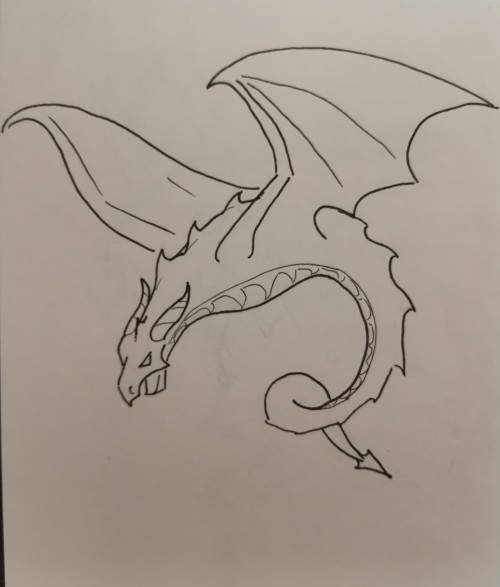
This is the basic dragon shape I use for everything. I try to vary it by making the dragon more hunched over or give the tail a different direction to swoosh in. I also like to make it so the wings follow the curve of the embroidery hoop
(the wings are supposed to be somewhat equally big but I messed up and now it's to late to fix so ignore that)

The amount of stripes on the wings varies depending on which (pride) colours you want to lose. For this I went with four for the black, grey, white and purple of the ace flag. In my embroidery piece I added a couple more stripes bc I tried to give it some more shading but the sketch for that looked like a mess so four stripes it is. The weird lines in the middle of the top (black) stripe isn't necessar, but I like to put a little lighter shading there to indicate where the bone of the dragon wing would be

Now we add stripes to the body. I always use the colour of the top stripe on the flag for the spikes. For the ace dragon I used grey and white where the normal scales are and then for the scales down the dragon's front I used light and dark purple.
For the lesbian dragon I used the top stripe colours for the spikes and the rest for the normal scales. The front scales were just the lesbian flag repeated. For the bi dragon I used a base of pink, purple and blue for the whole body without giving the dragon that front stripe down. And then I used different shades of these colours to go over the base. (I wouldn't recommend that. It got a bit messy)

When embroidering I mostly start with the head, then do the body and lastly the wings. I don't know if there's a difference but I just think the wings are the easiest part so I like to keep them for the end, when my patience starts to dwindle. The arrows show the direction of the stitches. For the front scales I think it's easiest to go from side to side instead of up and down. For the spade part of the tail I used something kind of like a leaf stich but starting at the broad part, so pretty much a leaf stitch reversed (I have no idea if there's a name for that)
For the shading of the head, I honestly don't know what I'm doing. I think I like to take a light shade of the colour from one of the middle stripes and use it for the stripe going from nose to the eye. Then above that I use a slightly darker shade. Below the light stripe goes a the same darker shade and then below the mouth, you use an even darker shade. But really I still haven't figured that out. For the non-binary dragon I used dark yellow for the top of the head and light yellow for the beneath-the-mouth-part.
I fill the eye up with black or a dark shade of whichever colour is the darkest of the pride flag you use and then I take the brightest colour of the flag and do the tiniest french knot in the middle of the eye. For that it's best to split the thread in half or use only a single strand of the thread.
And just because I personally like the pose of the aro dragon more than the one of the ace dragon:
So you can fill in as many stripes as you need for your flag (or other colours you fancy). With this dragon shape everything is exactly the same except the direction of the left wing stitches go from bottom left to top right and I'd only use a darker shade of the top stripe colour bc the wing is angled so we only see the top part
I hope this helps and I hope that those who know how embroidery patterns really work aren't judging me too harshly lmao
{video description: a man standing in front of an abstract painting in-progress.
"One time I told a friend that I enjoy painting, and his response was, 'Oh yeah? Are you any good?'
And I was stymied in the moment, and I just today realized why.
Pretend instead of painting, I had said, 'I really enjoy going on walks.'
And then he had responded, 'Oh, are you a pretty skilled walker?'
What?! That doesn't follow. People go on walks to feel good not to be good. Not everything is about improvement or skill.
If I wanted to be good at painting I'd have to worry about composition, color theory, texture...taking care of my tools instead of just dumping them into a milk jug of water that I never rinse out.
I'm bored just listing that sh*t, let alone doing it.
If I had to be good, I would quit.
I paint because it takes me out of myself. The end result doesn't even really matter.
I'm sure some of you relate. That's why we get along. Thanks for listening, see you tomorrow!"
via @ abrahampiper on Tiktok}
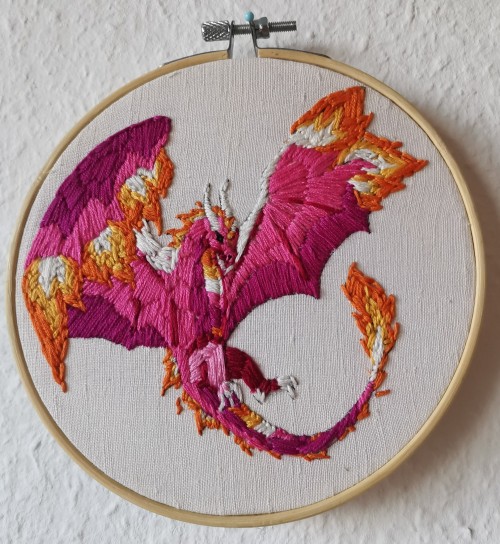
A little lesbian dragon
(ace dragon)
(sea dragon)


Visible Mending
Introduction:
Visible mending is a decorative way to fix up an item. Instead of trying to make your mend as invisible as possible, the idea is to make it part of the garment's design.
Visual mending is not a single technique: it's more of a mindset. If you've got an item you love, it deserves to be mended, and if you're going to put that love into stitches, why not show them off?
That being said, there are some specific techniques that are popular with visible menders. Let's take a look!
Sashiko:
Sashiko is a type of traditional Japanese embroidery that is used to both decorate and reinforce fabric. In visible mending, sashiko is often used to cover up holes with patches or to reinforce thinning fabric. This technique uses a variation on the running stitch.
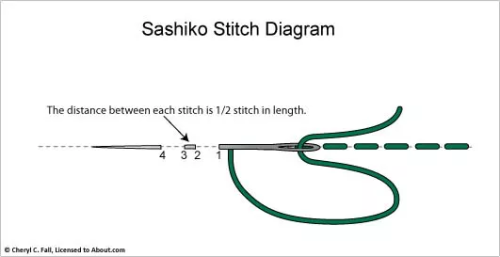
(Image source) [ID: sashiko stitch diagram: the distance between each stitch is 1/2 stitch in length.]
Some resources on sashiko:
SashiCo on YouTube: sashiko livestreams and information on the cultural aspect of sashiko.
Written tutorial by Upcycle Stitches.
Free sashiko templates by TheSpruceCrafts.
Fixing jeans with sashiko by Soluna Collective.
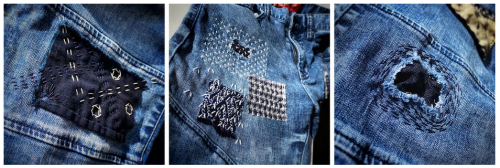
(Image source) [ID: three examples of sashiko embroidery on jeans fabric.]
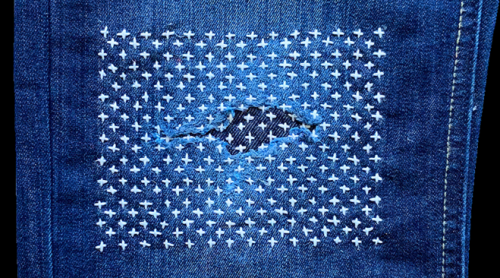
(Image source) [ID: sashiko embroidery with white thread on blue jeans fabric.]
Embroidery:
Regular embroidery is also a popular technique to accentuate your mends. Check out my embroidery 101 post to learn how to get started. You can embroider patches, or use embroidery to hide or accentuate any stitches you've made to fix holes. Embroidery's also a great way to cover up stains.
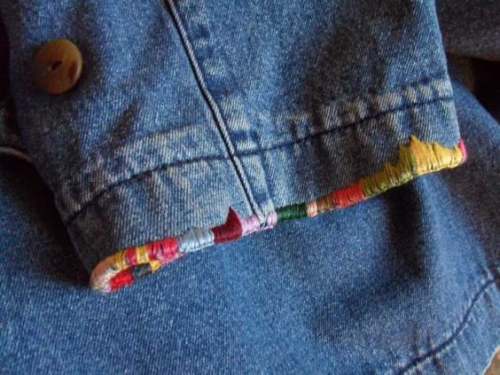
(Image source) [ID: colourful embroidery floss covers a worn sleeve edge of a jeans jacket]
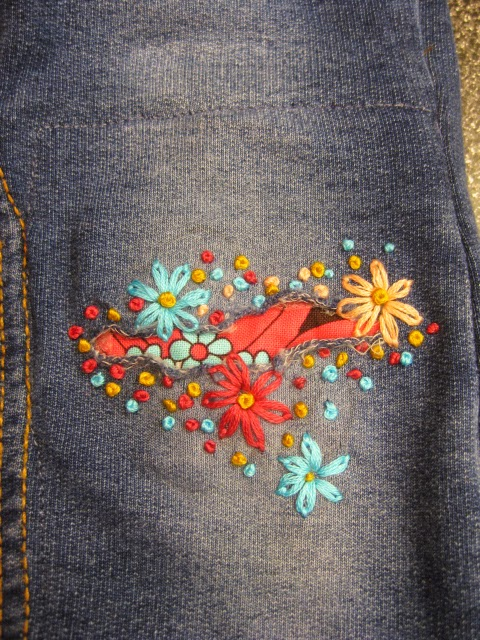
(Image source) [ID: colourful flower embroidery surrounds a hole in a pair of dark gray jeans. Fabric with a red and black flower print peaks out of the hole.]
Patches:
There are many ways to add patches to a garment. My tutorial on patches is a good place to start if you want to make custom-shaped patches to sew on top of your fabric. You can also sew your patch on the inside of your garment and have it peek out from beneath the hole you're trying to fix. Fun ideas for this are lace or superheroes.
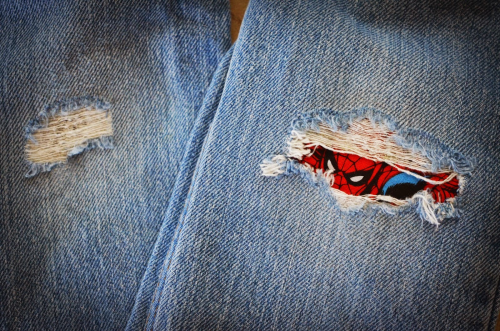
(Image source) [ID: Spiderman peaking out of a rip in a pair of blue jeans.]

(Source) [ID: a red flannel heart-shaped elbow patch on a gray knitted sweater.]
Darning:
Darning is a technique used to repair holes in fabric by using running stitches to weave extra fabric over the hole as to fill it up again. While traditionally darning is done in an invisible way by using the same colour of thread as your fabric, you can also use contrasting colours to accentuate your fix. Check out this written tutorial on darning by TheSpruceCrafts.
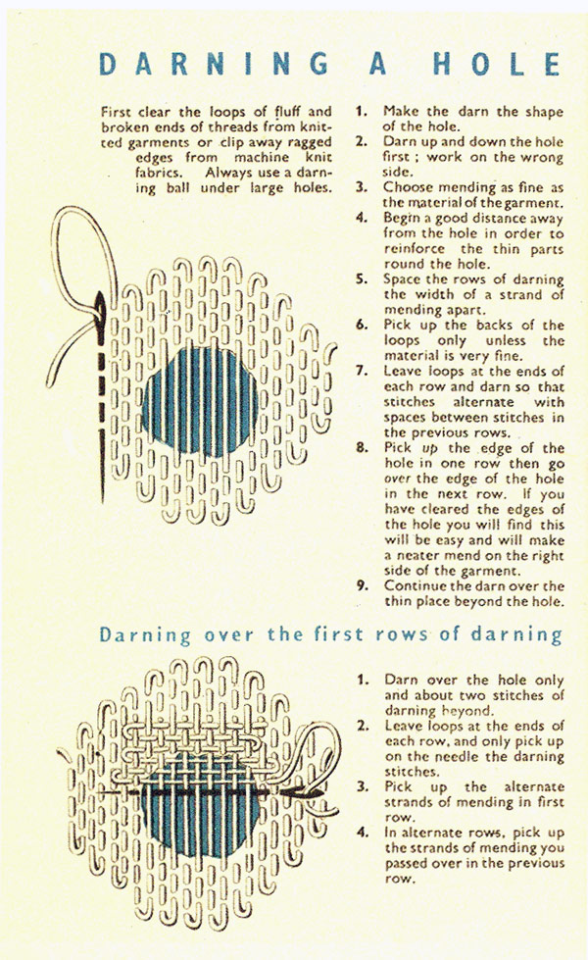
(Image source) [ID: vintage instructions on how to darn a hole.]
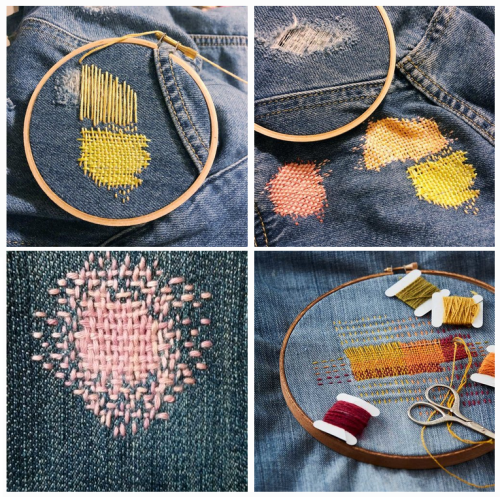
(Image source) [ID: four examples of darning on blue fabric with colourful contrasting thread.]
Conclusion:
Visible mending is a creative way to fix up your clothes and give them some personality at the same time.
You should be proud of the fact that you took the time and learned the necessary skills needed to mend your clothes! Show off what you did!
A fun side effect of wearing these obvious mends is that people will notice them. They'll remember your fixes the next time they're faced with a hole in their wardrobe, and it will make them more likely to try it for themselves.
These are just a few ways to visibly mend your garments. Want more inspiration? Check out Pinterest or r/Visiblemending on Reddit.