Visible Mending - Tumblr Posts
Visible Mending
Introduction:
Visible mending is a decorative way to fix up an item. Instead of trying to make your mend as invisible as possible, the idea is to make it part of the garment's design.
Visual mending is not a single technique: it's more of a mindset. If you've got an item you love, it deserves to be mended, and if you're going to put that love into stitches, why not show them off?
That being said, there are some specific techniques that are popular with visible menders. Let's take a look!
Sashiko:
Sashiko is a type of traditional Japanese embroidery that is used to both decorate and reinforce fabric. In visible mending, sashiko is often used to cover up holes with patches or to reinforce thinning fabric. This technique uses a variation on the running stitch.
(Image source)
Some resources on sashiko:
SashiCo on YouTube: sashiko livestreams and information on the cultural aspect of sashiko.
Written tutorial by Upcycle Stitches.
Free sashiko templates by TheSpruceCrafts.
Fixing jeans with sashiko by Soluna Collective.
(Image source)
(Image source)
Embroidery:
Regular embroidery is also a popular technique to accentuate your mends. Check out my embroidery 101 post to learn how to get started. You can embroider patches, or use embroidery to hide or accentuate any stitches you've made to fix holes. Embroidery's also a great way to cover up stains.
(Image source)
(Image source)
Patches:
There are many ways to add patches to a garment. My tutorial on patches is a good place to start if you want to make custom-shaped patches to sew on top of your fabric. You can also sew your patch on the inside of your garment and have it peek out from beneath the hole you're trying to fix. Fun ideas for this are lace or superheroes.
(Image source)

(Source)
Darning:
Darning is a technique used to repair holes in fabric by using running stitches to weave extra fabric over the hole as to fill it up again. While traditionally darning is done in an invisible way by using the same colour of thread as your fabric, you can also use contrasting colours to accentuate your fix. Check out this written tutorial on darning by TheSpruceCrafts.
(Image source)
(Image source)
Conclusion:
Visible mending is a creative way to fix up your clothes and give them some personality at the same time.
You should be proud of the fact that you took the time and learned the necessary skills needed to mend your clothes! Show off what you did!
A fun side effect of wearing these obvious mends is that people will notice them. They'll remember your fixes the next time they're faced with a hole in their wardrobe, and it will make them more likely to try it for themselves.
These are just a few ways to visibly mend your garments. Want more inspiration? Check out Pinterest or r/Visiblemending on Reddit.
Idea: sew some cute little moths with scrap fabrics and sew them on holes you have on your clothes so you can keep wearing them :)


trying out sashiko mending for the first time! my fingers are a little sore so I've gotta find a thimble or give it a rest before I do more though
This one's kinda funny, I went into affixing that patch SO sure that the design of that sword of mine, Arma, would be plenty for that patch, but the longer I stared at it doing other mends for these pants, the longer I felt it needed _something_ else, you know?

First up, we've got to stitch on the patch itself! I did some nice even straight stitches, because initially, I was planning on a little area of sashiko mending.

But, in looking at the size of the chunk of dissolvable backing I had cut, there wasn't really any patterns immediately springing to mind that'd work at a scale that small, or, so I thought after seeing how that basketweave pattern came together on an earlier piece. For context, the whole patch is roughly the size of the palm of my hand, at 3.5 inches square.

So, instead, I decided to try something a bit more complex to render than I'd really tried out before, this art of Arma! (Despite the sword's design being my work, the art in question is by @razzmatazic, who I did ask if I tried to trace, and she had no problems!) And so trace I did, tracing the outlines of the major features of the piece, namely, the outer lines, and the shapes of the gemstones.
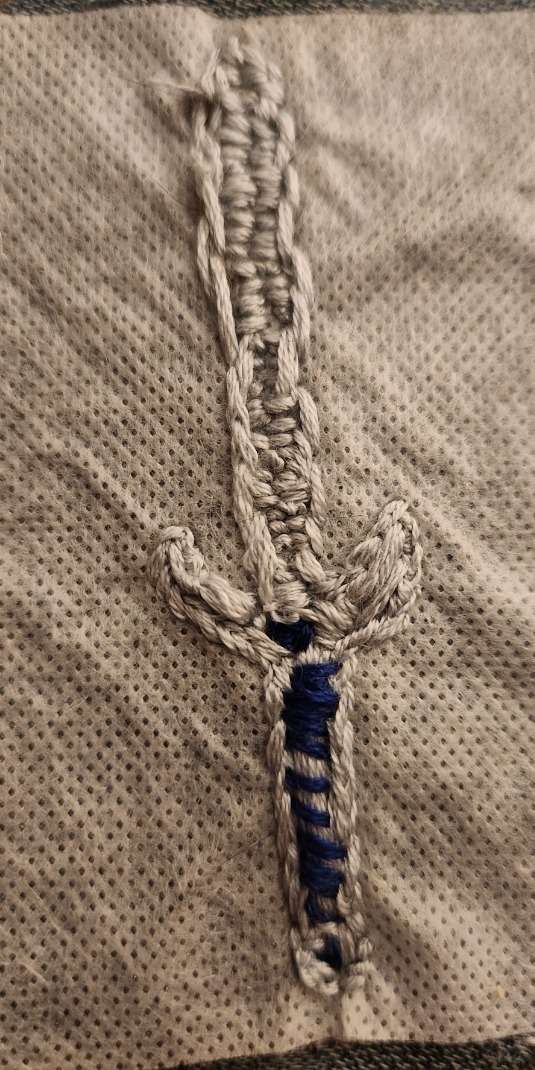
Unfortunately, in my haste (and, admittedly, my focus, since this was much higher detail than I normally tackle around here), I didn't grab any in-progress shots of this. Still, I actually really enjoy how this came out looking, even if it doesn't perfectly evoke the design or detail of the original piece, it certainly emulates the look of Arma well enough I recognize it, and very visibly reads Cool Sword, y'know?


Next up were a few colorful rims around the edges of the front pockets! They were fraying pretty significantly, so not only does this add a fun splash of color, but it keeps me from picking the edges of these seams apart while I'm not thinking about my hands. Initially, I was going to pick a different set of colors than that turquoise and purple, based on a fun fact about my hometown, but that color scheme was just calling out to me! I decided to lean into the somewhat royal vibes and went for a different, lighter purple, with two little bits of yellow thread, which, fun fact, I actually dyed with some yellow flowers I foraged back in the boston area!

As for these two little spot-mends, they were really more an exercise in frustration. Really, I'm mostly miffed the thread broke on the original patch in the one place the hole kept trying to expand through, but hopefully that little bit of randa stitching (which looks MUCH more like randa stitching should than my previous efforts, namely on my wallet and that previous pair of pants that we detailed, the ones with the segaihana sashiko) alongside some additional reinforcement along the edge of that original yellow patch, made from some thread I scavenged from a fraying bit of denim, should keep this particular pair of shorts from getting any more fixes right on the edge of the patch that has misbehaved TWICE now!

Last but not least, while I was wrangling those pocket rims and the spot mends, I really just had the feeling that Arma would look kinda... lonely, I suppose? Centered in the framing straight stitches like that, so I improvised a little open book next to her! (She's not a sword-girl, promise, it's she/her like you'd she/her a boat) There's actually some really nice dimensionality to the book, too, with some looser stitches to emulate ruffle-able pages, and those two knots along the spine make for a pleasant, crinkled texture to the cover lines! Can you tell I'm pleased with myself for getting that just so, without any guides?
All that said, hopefully that's all the mends my poor poor jean shorts need, I swear, just as I get one set fixed, the other winds up with another hole! Don't get me wrong, I'm starting to enjoy the whole almost boro-like vibe they're developing, with all these overlapping mends, but I'd like them to develop it slower, thanks! (And yes, I do plan to wear these at LEAST until they look like I've quilted them back together, they're comfy!)


Tried visible mending for the first time !
love the effect on this old turtleneck filled with holes.


I finally started fixing my pants 🌱🌿🌱 kinda proud of these little leaves ngl :)
Idea: sew some cute little moths with scrap fabrics and sew them on holes you have on your clothes so you can keep wearing them :)
Visible Mending
Introduction:
Visible mending is a decorative way to fix up an item. Instead of trying to make your mend as invisible as possible, the idea is to make it part of the garment's design.
Visual mending is not a single technique: it's more of a mindset. If you've got an item you love, it deserves to be mended, and if you're going to put that love into stitches, why not show them off?
That being said, there are some specific techniques that are popular with visible menders. Let's take a look!
Sashiko:
Sashiko is a type of traditional Japanese embroidery that is used to both decorate and reinforce fabric. In visible mending, sashiko is often used to cover up holes with patches or to reinforce thinning fabric. This technique uses a variation on the running stitch.
(Image source)
Some resources on sashiko:
SashiCo on YouTube: sashiko livestreams and information on the cultural aspect of sashiko.
Written tutorial by Upcycle Stitches.
Free sashiko templates by TheSpruceCrafts.
Fixing jeans with sashiko by Soluna Collective.
(Image source)
(Image source)
Embroidery:
Regular embroidery is also a popular technique to accentuate your mends. Check out my embroidery 101 post to learn how to get started. You can embroider patches, or use embroidery to hide or accentuate any stitches you've made to fix holes. Embroidery's also a great way to cover up stains.
(Image source)
(Image source)
Patches:
There are many ways to add patches to a garment. My tutorial on patches is a good place to start if you want to make custom-shaped patches to sew on top of your fabric. You can also sew your patch on the inside of your garment and have it peek out from beneath the hole you're trying to fix. Fun ideas for this are lace or superheroes.
(Image source)
(Source)
Darning:
Darning is a technique used to repair holes in fabric by using running stitches to weave extra fabric over the hole as to fill it up again. While traditionally darning is done in an invisible way by using the same colour of thread as your fabric, you can also use contrasting colours to accentuate your fix. Check out this written tutorial on darning by TheSpruceCrafts.
(Image source)
(Image source)
Conclusion:
Visible mending is a creative way to fix up your clothes and give them some personality at the same time.
You should be proud of the fact that you took the time and learned the necessary skills needed to mend your clothes! Show off what you did!
A fun side effect of wearing these obvious mends is that people will notice them. They'll remember your fixes the next time they're faced with a hole in their wardrobe, and it will make them more likely to try it for themselves.
These are just a few ways to visibly mend your garments. Want more inspiration? Check out Pinterest or r/Visiblemending on Reddit.
Idea: sew some cute little moths with scrap fabrics and sew them on holes you have on your clothes so you can keep wearing them :)

So I've had this joke in my head for a couple months (at least), but hadn't found the right spot to make it. Today it is complete.

A hole in my jeans?

Hmm? What's this?

A Patchypus?

REPAIRRY THE PATCHYPUS!!!?!!!


Growin's tough work, but its worth it! 🌱
hey, i need to fix up a hole in a (wool/ knit) sweater. the lady at the store i bought the right sort of yarn for it at said i needed to secure/ „catch“ all the stitches/ loose parts so the sweater doesn‘t end up unravelling over time. can you explain how best to do this or do you have any resources for it? i feel very overwhelmed and i don‘t wanna ruin my sweater by doing it wrong
Mending holes in knit fabric
The thing about knitting is that it's basically a collection of loops. If one loop gives in, the rest of the fabric risks unravelling, too. That's why this person mentioned "catching" all the stitches: if you miss one, your sweater might continue unravelling.

(Image source) [ID: a woven fabric (plain weave) versus a knit fabric (stockinette stitch).]
That probably sounds super stressful, but don't worry! There's different ways to fix knitting. Some are easier, and some are harder. Let's take a look.
Swiss darning:
The cleanest and most invisible fix is Swiss darning. This type of mending requires you to thread through the loops of the hole, and use those to knit new stitches. Swiss darning is probably the trickiest way to mend knits mentioned in this post.
If you've got a really small hole, you could also try duplicate stitch which doesn't require threading. This technique can also be used to reinforce worn-out spots in knitting, or even for embroidery.
Check out Patty Lyons' written guides on Swiss darning and duplicate stitch to see how it's done, or these YouTube guides on Swiss darning and duplicate stitch by Heather Storta and Stuart Moores Textiles.

(Image source) [ID: a black and white image showing how to do Swiss darning on a piece of knitting with a hole in it. Threads have been threaded between the loose knit loops, and a tapestry needle is weaving new knit stitches along these threads. Text: "Fig.3."]

(Image source) [ID: example of a hole in a gray piece of knitting that's been mended with the duplicate stitch. Six stitches have been mended with yellow yarn. Text: "Ta Da, a brand new section of knitting with no bulk - Swiss Darning Magic. PattyLyons."]
Woven darning:
If you don't feel like recreating knit stitches, you can also do woven darning on knit fabrics. The technique's the same as you would use for a woven item.
Note that a darned patch like this is not stretchy, unlike its surrounding fabric. You can somewhat remediate this by darning diagonally, but it'll still be less stretchy than actual knit fabric.

(Image source) [ID: close-up on a hole in a swatch of beige knitting that's been patched with a woven darn in light blue, dark blue, red, pink, and yellow yarn.]

(Image source) [ID: vintage instructions on how to darn a hole.]
Knitting over the hole:
You can also knit a patch and sew it across the hole, or pick up stitches around your hole and knit over it. Don't forget to finish off the loose stitches at the edge of the hole on the wrong side. Loop your yarn through them, making sure to catch them all, and secure them.
This YouTube video by VeryPink Knits will show you how to knit across a hole. If you're more of a written tutorial person, take a look at this Berroco article on knit patches.

(Image source) [ID: a gray sweater on which a red knit patch has been added to cover up a hole.]
Crochet:
If you're an avid crocheter, crochet's also an option to fix holes in knits.

(Image source) [ID: close-up on the shoulder of a blue knit sleeveless top with a hood. A hole has been mended with crochet, using red and brown thread. Text: "Cucicucicoo".]
Picking up dropped stitches:
If just one line of stitches was damaged, you could try picking up the dropped stitches with a crochet hook.
Fabric patches:
If you'd rather not knit or crochet anything, you could just sew a patch over the hole. First sew around the hole to stabilise the stitches, then sew a piece of fabric over or under the hole. Sandwich the hole between two pieces of fabric for extra security.
Use stretchy fabric and a stitch that allows for stretch to retain the stretch of the original knit material. If you do use a patch of woven fabric, note that this will effect the material's stretchiness.

(Image source) [ID: close-up on the neckline of a gray knit sweater. A hole has been mended with a green patch of fabric and sashiko stitching in yellow thread.]

(Image source) [ID: close-up on the elbow of a black and white knit sweater. The elbow has been patched with a heart-shaped scrap of red fabric with white polkadots and sewn on with a whipstitch.]
Conclusion:
This list is not exhaustive, but will give you some ideas on how to get started. You can go as visible or invisible as you want with these techniques.
Remember to use a yarn that's similar in weight and fibre as your sweater! If you darn a polyester sweater with real wool, you risk the wool patch felting in the wash, for example.
Sustainable fashion for the Solar Punk
If you enjoyed this, consider checking out my Ko-Fi for a printable zine version (or just to support my art :))


Visible Mending
Introduction:
Visible mending is a decorative way to fix up an item. Instead of trying to make your mend as invisible as possible, the idea is to make it part of the garment's design.
Visual mending is not a single technique: it's more of a mindset. If you've got an item you love, it deserves to be mended, and if you're going to put that love into stitches, why not show them off?
That being said, there are some specific techniques that are popular with visible menders. Let's take a look!
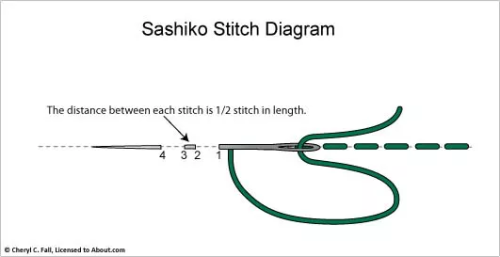
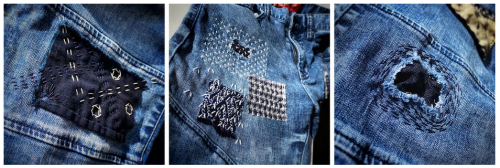
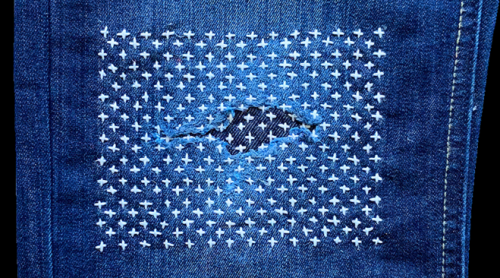
Sashiko:
Sashiko is a type of traditional Japanese embroidery that is used to both decorate and reinforce fabric. In visible mending, sashiko is often used to cover up holes with patches or to reinforce thinning fabric. This technique uses a variation on the running stitch.
(Image source) [ID: sashiko stitch diagram: the distance between each stitch is 1/2 stitch in length.]
Some resources on sashiko:
SashiCo on YouTube: sashiko livestreams and information on the cultural aspect of sashiko.
Written tutorial by Upcycle Stitches.
Free sashiko templates by TheSpruceCrafts.
Fixing jeans with sashiko by Soluna Collective.
(Image source) [ID: three examples of sashiko embroidery on jeans fabric.]
(Image source) [ID: sashiko embroidery with white thread on blue jeans fabric.]
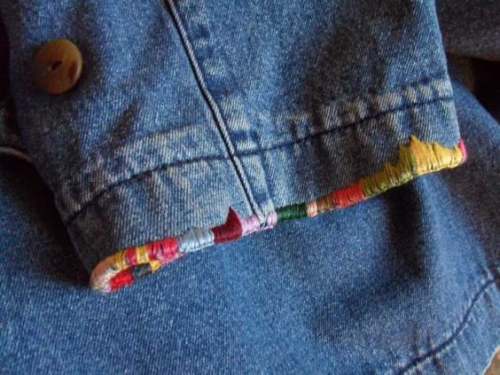
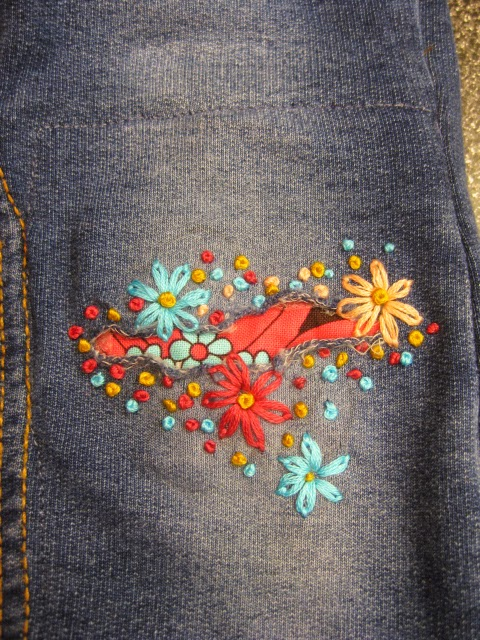
Embroidery:
Regular embroidery is also a popular technique to accentuate your mends. Check out my embroidery 101 post to learn how to get started. You can embroider patches, or use embroidery to hide or accentuate any stitches you've made to fix holes. Embroidery's also a great way to cover up stains.
(Image source) [ID: colourful embroidery floss covers a worn sleeve edge of a jeans jacket]
(Image source) [ID: colourful flower embroidery surrounds a hole in a pair of dark gray jeans. Fabric with a red and black flower print peaks out of the hole.]
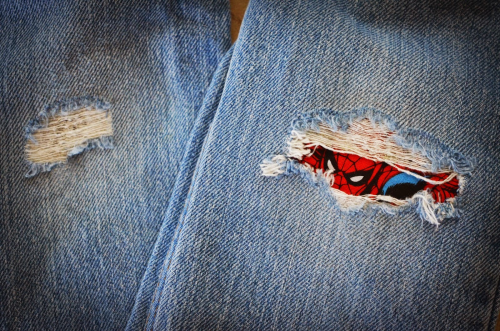
Patches:
There are many ways to add patches to a garment. My tutorial on patches is a good place to start if you want to make custom-shaped patches to sew on top of your fabric. You can also sew your patch on the inside of your garment and have it peek out from beneath the hole you're trying to fix. Fun ideas for this are lace or superheroes.
(Image source) [ID: Spiderman peaking out of a rip in a pair of blue jeans.]
(Source) [ID: a red flannel heart-shaped elbow patch on a gray knitted sweater.]
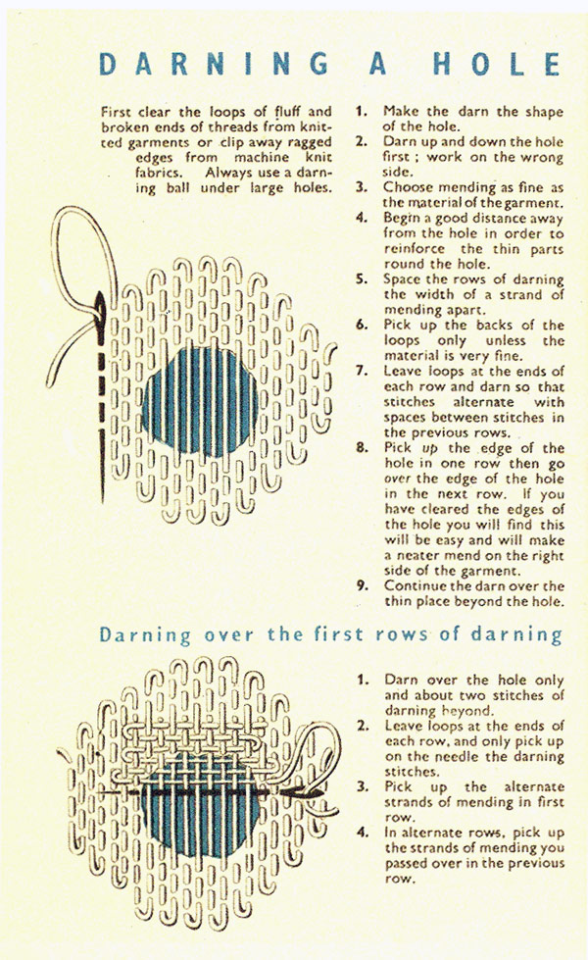
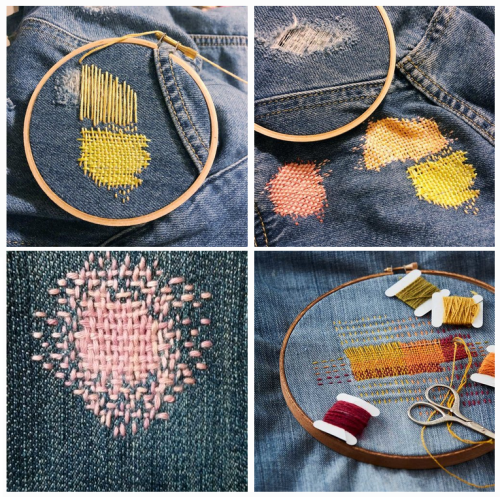
Darning:
Darning is a technique used to repair holes in fabric by using running stitches to weave extra fabric over the hole as to fill it up again. While traditionally darning is done in an invisible way by using the same colour of thread as your fabric, you can also use contrasting colours to accentuate your fix. Check out this written tutorial on darning by TheSpruceCrafts.
(Image source) [ID: vintage instructions on how to darn a hole.]
(Image source) [ID: four examples of darning on blue fabric with colourful contrasting thread.]
Conclusion:
Visible mending is a creative way to fix up your clothes and give them some personality at the same time.
You should be proud of the fact that you took the time and learned the necessary skills needed to mend your clothes! Show off what you did!
A fun side effect of wearing these obvious mends is that people will notice them. They'll remember your fixes the next time they're faced with a hole in their wardrobe, and it will make them more likely to try it for themselves.
These are just a few ways to visibly mend your garments. Want more inspiration? Check out Pinterest or r/Visiblemending on Reddit.
hello tumbler people! did anyone here ever organised a clothes-mending workshop? i'm thinking of organising one in my city but i don't have much experience in mending nor organising workshops so i'm looking for some tips! did you ever attended/organised one and how did it look like?