
I print and paint minis! take a look if you want He/Him
50 posts
Double Post! I Realised I Never Actually Made A Post About This Halfling Smith I Painted Last Week, Which


Double post! I realised I never actually made a post about this halfling smith I painted last week, which is a travesty, because she's cool as heck! Also, she's a four fingered smith now, because I'm a clutz and dropped her while carrying her over to take pictures ¯\_(ツ)_/¯
One of the great things about 3d printing, is that when I want to paint a mini like this to display on a shelf rather than use on a table, I can just scale it up a bit before printing, rather than having an oddly sized mini on a shelf next to a bunch of larger figurines!
I really like how all the different colours and materials came together on this paint job, I think I managed to keep everything cohesive but distinct.
I'm also pretty happy with how the skin tone came out. I tried something a bit different to what I usually do, by mixing my favourite light skin tone paint with a little bit of reddish brown paint to get a slightly more tan colour as a base I could work up from. I think it turned out great, and really suits this halfling smith!
This print is Helen, the Blacksmith Halfling by Bite The Bullet
-
 forwhomtheyeastrolls liked this · 2 years ago
More Posts from Gooseofthevoid


I put these in my drafts and forgot them! Red and Blue fire elementals. They were super fun to paint, lots of drybrushing which is always fun to do with a lot of sculpted detail.
This is my first time trying to paint fire effects, and I think it turned out fairly well! Room for improvement certainly, but it does read as fire when you look at it I think, and thats the main thing.
I tried making some sort of obsidian-gravel looking bases to put these on, but they didn't really work out, so I just tried painting a sort of gradiant like they're glowing from the elementals on them. It sorta worked? IDK, its fine ¯\_(ツ)_/¯.
This model is Armour-bound fire elemental by Rocket Pig Games.
They've got a great patreon that has a bunch of awesome minis like this every month: https://www.patreon.com/rocketpiggames/posts


So lately I've been printing off a few figurines to paint, rather than just minis, because apparently my limited shelf space isn't crowded enough XD.
This figure was a lot of fun to paint, and I really enjoyed making the contrast between the mostly greyscale werewolf, and the very bright red riding hood. I really like how the whole thing came out, but especially red riding hood. That evil look to her sculpt was just so fun to paint and bring life too.
I also really like how the veins on the wolf just pop. Its always fun to highlight details like that and see how much extra dimensionality they add to the model.
Of course my problem now that I've finished this figure off is I have a bunch of minis and figures I'm really looking forward to painting, but I've got to pick just one to start with. Its not the worst problem to have at least. (I am also actively making it worse by printing more things every day over the last week).
This figure is Little Red Riding Hood and her new best friend!, by Arminas Didzioas.
The little mushroom added to the base is from Pellinors' Mushroom Collection.
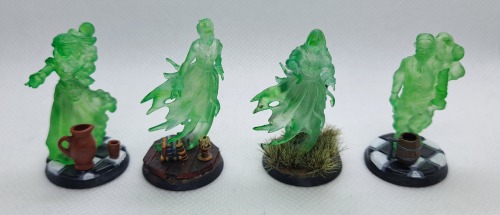


BOO! Spooked yah, right? Don't worry, these ghosts aren't real, just miniatures. :P
I mentioned in a previous post that I found I could dye clear resin prints colours with alchohol inks, and these ghosts are actually what I figured that out on!
I did these quite a while back, but then I left them for a few weeks until I made some bases, and then I left them sitting in my light box for a couple more weeks before actually taking these photos, because for some reason I really just didn't want to. ¯\_(ツ)_/¯
the transparent ghostly effect is cool, but I also really like the bases I did for them too. This was me trying out adding little extra bits to them, going for a bit of a haunted manor theme. I'm pretty happy with it on the whole, although I think the beer mug and the pot are just a bit too big and attention grabbing. I really want the focus to be on the mini, with the base elements blending in more. I am quite happy with how the kitchen tile bases came out too. I started out trying to freehand sculpt them out of greenstuff, then when I figured out that I am not by any means a compenent enough sculptor to make that work, I quickly designed and printed a little tile impression jig to make clean, straight tiles for me. I made and printed it fast enough that I didn't waste my greenstuff, so thats pretty cool I think.
On the whole, I'm happy to have these translucent spooky ghosts in my collection.
Miniatures in this post are made by:
Townfolks ghost male and Townfolks ghost female by Titan Forge Miniatures.
Ghost by Great Grimoire.
Base in this post are made by:
Gothic Tombstones by Medusa Miniatures.
Table Scatter, Extra Dining Items, Books, Piles & Rows by Darkest Desire.
Candle Holders by Pellinor.

So I got a resin printer this weekend (Elegoo Mars 2 Pro), and the upgrade in quality just has me gobsmacked.
I reprinted Mars, my Elf barbarian in the game I'm playing in at the moment. Which is fortunate because she recently grew Antlers due to the somewhat questionable decision to eat some Fae moss found in a wizards basement.
Here are some comparisons between my new mars, and the original printed in FDM:


It was actually because of the resin I noticed that what I'd originally painted as shorts was actually her leg and the top of her boot.
I used to think I wasn't missing out on too much with just an my FDM printer, aside from having to steer away from some minis with lots of thin details, but even sections where I thought my FDM machine was handling quite well are just so much nicer in the Resin print.
I still think you can get decent table ready minis with just an FDM machine, but my new preference is definitely for Resin minis.
I keep just spending time turning this model around looking closely, because the quality is such an improvement. I'd never manage to get the antlers so crisp and clean with an FDM print. I also don't have to struggle with thin paint wikking away into layer lines, which makes the painting process much easier.
My Mars mini is Sony Jona from Artisan Guild, with some edits made in Blender to turn her from a Sorceress into a Barbarian. My limited Blender skill means I decided she just really likes apples, since I needed to put something round in that hand.


Another Figurine!
I really love this one, it's just got such a dynamic pose, and it's pretty different to what I normally paint. It's good to shake things up now and then. I probably could've done a bit more work on the details of this one, but I was working on a time limit to get it done, and I'm pretty happy with where I got it all things considered.
I wasn't sure at first what sort of detailing I should do on the metal armour parts. I was considering just leaving it all silver at one point, but I thought it'd be just a bit too boring like that. I think the few gold details really help keep it all interesting, without being gaudy or overwhelming.
The panel lining isn't quite as crisp as I'd like, but it's not something I normally have to do on a lot of what I paint, so I'm ok with that. It really helps make things pop having that separation between panels. It was kind of hard getting wash into just the cracks though, since I wanted to avoid toning down the silver and gold. It's got me thinking that I should try oil washes though. Being able to put wash all over something, then clean it up off anything you don't want to be toned down seems pretty cool. I've just got to get over that anxiety of trying out something new without knowing how it'll turn out.
This figure is Mecha Knight Odessa by Dinamuuu3D.