
I print and paint minis! take a look if you want He/Him
50 posts
This Is The Third Beholder I've Painted.
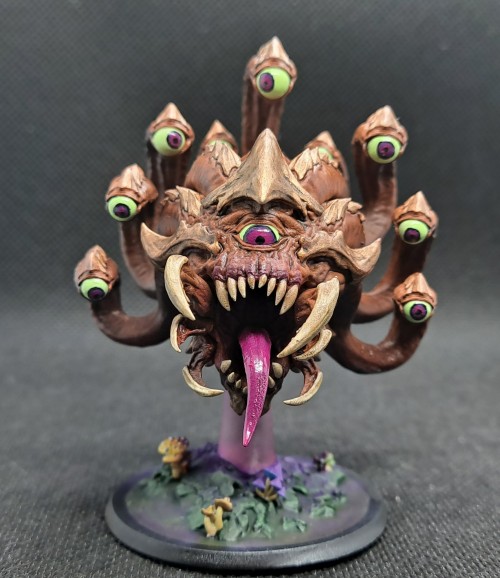


This is the third beholder I've painted.
I might have a problem :T
I just really like them. Maybe its because each gets to be unique and different.
Maybe it's because they're such iconic monsters.
Maybe it's because, unlike regular minis, the eyes aren't tiny little specks that require perfect pinpoint precision to paint.
Anyway, I really like how this one came out. I played around a bit with the airbrush on this one, and tried out doing a little bit of purple undershading in which I think turned out quite well, though it could've been maybe just a touch lighter in retrospect.
I printed the support piece separate from the mini and base, so I could do it in transparent resin and give it a purple stain. My thought is it's meant to be a sort of psionic pillar of anti-gravity or something. (because psionics are purple, as we all know).
I also had a go at making a glow effect on the base around the support, something I've been nervous to experiment with so far. I'm always worried about ruining a paint job I spent hours on, but since this base is a simple and quick paint job it was the perfect bit of low-stakes practice.
This model is Beholder by Lord Of The Print.
-
 sstardow liked this · 10 months ago
 -
 thedungeoneddragon liked this · 1 year ago
 -
 sharptootheddancer liked this · 1 year ago
 -
 fiendishfifi liked this · 2 years ago
 -
 babadell liked this · 2 years ago
 -
 kissingonneptune liked this · 2 years ago
 -
 wealmostaneckbeard reblogged this · 2 years ago
 -
wealmostaneckbeard liked this · 2 years ago
-
 nerdy-mcgeek liked this · 2 years ago
 -
 the-dungeon-masters-journal reblogged this · 2 years ago
 -
 minipaints reblogged this · 3 years ago
 -
 frutbat liked this · 3 years ago
 -
 afterallthisisgone liked this · 3 years ago
 -
beelzebill liked this · 3 years ago
-
 impossibleclair liked this · 3 years ago
 -
 its-yashas-strong-arms reblogged this · 3 years ago
 -
its-yashas-strong-arms liked this · 3 years ago
-
 starrcn-blog liked this · 3 years ago
 -
 ldenes liked this · 3 years ago
 -
 zrinboy reblogged this · 3 years ago
 -
 plunetzero liked this · 3 years ago
 -
 hancill liked this · 3 years ago
 -
 girl-debord liked this · 3 years ago
 -
 jillusiveman liked this · 3 years ago
 -
 machinedemon reblogged this · 3 years ago
 -
 flamingcreatvre liked this · 3 years ago
 -
 salem-the-druid liked this · 3 years ago
 -
 mastermatoyas reblogged this · 3 years ago
 -
mastermatoyas liked this · 3 years ago
-
 dropattackbear liked this · 3 years ago
 -
 sleepyforestbeast reblogged this · 3 years ago
 -
sleepyforestbeast liked this · 3 years ago
More Posts from Gooseofthevoid
I got asked about how I did my resin sharks, and I've had an octopus sitting on my shelf for ages waiting for the same resin treatment, so I figured I'd kill to birds with one stone, and take some pictures explaining the process!

Here I've got the octopus I'll be casting in resin, and a thick cylinder with the same diamater to the base we're using.
I 3d print my bases, so getting this cylinder was simple for me. I just 3d printed a thicker version of the base and called it good. If you're using a store bought base, you can probably just stack a few of them on top of one another and tape them together to make a cylinder. You only need about 2-3cm of thickness.
I've also put just a teeny bit of blutack on the cyilnder, to keep the base from shifting around while I do the next step.

Step 1:
Put the cylinder on the base, and tape them together like so. Make sure that the tape forms a tight seal around the top of the base. This is to stop any leaking resin from getting between the base and the cylinder and sticking them together. If enough gets in there and sets, they won't be coming apart.
(Also, be sure that any basing material or bits of the mini don't extend out over the side of the base, that will also cause problems with making a tight seal).

Step 2:
Now we're going to need a laminating pouch. I use A3 sized pouches, but for something this size you could get away with A4 easily enough. You should be able to find packs these from any office supply store for fairly cheap.
Cut the pouch were it joins together, so you have two sheets of plastic.
There should be a glossy and matte side, take note of which is which. The glossy side needs to end up on the inside of the dam we're making, so that the resin turns out smooth and see through. Be careful while handling these sheets, as any creases or dents will show up in the final product.
Determine how deep you want your resin to be, and mark that depth on the sheet. Don't forget to factor in the depth of the cylinder attatched to the base of the mini for this.
Here, I want this octopus to be the same size as my sharks, so I'm using one as a reference.
Make a quick mark at the height you want (on the non-glossy side of the laminating pouch), then cut the sheet about 1-2 centimetres higher than that. It doesn't have to be particularly neat.

This is the sort of thing we're going for.
(Apologies for the background, its kinda hard to get a good picture of something transparent :p ).
Note that we've got a neat, straight edge along the bottom, unlike the top where it was cut. So long as you have one edge that is neat and straight, you're all good to continue.

Step 3:
Take a small strip of tape, and attatch it to the matte side of the sheet. Then take the base and cylinder, and line the bottom of the base up along the long, straight edge of the sheet.
Carefully roll the base onto the tape, so that the bottom of the cylinder and sheet are flush with one another.
Be careful where you do this on the base, as there will be a small seam in the resin along the edge of the sheet going up from here. I've put mine at the back of my octopus, so it doesn't get in the way of looking at it front-on.

Step 4:
The sheet is long enough to wrap around the base with quite a bit of overlap, which we don't want. So before continuing, quickly wrap the sheet around the base, and find where it will overlap. Cut the sheet so there is only about a centimetre of overlap when it is wrapped around the base.
Then carefully wrap the sheet around the base, keeping the edge of the sheet flush with the bottom of the base. Make sure the sheet is wrapped firmly around the base, and is forming a straight tube, not a funnel. Use a small strip of tape to fix it in place.
Double check now that the glossy side of the laminating sheet is on the interior of this tube. If it isn't, undo all this and start over.

Step 5:
Now take a long strip of tape, and wrap it all the way around the base. Line the top edge of the tape up with the top of the base (not the sand on the base, just the top of the actual base). Keep tension in the tape while you wrap, the goal here is to hold the sheet close to the base, to form a seal that will keep resin in the tube, rather than leaking down the base.

Step 6:
Now put another strip of tape along the outside seam of the sheet. Don't be too woried about getting a really good seal here, the weight of the resin should keep the inner flap of the sheet pressed against the outer one anyway. This is just to stop sheet from moving when resin is poured in, so it stays as a tube, rather than turning into a funnel.

Step 7:
Finally, take a rubber band and wrap it around the base of the mini. Try and line it up with the top of the base (like with the tape from step 5). This just adds a little extra pressure to try and stop resin leaking out.
And thats done! We've now got a cylindrical resin dam ready to pour resin into!
I hope this helps anyone curious about my process for doing this!
I've hit the 10 image limit on this post, so I'll make another one soon showing my resin pours and the finished mini.
Update: post showing the resin pouring process here.

As promised, the finished Octopus, waves all dried and painted. Those bubbles are definitely in the way, but you can still make out theres an octopus in there, so its not a complete loss :).


Different angles, and next to one of my sharks. Tried doing the waves slightly different for the octopus, but I think I prefer the ones on the shark in the end. Oh well, still looks pretty nifty anyway :)
Making the resin dam: Here.
Pouring the resin: Here.


New mini!
This is Atropos, a half elf (?) bard, painted for Yoshikagequeens' character in an upcoming campaign! Atropos will be in the same party as Frix! I'm looking forward to it.
I'm weirdly chuffed with my choice of dark red for his pants, and I think the highlights along the creases look really good. I also got the opportunity to finally properly use some of the colour shift paint I got like half a year ago, to put some glitter in his hair, so that's neat. I put the colour shift just in the parts and underside of his hair, to kind of make it looks like some sort of underlayer shining through. I really like the effect in person, seeing the glitter shift as you move your viewpoint is quite cool! Photos don't really do it justice.
My least favourite bit of this mini is the base. I shoved a generic column into a generic base, rather than using the desk base that comes with the stl for this mini. I wanted to push the character more into bard territory, rather than the professor character it's originally meant to be. I think it works for that, and I like the column he's leaning on, but the ground of the base is just a bit too plain. I put some cracks in it with an Exacto blade and added some cut up grass tufts to give it a bit of texture, but it's still not quite right. In the end, I just had to stop fiddling with it before I made it worse.
It's a learning experience to remember next time I try and make a custom base though, gotta remember to have texture or something on there.
The mini used here is Professor Syiva, by Twin Goddess Miniatures.
The column used on the base is Socket Pillar, by Phillip Meys.


Clockwork minotaur and shield golem! Metallic paints are a lot of fun to play with.
The clockwork minotaur was a lot of fun both to paint, and to design a base for. I imagined this guy as being some sort of gladiatorial arenas trump card, for cocky fighters to get wrecked by. Its my first attempt at a base that tells a bit of a story about the mini, rather than just being an attempt at a terrain it might be found in.


Beholders! And an old gazer, because he makes me laugh. The beholders were the first thing I painted once I got my hands on an airbrush, and they made playing around with it super fun. The blue one got significantly less fun once I realised I'd commited myself to painting half a million tiny spikes though.
I also really enjoyed painting the big central eyes, particularly on the green beholder. You might recognise that eye if you look closely ;) .
The lump on the gazers tongue over on the right is from where I managed to snap it in two while painting, followed by hasty and poorly thought out superglue+baking soda repairs. I like to imagine he maybe got stung by a bee on it right there. Serves him right for licking the floor like that, the gross little eyeball :P


This hill giant was a bit of an experiment with the airbrush. I tried doing his skin by doing a zenythal prime, then spraying over it with transparent ink to get easy highlights and shadows. It sorta worked, but I'm not convinced by the skin tone and I kept having to start over because I'd try adding a wash before the ink had fully set. After the third time I had to start over completely on him I just couldn't be bothered to take another shot at it and left the skin tone as it was.
I also tried making his fur look a bit like grass, I thought it might be a cool idea if when sitting down he could be mistaken for a hill. It doesn't quite look right to me though in the end.
IDK, I'm just not totally sold on this guy overall.

A whole collection of buggy minis. Most of these are from earlier on in my attempts at painting, since the bases are all pretty plain.
It was when I was painting all those spider thingos at the back that I realised how boring it was having just a whole bunch of minis all in the same pose. Since then, I've made a concious effort to find multiple poses when I'm printing more than just 1 or 2 of a creature. It makes finding minis a bit harder, but I think its worth it for a more interesting end result.

And finally for tonight, this is either the first or second mini I ever painted, I'm not entirely sure. I've definitely come a long way since then, but I like keeping him around as a reminder of how much I've improved for when I get frustrated at a mini not turning out quite how I hoped :)

So I got a resin printer this weekend (Elegoo Mars 2 Pro), and the upgrade in quality just has me gobsmacked.
I reprinted Mars, my Elf barbarian in the game I'm playing in at the moment. Which is fortunate because she recently grew Antlers due to the somewhat questionable decision to eat some Fae moss found in a wizards basement.
Here are some comparisons between my new mars, and the original printed in FDM:


It was actually because of the resin I noticed that what I'd originally painted as shorts was actually her leg and the top of her boot.
I used to think I wasn't missing out on too much with just an my FDM printer, aside from having to steer away from some minis with lots of thin details, but even sections where I thought my FDM machine was handling quite well are just so much nicer in the Resin print.
I still think you can get decent table ready minis with just an FDM machine, but my new preference is definitely for Resin minis.
I keep just spending time turning this model around looking closely, because the quality is such an improvement. I'd never manage to get the antlers so crisp and clean with an FDM print. I also don't have to struggle with thin paint wikking away into layer lines, which makes the painting process much easier.
My Mars mini is Sony Jona from Artisan Guild, with some edits made in Blender to turn her from a Sorceress into a Barbarian. My limited Blender skill means I decided she just really likes apples, since I needed to put something round in that hand.