aka @rmgrey-author | Rowan Grey • writer • graphic artist • mix maker • tutorial maker • ABSOLUTE STEREK TRASH • multiship af
441 posts
Me: How Many Words Have I Written
me: how many words have i written
is it a million
is it TWO million
word counter: 409 words
me: LIES
-
 thatsgoodweather liked this · 11 months ago
 -
 lizzle-the-edu-gamer liked this · 11 months ago
 -
 mizuniatora reblogged this · 11 months ago
 -
mizuniatora liked this · 11 months ago
-
 veradragonjedi liked this · 11 months ago
 -
 lawfulbasketcase liked this · 11 months ago
 -
 cas-tea-elle liked this · 11 months ago
 -
 returnofahsoka reblogged this · 11 months ago
 -
 icarusisbabygirl reblogged this · 11 months ago
 -
 brazen-kenobi reblogged this · 11 months ago
 -
brazen-kenobi liked this · 11 months ago
-
 vaderwcn reblogged this · 11 months ago
 -
 superfast-pillowcase liked this · 1 year ago
 -
 calanthe-d liked this · 1 year ago
 -
 lolbithahaha liked this · 1 year ago
 -
 her-imperius-condessy reblogged this · 1 year ago
 -
 nina206 liked this · 1 year ago
 -
 tezukamaiko reblogged this · 1 year ago
 -
 lawetlat-la liked this · 1 year ago
 -
 gurngle liked this · 1 year ago
 -
 bluewaterlily reblogged this · 1 year ago
 -
 krzykot reblogged this · 1 year ago
 -
 cutebombtasticscientist liked this · 1 year ago
 -
 yume-hale reblogged this · 1 year ago
 -
 mikokomi-spoils reblogged this · 1 year ago
 -
 a-psychedelic-insanity reblogged this · 1 year ago
 -
a-psychedelic-insanity liked this · 1 year ago
-
 misskiku reblogged this · 1 year ago
 -
 cyanideespresso reblogged this · 1 year ago
 -
 bunniminm reblogged this · 1 year ago
 -
bunniminm liked this · 1 year ago
-
 spartanofobsession reblogged this · 1 year ago
 -
cyanideespresso reblogged this · 1 year ago
-
 aquariana131 reblogged this · 1 year ago
 -
 burning--death reblogged this · 1 year ago
 -
burning--death liked this · 1 year ago
-
 imjustacat liked this · 1 year ago
 -
 unfilteredaj liked this · 1 year ago
 -
 thecurrenthyperfixation liked this · 1 year ago
 -
 soft-girl-musings liked this · 1 year ago
 -
 moon-knights-balls reblogged this · 1 year ago
 -
moon-knights-balls liked this · 1 year ago
-
 rawson-butts liked this · 1 year ago
 -
 michaelburham liked this · 1 year ago
 -
 lespetitesmortsde reblogged this · 1 year ago
 -
 zoneofrevale liked this · 1 year ago
More Posts from Lycaens
COLOR TUTORIAL #1
Color Porn Lydia.
Another tutorial, this time with a lot of contrasting and color, featuring a Crying Banshee. This will be part one of a two or three part theme I’m trying to establish. Mostly working with color porn and contrasting.
I am using Photoshop CS5, and this is not a beginner tutorial, but it isn’t too hard either.
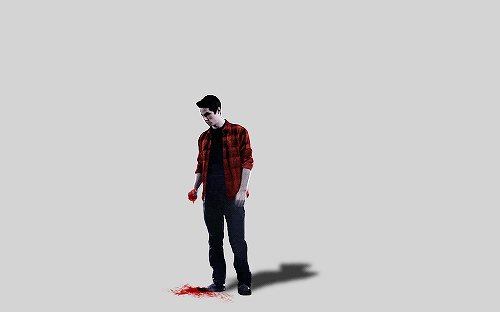
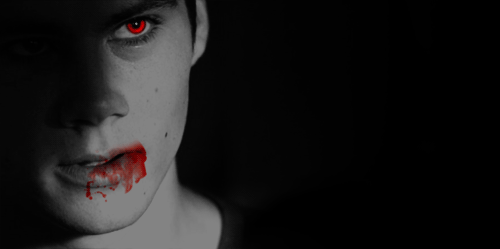
I will be showing you how to turn this:

into this:

First start with a duplication of the background layer, then resize and crop how you want. My cap is 500x280. Next add a black and white gradient map and set the blend mode to soft light. Duplicate the layer and set the opacity to 45%. Now some lighting. Levels, curves and levels again; these are the settings I used.


Then a gradient map,

black, #000000; pink, #f10055. Set it to darken and make a layer mask to color the background. The mask will end up looking like this.


After that layer you want to hold CTRL and click into the black and white box for the curves layer, so that it selects only the parts of the face you highlighted with curves. Then make a levels adjustment.

Next you want to make a new layer, empty and select a small round brush, soft. Then a nice pink color, close to the color that you used for the background, so we can color the lips. I used this color #e40559. Then change the blend mode to multiply and change the opacity to 34%.
This screenshot has a lot of tight subtle emotion and fear, and I did want to focus on that, so I made another curves layer; output 140, input 114 and then mask it so the layer is hidden. Use a white brush to paint over the tear and some on her eyelids. Erase and blend as needed. Here is my finished mask.

Then another curves for her eyes. This one should be output, 106; input, 135. Then mask and use a soft round brush again. This was my end mask.

This is where the cap should be right now.

More curves. This time we mask it for the irises; the first curves should be output, 142; input, 100.


That’s the eyes right now. Next I added a simple selective color, just focusing on black (+5).
Take a soft brush, black; and make a new layer. Color only the left side of the cap, like so:

Gradient fill next, just to add to the shading on the left:

Now another solid color, pink same color as the background. Mask it and use a soft brush to blend it over the background and onto some of Lydia’s hair. The blend mode is color and the opacity 25%.

Add a selective color again, +5 black. Then another, for red adjustments.


Next is a vibrance layer, masked for the face.

Vibrance +28, saturation +14.
Next a gradient fill, now this one will focus on adding even more color to the right hand side. #000000, #e09696.

And focus it on the right, this was my mask.

Blend mode hard light, 38% opacity.

This should be masked for only the hair. Just to adjust and bring Lydia’s gorgeous strawberry blonde hair out of the pink background. Next another magenta selective color.

This is how it looks so far.

I added two textures, very subtle and sharpened after. Texture 1, set that to lighten and 24% opacity. Texture 2, this one I did screen at 16% opacity. Lastly, you press CTRL, ALT, SHIFT+E to stamp the image. Which just means you create a layer on top of everything that blends all the layers but also keeps the originals. Then filter>sharpen>smart sharpen; amount 500, radius 0.3, more accurate and remove gaussian blur.

Here’s a second example of another screencap using pretty much the same methods:

DOWNLOAD THE PSD HERE.
![Teen Wolf Meme [1/3] Colours Purple](https://64.media.tumblr.com/57cb7c0fbeca674edb44d507c044ff82/tumblr_nmad0dmlBf1r3ftwpo3_r1_400.gif)
![Teen Wolf Meme [1/3] Colours Purple](https://64.media.tumblr.com/9738d4dac60aed1b0b7f33e4baa7164a/tumblr_nmad0dmlBf1r3ftwpo8_r1_400.gif)
![Teen Wolf Meme [1/3] Colours Purple](https://64.media.tumblr.com/0c77278428d088006f4b69917962dbb6/tumblr_nmad0dmlBf1r3ftwpo4_r1_400.gif)
![Teen Wolf Meme [1/3] Colours Purple](https://64.media.tumblr.com/0ff7c9495a1c242862ee77af7d88dc21/tumblr_nmad0dmlBf1r3ftwpo2_400.gif)
![Teen Wolf Meme [1/3] Colours Purple](https://64.media.tumblr.com/0b79100b449995057f817b0ea69f64c4/tumblr_nmad0dmlBf1r3ftwpo6_r1_400.gif)
![Teen Wolf Meme [1/3] Colours Purple](https://64.media.tumblr.com/7ec6cb9a8059c6bcebdad00d91ed02c1/tumblr_nmad0dmlBf1r3ftwpo5_r1_400.gif)
![Teen Wolf Meme [1/3] Colours Purple](https://64.media.tumblr.com/7e20cc992337fd0f15e416908909a6f1/tumblr_nmad0dmlBf1r3ftwpo1_400.gif)
![Teen Wolf Meme [1/3] Colours Purple](https://64.media.tumblr.com/2f77ce253fb355b7cdd32bf8e55bbbc2/tumblr_nmad0dmlBf1r3ftwpo7_r1_400.gif)
Teen Wolf meme → [1/3] Colours ↳ purple
she’s the girl with a fairytale face but her mouth screams like a wolf’s
words of the consultant, minjeong son (via izumruds)


we were both created in chaos, we were both born to destroy