The place where I reblog helpful resources for my art blog, @molagboop
905 posts
Some Photoshop Tips
Some Photoshop Tips
I’ve been getting quite a few asks about the process for the patterns in my stylized artworks, so I decided to put together a couple of tips regarding them.
Firstly, what you need are
— CUSTOM BRUSHES —
Most of the patterns I use are custom brushes I made, such as those:

For the longest time I was convinced making brushes must be super extra complicated. I was super extra wrong. All you need to start is a transparent canvas (2500px x 2500px max):

This will be your brush tip. When you’re satisfied how it looks, click Ctrl+A to select the whole canvas and go to ‘define brush preset’ under the edit menu

You will be asked to name your new glorious creation. Choose something that describes it well, so you can easily find it between all the ‘asfsfgdgd’ brushes you’ve created to be only used once

This is it. Look at it, you have just created a photoshop brush. First time i did I felt like I was cheated my whole life. IT’S SO EASY WHY HASN’T ANYONE TOLD ME

Time to edit the Good Boi to be more random, so it can be used as a Cool Fancy Pattern. Go into brush settings and change whatever you’d like. Here’s a list of what I do for patterns:
- under Shape Dynamics, I increase Size Jitter and Angle jitter by 5%-15%
- under Brush Tip Shape, I increase spacing by a shitload. Sometimes it’s like 150%, the point is to get the initial brush tip we painted to be visible.
- If I want it to look random and noisy, I enable the Dual Brush option, which acts like another brush was put on top of the one we’ve created. You can adjust all of the Dual Brush options (Size, Spacing, Scatter, Count) as you wish to get a very nice random brush to smear on your backgrounds

The result is as above. You can follow the same steps to create whatever brush you need: evenly spaced dots that look like you painted them by hand, geometric pattern to fill the background, a line of perfectly drawn XDs and so on.
BUT WAIT, THERE’S MORE
— PATHS —
But what if you want to get lots of circles made of tiny dots? Or you need rows of triangles for your cool background? Photoshop can do all of that for you, thanks to the magic of paths.
Typically, paths window can be found right next to Layers:


Draw whatever path you want, the Shape Tool has quite a bit of options. Remember, paths are completely different from brush strokes and they won’t show up in the navigator. To move a path around, click A to enable path selection tool. You can use Ctrl+T to transform it, and if you move a path while pressing Alt it will be duplicated.

Now, pick a brush you wish really was in place of that path you’ve drawn and go to layers, then choose the layer you want it to be drawn on. Then, click this tiny circle under the Paths window:

Then witness the magic of photoshop doing the drawing for you while you wonder how tf have you managed to forget about this option for the past 2 years

You can combine special brushes and paths for all sorts of cool effects. I mostly use them in backgrounds for my cards, but you can do whatever you want with them.

I hope that answers the questions for all of the people who were sending me inquires about the patterns. If you have any questions regarding this or any other Photoshop matter feel free to message me, I’m always up for complaining about how great and terrible Photoshop is C’:
-
 andiv3r liked this · 8 months ago
 -
 starsunsblog reblogged this · 8 months ago
 -
starsunsblog liked this · 8 months ago
-
 reblogliquidstarrr reblogged this · 8 months ago
 -
 lorlocks liked this · 8 months ago
 -
 verben-erben liked this · 9 months ago
 -
 dreamcatchintilldawn reblogged this · 9 months ago
 -
dreamcatchintilldawn liked this · 9 months ago
-
 dors-ee liked this · 9 months ago
 -
 black-eco-sage liked this · 9 months ago
 -
 gaiathemuse reblogged this · 9 months ago
 -
 nanuk-dain liked this · 9 months ago
 -
 psyantics reblogged this · 9 months ago
 -
 pastelracoon reblogged this · 9 months ago
 -
 katppi liked this · 9 months ago
 -
 id0ntc4r3reallyd0nt-blog liked this · 9 months ago
 -
 kaethedumbfox liked this · 9 months ago
 -
 jigglewarrior liked this · 9 months ago
 -
 auroblaze liked this · 9 months ago
 -
 tajmutthall liked this · 9 months ago
 -
 fitzylovesjemma reblogged this · 10 months ago
 -
 prettyandred liked this · 10 months ago
 -
 kikithething liked this · 10 months ago
 -
 youseethehat reblogged this · 10 months ago
 -
 xxcringecake69xx liked this · 10 months ago
 -
 jooemarmay liked this · 10 months ago
 -
 hiimsuperawkwarddontmindme liked this · 10 months ago
 -
 witticismz liked this · 11 months ago
 -
 rosifire liked this · 11 months ago
 -
 evelinn-zaerien reblogged this · 11 months ago
 -
 deltashell reblogged this · 11 months ago
 -
 justhereforfun0 liked this · 11 months ago
 -
 etrye liked this · 11 months ago
 -
theletterv23 liked this · 11 months ago
-
 thatcharmingjerk reblogged this · 1 year ago
 -
 legends03kai liked this · 1 year ago
 -
 chessb0r3d liked this · 1 year ago
 -
 neyel-dot-com reblogged this · 1 year ago
 -
 owerewolf13 liked this · 1 year ago
 -
 winterofherdiscontent liked this · 1 year ago
 -
 artking-4 reblogged this · 1 year ago
 -
 munchonbrows liked this · 1 year ago
 -
 punkrockpizzaprince reblogged this · 1 year ago
 -
 melonpopped liked this · 1 year ago
 -
 borfie liked this · 1 year ago
 -
 wyrddoe reblogged this · 1 year ago
 -
wyrddoe liked this · 1 year ago
More Posts from Molagblep
Hey there! Random question but I'm curious, how would you go about drawing chainmail? I have a D&D character that has chainmail under their armour and every time I try to draw them I'll start off by drawing all the links by hand then it gets way too tedious so I go look for chainmail pattern on google and paste it lmao but it feels like I'm cheating by doing that, and it clashes with the style I'm going for. I was wondering if you had any tips or tricks?
I don’t feel particularly great at drawing chain-mail either but there’s a technique I learned from a tutorial a bunch of years ago that I think makes a pretty good texture. It’s fast and the end result is cartoon-y enough to match a less photo-realistic style. I can’t for my life find the tutorial so I’ll recreate it here (using Photoshop):
1. Fill your canvas with black or white. Filter -> Render -> Clouds

2. Filter -> Filter Gallery -> Glass (under the Distort category)Keep smoothness as low as possible, play with the other settings

3. Find a filter in Filter Gallery that you like and apply it. Combine them, if needed.

4. When applying texture to the drawing, use Edit->Transform->Warp to make it fit the shape you’re trying to convey

You can stack more filters on after the texture is placed or draw over it with a textured brush to make it look less uniform if that’s what you want. Add a shine to it with a big soft brush, colorize it, go crazy. I go with whatever looks best to me atm.
This is how I did Geralt’s armor too, though since I knew the final print will be smaller than 1.5″ I didn’t worry about details much.

Hope that helps!
Please allow me to walk you through my creative process:
Sometimes it starts off as a simple exercise: can I draw an expressive face?

“Nice!” I think to myself. “But…now I’m curious: what has her so terrified? What might possibly-”

“Okay, but this leads into another question: how did he get up there?”

“Of course. We have a reaction (surprise) to an effect (lizard) with a cause (man), but now I want a motive for this story to complete it. Why did he throw the lizard?“


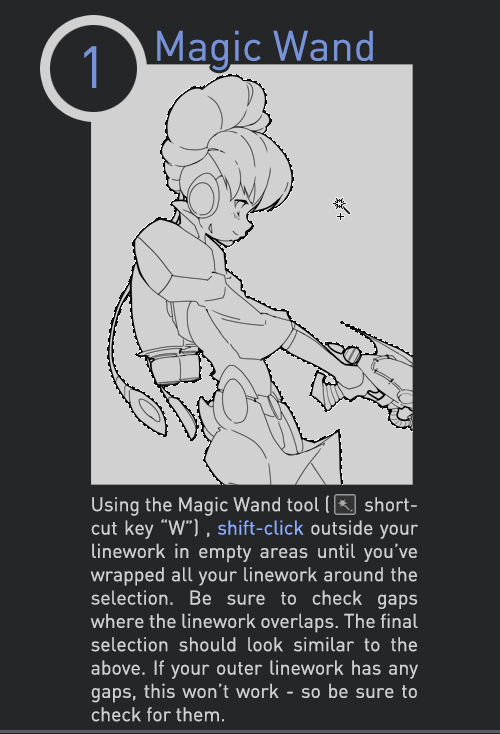
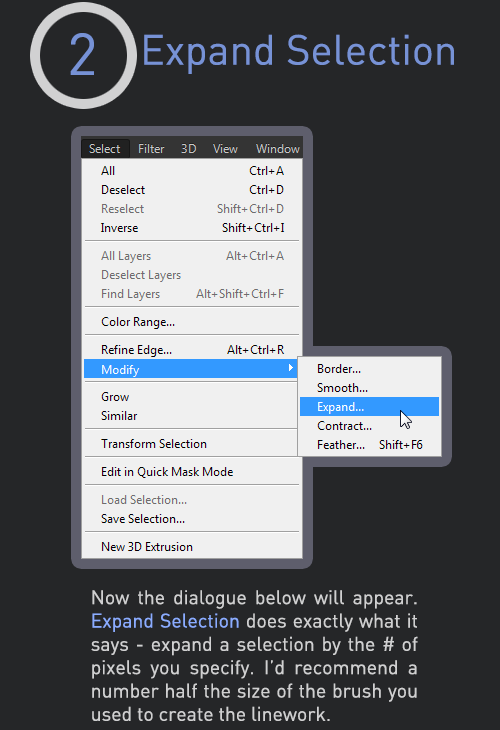

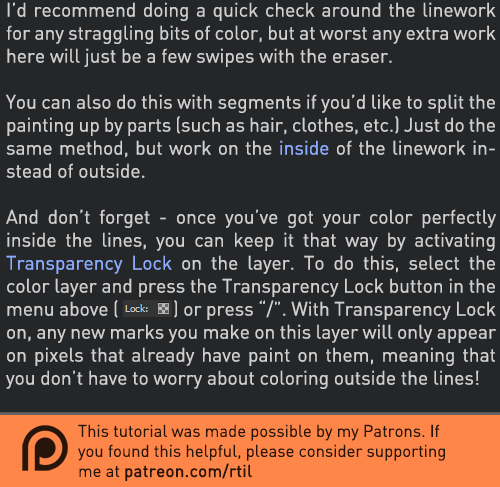
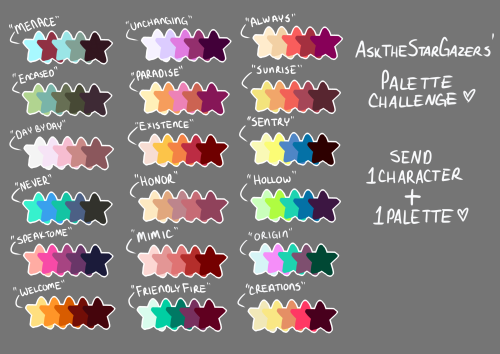
Late last year I wanted to start a series of short tutorials called Tip Jar, as a way of saying thanks to my fans and giving back to my patrons. This is the first of the series I have made, showing my technique on quickly filling in lineart so you can get to painting without coloring outside the lines faster.
Someday I hope to turn these into video tutorials when I have the income and the time, but for now I hope that I will be able to share useful tips in this infographic format.
Full tutorial image
Support me on Patreon
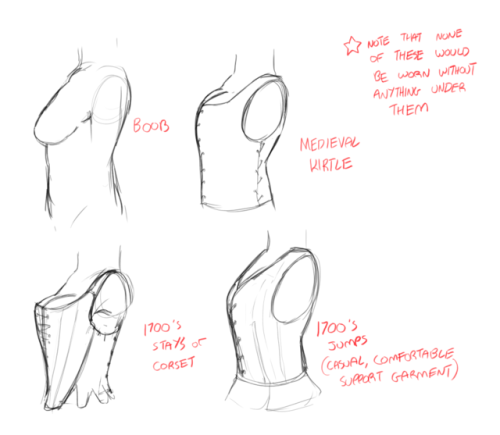
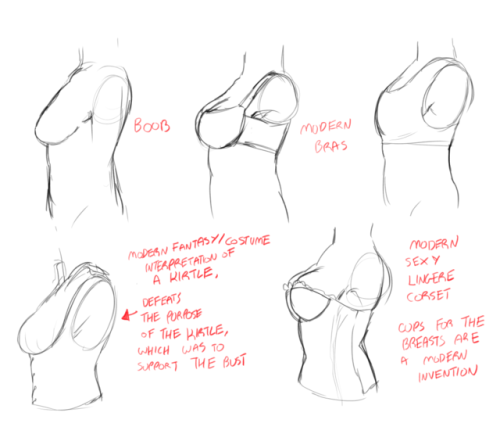
heres some information ive learned recently about various historical boob holders if you were interested.
these arent super specific to decades or anything like that and there’s lots of variation and stuff, so this isn’t the best reference for making a specific historically accurate costume/character design but its stuff i thought was interesting to know