Art Help - Tumblr Posts
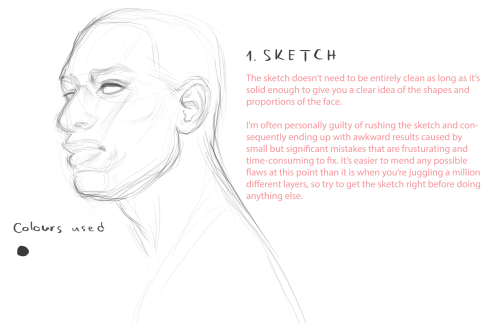

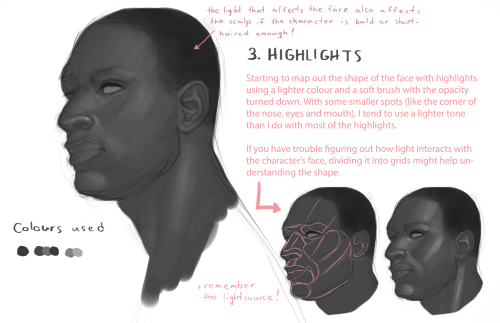

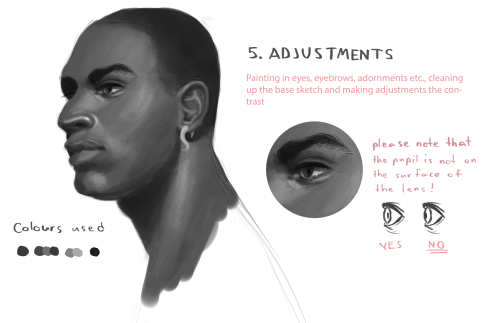


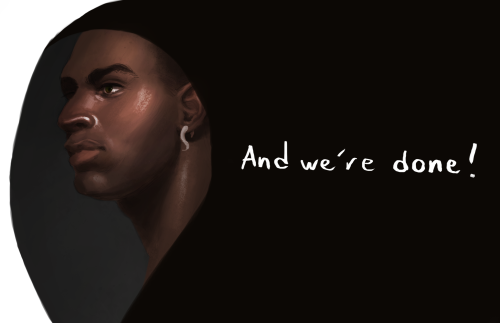
A few people have asked about this recently so I tried to break down my method of painting faces to the best of my ability. I personally like to use gritty chalky brushes, and this particular painting was mainly done with this brush by Mark Winters.

I forgot I have to be active here so here’s my Twitter tutorial on how to draw folds I made a while back to help a friend!


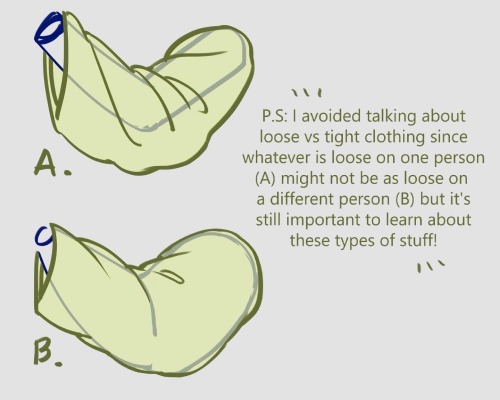

replying as a reblog in cas anyone else needs it !!!
Hello! If you're still looking, I've been a Krita user for a while now so I'll answer as best as i can.
First off, Krita has at least three charcoals in its basic brush bundle (the one that comes when you install it) so I'd advise trying those first. If they don't match what you want exactly, try fiddling with the brush engine to get a similar feel.
I don't think it has a ' stucco' brush per say, but by what i could see online of the procreate brushes I think the basic-1 or basic-1 opacity brushes come close to what you're looking for? Again these are in the basic bundle that comes with the software.
Another option would be to look for krita bundles or brushes you can get online. Since Krita allows the import of .abr files (so photoshop brushes basically), you're also not limited to brushes specifically made for Krita only and can thus broaden your search to look for similar brushes through the photoshop brushes available online.
A good place to find krita brushes (that are also free!) is this website that also serves as forum for Krita users. Give it a glance if you need anything. There are also several articles listing brushpacks and free brushes available on the internet (and on tumblr!) with some of my favorites being gdquest's and deevad's brushpacks.
Hope this helps~
Hi guys! I’m learning Krita and I was wondering if I could get any tips (as up until now ive mostly used simpler apps like Procreate)
Are there any brushes similar to the Chalk, shale, and stucco brushes from procreate as well? Any tips would help as well as redirecting me!
![[ Download Link ]](https://64.media.tumblr.com/5f429d178bb1fe4870a8c6931415c38e/1c195b3b919b6bc0-22/s500x750/9f3e89788ae15eab900a39fc63f99bd7a543868d.jpg)
![[ Download Link ]](https://64.media.tumblr.com/6dd33d9a47c84fae4004c3891a069032/1c195b3b919b6bc0-70/s500x750/7a350518ca98cd34cd6e5fa9cd463fb933dbcf11.jpg)
![[ Download Link ]](https://64.media.tumblr.com/c6bcee52d8e78ba0e31e786b91f81fc1/1c195b3b919b6bc0-03/s500x750/735d52cfd62421cf43e46a8a710f76dad2c52707.jpg)
![[ Download Link ]](https://64.media.tumblr.com/87c3f0ff1da8e8a917485898808bd63b/1c195b3b919b6bc0-64/s500x750/62e90c66492ac189a3325bbd25965dd635cc65b7.jpg)
![[ Download Link ]](https://64.media.tumblr.com/133564050990bca016611a68fa71a2de/1c195b3b919b6bc0-c1/s500x750/87ea85696f416c49b91f8f64754306f4208b6726.jpg)
![[ Download Link ]](https://64.media.tumblr.com/9a2582c5d3abc3f5cf6ce4587482f493/1c195b3b919b6bc0-c5/s500x750/19c8f03ee111f028acd365ae95b24a04a72e60d9.png)
[ Download Link ]
As promised, it’s finally here! Thank you to all of my patrons for not only the support that made this possible, but for giving me the confidence to work on a big project like this.
Rather than providing any drawing instruction, what this writeup aims to do is help you learn to unpack the decisions being made in a given composition, and articulate what elements in a piece are responsible for its impact. Being able to isolate these qualities in your own art and art that inspires you opens up avenues for improvement regardless of medium, style, or technical skill. This is the first of hopefully many PWYW art ‘tutorials’ from me.
I hope you all enjoy!


two (2) people asked how i did the matchbook thing so take this
this is just a simple idea but if you spend some more time you can get real krazy with it:

making fake prints is so fun please do it immediately free resources under cut xoxo
Keep reading

Can't afford art school?
After seeing post like this 👇

And this gem 👇
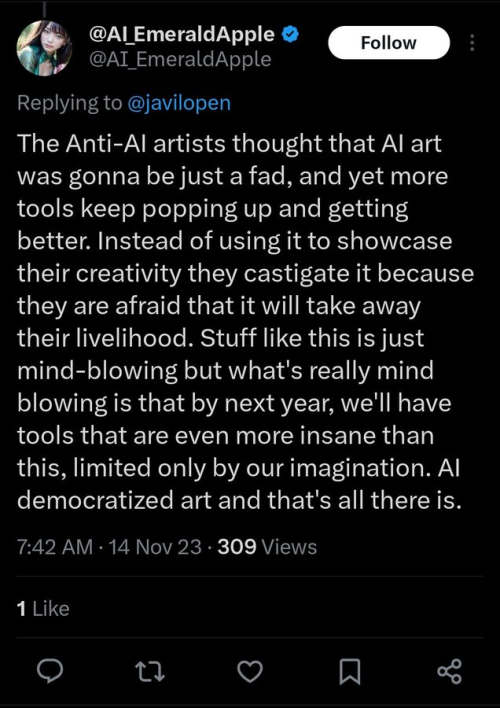
As well as countless of others from the AI generator community. Just talking about how "inaccessible art" is, I decided why not show how wrong these guys are while also helping anyone who actually wants to learn.
Here is the first one ART TEACHERS! There are plenty online and in places like youtube.
📺Here is my list:
Proko (Free)
Marc Brunet (Free but he does have other classes for a cheap price. Use to work for Blizzard)
Aaron Rutten (free)
BoroCG (free)
Jesse J. Jones (free, talks about animating)
Jesus Conde (free)
Mohammed Agbadi (free, he gives some advice in some videos and talks about art)
Ross Draws (free, he does have other classes for a good price)
SamDoesArts (free, gives good advice and critiques)
Drawfee Show (free, they do give some good advice and great inspiration)
The Art of Aaron Blaise ( useful tips for digital art and animation. Was an animator for Disney)
Bobby Chiu ( useful tips and interviews with artist who are in the industry or making a living as artist)
Second part BOOKS, I have collected some books that have helped me and might help others.
📚Here is my list:
The "how to draw manga" series produced by Graphic-sha. These are for manga artist but they give great advice and information.
"Creating characters with personality" by Tom Bancroft. A great book that can help not just people who draw cartoons but also realistic ones. As it helps you with facial ques and how to make a character interesting.
"Albinus on anatomy" by Robert Beverly Hale and Terence Coyle. Great book to help someone learn basic anatomy.
"Artistic Anatomy" by Dr. Paul Richer and Robert Beverly Hale. A good book if you want to go further in-depth with anatomy.
"Directing the story" by Francis Glebas. A good book if you want to Story board or make comics.
"Animal Anatomy for Artists" by Eliot Goldfinger. A good book for if you want to draw animals or creatures.
"Constructive Anatomy: with almost 500 illustrations" by George B. Bridgman. A great book to help you block out shadows in your figures and see them in a more 3 diamantine way.
"Dynamic Anatomy: Revised and expand" by Burne Hogarth. A book that shows how to block out shapes and easily understand what you are looking out. When it comes to human subjects.
"An Atlas of animal anatomy for artist" by W. Ellenberger and H. Dittrich and H. Baum. This is another good one for people who want to draw animals or creatures.
Etherington Brothers, they make books and have a free blog with art tips.
As for Supplies, I recommend starting out cheap, buying Pencils and art paper at dollar tree or 5 below. For digital art, I recommend not starting with a screen art drawing tablet as they are more expensive.
For the Best art Tablet I recommend either Xp-pen, Bamboo or Huion. Some can range from about 40$ to the thousands.
💻As for art programs here is a list of Free to pay.
Clip Studio paint ( you can choose to pay once or sub and get updates)
Procreate ( pay once for $9.99)
Blender (for 3D modules/sculpting, ect Free)
PaintTool SAI (pay but has a 31 day free trail)
Krita (Free)
mypaint (free)
FireAlpaca (free)
Libresprite (free, for pixel art)
Those are the ones I can recall.
So do with this information as you will but as you can tell there are ways to learn how to become an artist, without breaking the bank. The only thing that might be stopping YOU from using any of these things, is YOU.
I have made time to learn to draw and many artist have too. Either in-between working two jobs or taking care of your family and a job or regular school and chores. YOU just have to take the time or use some time management, it really doesn't take long to practice for like an hour or less. YOU also don't have to do it every day, just once or three times a week is fine.
Hope this was helpful and have a great day.
HOT ART TIPS!!!!
1) FIRST THINGS FIRST
GET A COMPUTER THAT ISN’T SHIT!!! GET A COMPUTER THAT CAN RUN PHOTOSHOP!! OR A PROFESSIONAL PROGRAM LIKE IT!!!
IF YOUR COMPUTER IS GARBAGE, YOU WILL NOT BE ABLE TO RUN GOOD ART PROGRAMS. YOU WILL NOT BE ABLE TO SAVE LARGE FILES SO THAT YOUR ART CAN LOOK GOOD!!!
2) YOUR ART NOT TURNING OUT GOOD? IS IT LOOKING HELLA SMUDGED???? ARE THE DETAILS NOT COMING OUT GOOD?? OR LOOKING LIKE A SMASHED DONUT???


(REASON FOR THIS)??
BIGGER PICTURE MEANS YOU CAN PUT MORE DETAILS IN IT AND RENDER IT BETTER!!!!!!!
SMALLER PICTURE MEANS LOWER RESOLUTION AND YOU CAN’T BLEND SHIT AS WELL!!!
GOD I LITERALLY FIGURED THIS SHIT OUT TONIGHT!!! YOUR LIFE WILL BE CHANGED!!!
3) DO NOT STAY WITH PROGRAMS LIKE FIRE ALPACA OR PAINT TOOL SAI UNLESS YOU HAVE ALREADY TRIED OTHER ART PROGRAMS!!!
REASON??

(AND FIRE ALPACA)


PROGRAMS LIKE gOOD OL’ PHOTOSHOP, CLIP STUDIO PAINT, AND OTHER PROGRAMS THAT HAVE A VAST SELECTION OF FANCY SCHMANCY STUFF TO ENHANCE YOUR ART ALLOW YOU A LOT MORE ROOM TO GROW!!
4) MAKE!!! YOUR!!! OWN!!! BRUSHES!!!!
LIFE WILL BE IMMENSELY EASIER WHEN YOU FIND THE BRUSH THAT ACTIVATES YOUR MAGICAL ART ABILITIES (MINUS THE TRANSFORMATION SHIT)
HOW DO YOU DO THAT?
HERE’S HOW TO DO IT IN PHOTOSHOP
HERE’S HOW TO DO IT IN CLIP STUDIO PAINT
HERE’S HOW TO DO IT IN FIRE ALPACA
HERE’S HOW TO DO IT IN PAINT TOOL SAI


SOMEBODY PLEASE TELL ME HOW I CAN COLOR MY ART LIKE THIS PLEASE
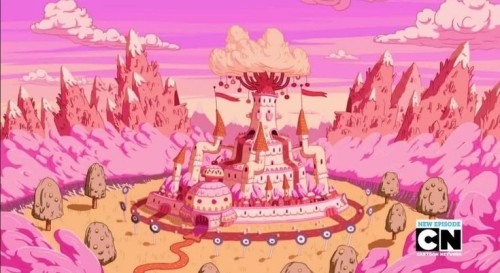
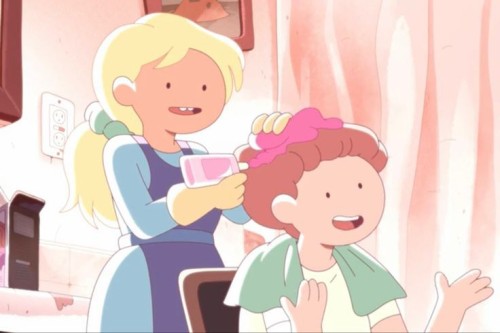


I love how the colors really impact how you feel without any duologue, it can make you feel sad comforted etc etc. But please someone give my tips on how I can make my art look and feel this way!!!
Shows in order!! :adventure time, Fiona and cake, bee and puppycat, Steven universe
this is just for me lmao
Hi!!! I was wondering if you have art videos and such?? I would really love seeing your process
i’m too self-conscious about my drawing process to record it and show to people, that’s why i did this step-by-step explanation, hope it’ll do
1. sketch layer (i usually start with 2000x2000 size canvas and then just crop/resize it after sketching out what i have in mind)
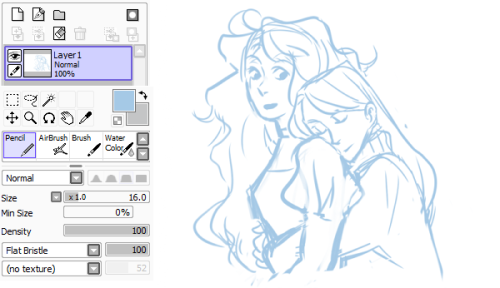
2. lineart layer (aka the part where i use a combination of lasso tool and ctrl+t a lot because this is the last chance to get proportions and stuff right)
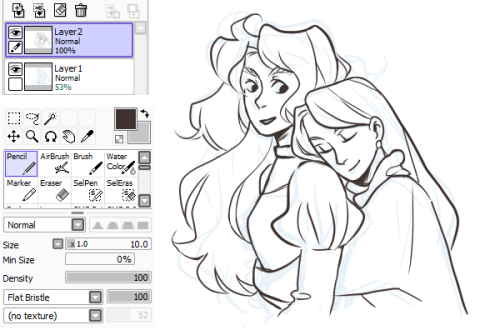
3. colouring, for which i usually make two separate layers: one for skin and one for hair/clothes (because i am a baby who gets easily confused when there’s more than 10 layers in total)
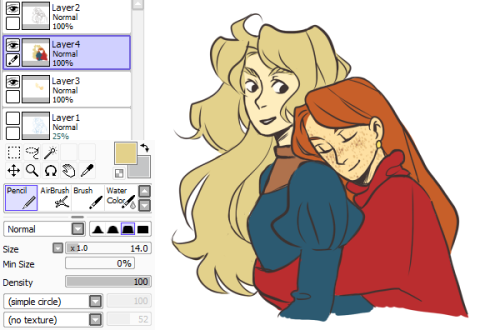
4. (optional) sometimes i also colour lineart
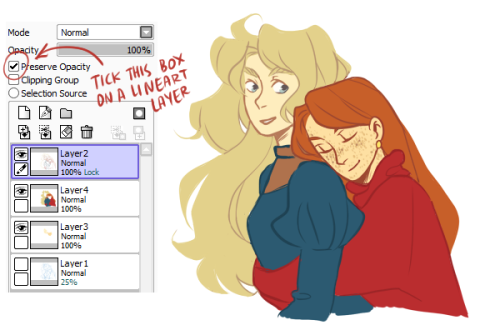
5. …and then add an overlay layer because an overlay layer makes everything look better

that’s it, basically. sorry i used such a shippy pic as an example lol
Can someone teach me how to pose a Minecraft Phantom? I want them to be like a little dragon without legs but I can't figure out poses.
A general cane guide for writers and artists (from a cane user, writer, and artist!)
Disclaimer: Though I have been using a cane for 6 years, I am not a doctor, nor am I by any means an expert. This guide is true to my experience, but there are as many ways to use a cane as there are cane users!
This guide will not include: White canes for blindness, crutches, walkers, or wheelchairs as I have no personal experience with these.
This is meant to be a general guide to get you started and avoid some common mishaps/misconceptions in your writing, but you absolutely should continue to do your own research outside of this guide!
This is NOT a medical resource!!! And never tell a real person you think they're using a cane wrong!
![[Image text] Arm bends a little. Cane height at hip joint. Many canes have adjustable height. Cane sits within the natural center of balance. Causes stress on: Triceps, upper back, wrist (pressure) fingers (grip). Helps with: Joints (lower back, hip, knee, ankle, foot), weakness, balance, pain.](https://64.media.tumblr.com/0c8731401f496885dc8d4309a7dbe7ee/f831b3159e1d7635-e7/s500x750/6e5fe00081a6ce3b64cbe1a648f0c967f9f601e9.jpg)
The biggest recurring problem I've seen is using the cane on the wrong side. The cane goes on the opposite side of the pain! If your character has even-sided pain or needs it for balance/weakness, then use the cane in the non-dominant hand to keep the dominant hand free. Some cane users also switch sides to give their arm a rest!
A cane takes about 20% of your weight off the opposite leg. It should fit within your natural gait and become something of an extension of your body. If you need more weight off than 20%, then crutches, a walker, or a wheelchair is needed.
Putting more pressure on the cane, using it on the wrong side, or having it at the wrong height can make it less effective, and can cause long term damage to your body from improper pressure and posture. (Hugh Laurie genuinely hurt his body from years of using a cane wrong on House!)
(some people elect to use a cane wrong for their personal situation despite this, everyone is different!)
(an animated GIF of a cane matching the natural walking gait. It turns red when pressure is placed on it.)
When going up and down stairs, there is an ideal standard: You want to use the handrail and the cane at the same time, or prioritize the handrail if it's only on one side. When going up stairs you lead with your good leg and follow with the cane and hurt leg together. When going down stairs you lead with the cane and the bad leg and follow with the good leg!
Realistically though, many people don't move out of the way for cane users to access the railing, many stairs don't have railings, and many are wet, rusty, or generally not ideal to grip.
In these cases, if you have a friend nearby, holding on to them is a good idea. Or, take it one step at a time carefully if you're alone.
Now we come to a very common mistake I see... Using fashion canes for medical use!
![[Image text] 4 Major Handle Shapes (significant variation and uses). Tourist/Crook/Hook. Classic shape, fashion and medical, easy to hook on things (arm, door, chair, etc), generally solid wood (stronger, heavier). Offset. Newer design, not a fashion handle, only handle for quad-bases, generally better balance, usually aluminum (light + cheap), soft handle, adjustable (rattles/clicks when swinging). Derby/Fritz/Anatomical/Contour. Classic medical shape, many fashion variants, some fashion + medical, varies in many ways, sometimes contoured to hand, comes in foldable styles, many aluminum styles, many customizable styles. Knob/Decorative. Fashion exclusive, knob shape hurts the hand after prolonged pressure (especially with designs), tend to be heavy, "sword canes" have the same issues.](https://64.media.tumblr.com/102d2e5f13a88817eaa44974bc5a7486/f831b3159e1d7635-e2/s500x750/887023dbcfc758db12a7fcf3f258bca52eba2d53.jpg)
(These are 4 broad shapes, but there is INCREDIBLE variation in cane handles. Research heavily what will be best for your character's specific needs!)
The handle is the contact point for all the weight you're putting on your cane, and that pressure is being put onto your hand, wrist, and shoulder. So the shape is very important for long term use!
Knob handles (and very decorative handles) are not used for medical use for this reason. It adds extra stress to the body and can damage your hand to put constant pressure onto these painful shapes.
The weight of a cane is also incredibly important, as a heavier cane will cause wear on your body much faster. When you're using it all day, it gets heavy fast! If your character struggles with weakness, then they won't want a heavy cane if they can help it!
This is also part of why sword canes aren't usually very viable for medical use (along with them usually being knob handles) is that swords are extra weight!
However, a small knife or perhaps a retractable blade hidden within the base might be viable even for weak characters.
![[Image text] 4 Major base shapes (significant variation and uses). Adjustable base. Aluminum, standard modern medical, adjustable height, rubber base, wears down over time. Tripod/ quad base. If you need extra balance. Terrain attachment (varies, this is for ice). Removable, helps stop slipping on ice/snow/sand/etc, some canes have a retractable tip for ice. Classic base. Non-adjustable, custom only, modern standard still has a rubber base.](https://64.media.tumblr.com/78d350cfac4077376b7ce521a9a7d929/f831b3159e1d7635-ab/s500x750/4b4a6b8062c06686baf17c83c28b793bfb89e05b.jpg)
Bases have a lot of variability as well, and the modern standard is generally adjustable bases. Adjustable canes are very handy if your character regularly changes shoe height, for instance (gotta keep the height at your hip!)
Canes help on most terrain with their standard base and structure. But for some terrain, you might want a different base, or to forego the cane entirely! This article covers it pretty well.
Many cane users decorate their canes! Stickers are incredibly common, and painting canes is relatively common as well! You'll also see people replacing the standard wrist strap with a personalized one, or even adding a small charm to the ring the strap connects to. (nothing too large, or it gets annoying as the cane is swinging around everywhere)
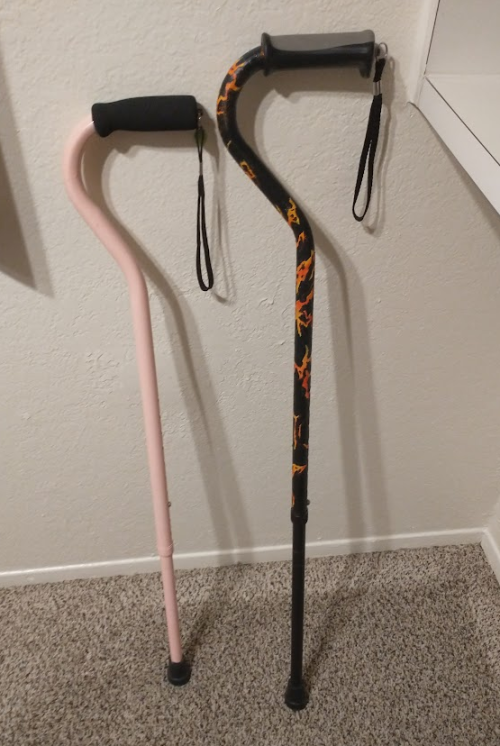
(my canes, for reference)
If your character uses a cane full time, then they might also have multiple canes that look different aesthetically to match their outfits!
When it comes to practical things outside of the cane, you reasonably only have one hand available while it's being used. Many people will hook their cane onto their arm or let it dangle on the strap (if they have one) while using their cane arm, but it's often significantly less convenient than 2 hands. But, if you need 2 hands, then it's either setting the cane down or letting it hang!
For this reason, optimizing one handed use is ideal! Keeping bags/items on the side of your free hand helps keep your items accessible.
![[Image text] Where to put your stuff. Purses/bags. A lot of size range, Can mess with balance, Zippers are too hard with one hand, Handheld means you have no hands, over the shoulder only. Fanny pack. Accessible with one hand, Limited space, Good for balance. Backpack. Very physically comfortable, evenly weighted, holds a lot (medicine, foldable cane, emergency supplies, etc) can't access without fully stopping and putting cane down/hooking it on arm/dangling on strap. Pockets. Can only use on free side, many outfits don't have good pockets.](https://64.media.tumblr.com/de0f85e864c0ac470fb08900d78d8375/f831b3159e1d7635-21/s500x750/dbc646d95d144bb9c097f220361f074cc4b59584.jpg)
When sitting, the cane either leans against a wall or table, goes under the chair, or hooks onto the back of the chair. (It often falls when hanging off of a chair, in my experience)
When getting up, the user will either use their cane to help them balance/support as they stand, or get up and then grab their cane. This depends on what it's being used for (balance vs pain when walking, for instance!)
That's everything I can think of for now. Thank you for reading my long-but-absolutely-not-comprehensive list of things to keep in mind when writing or drawing a cane user!
Happy disability pride month! Go forth and make more characters use canes!!!
How the fuck does one draw a character with four arms?
Art Help

I redid this list because broken links 💀
General Tips
Stretch your fingers and hands
Art is for fun
Never too late to start/improve
Using a tablet
Editing software: pictures & video
Moodboard resources
Comic pacing
Watercolor
Coloring
Color Theory (not children's hospital)
Resources: coloring things a different color
Gold
Dark Skin undertones
Dark Skin in pastel art
POC Blush tones
Eyes colors
Human Anatomy
POSE REFERENCES
Wizard Battle poses
Romance poses
Shoulders
Tips for practicing anatomy
Proportional Limbs
Skeletons
Hair Directions
Afro, 4C hair
Cane use
Clothing
Long skirts
Traditional Chinese Hanfu (clothing reference)
CLOTHING REFERENCE
Sewing information
Animals
Horse -> Dragon
Snouts: dogs, cats, wolves, fox
Foot, paw, hoof
More
Drawing references sources
Art tutorial Masterlist
Another art tutorial Masterlist
Inspiration: father recreates son's art
Inspiration: Lights
ART BOOKS
Plants/flowers: North America, Hawaii, Patagonia


You don’t suck at Lineart, you’re just not familiar with line weight👍🏼!
![Title card reading: [Storyboarding Basics. Brought to you by NU Animation Club, March 23 2023]. There is a chibi drawing of Feeb drawing on a CINTIQ](https://64.media.tumblr.com/1bb4994121212e48c92ee88de5cbe45d/8f6b9c73271b12ac-28/s500x750/efeaa63ce1f755c3643a35f0973a68f1f1057236.png)


a couple snippets from a presentation i gave at school this past week on storyboarding!!
‼️DISCLAIMER: I am still a student and have only worked on student and indie projects! This is just stuff that I personally find helpful as an amateur, so feel free to take it with a grain of salt!
Happy boarding, friends! ✍️💕
Could you please show us how to draw faces with nice fangs please.

Hope this is helpful!