Photoshop Reference - Tumblr Posts


Please support me so I may continue making tutorials and guides for everyone!
https://www.patreon.com/doxydoo?ty=h

So I got a lot of messages after my first post asking me to explain layers, so I have put together a cheat sheet of the different layer types. The quickest way to become awesome with layers is to know exactly what each one does. Once again, I’m no expert, and these are just my personal definitions, so please try these out for yourself! LONG POST BELOWWW THE LAYERS CHEAT SHEET PART ONE: 1. NORMAL: Aw yeah you know all about this layer its just your average layer 2 DISSOLVE: This mode “dissolves” some pixels, allowing the lower layer to show through. very pixel-y. Reducing opacity makes it dissolve more. ________ 3. DARKEN: Now the difference between darken and multiply are a little confusing, so I will explain them together. MULTIPLY is more of a glaze, while DARKEN favors the darks on all layers. So if you have a darken layer on, it tend to reduce/remove the lighter tones on the layer if there are darker tones below it, while darkening the darks. 4. MULTIPLY: A glaze that darkens the color of the layer below. It is great for shading. Reduces whites. 5. COLOR BURN: “Burns” the lower layer favoring a more saturated look. Marks made over white are not preserved. 6. LINEAR BURN: “Burns” the lower layer, with a little less saturation than color Burn. Also will preserve colors over white. 7. DARKER COLOR: I tend to avoid this puppy cause it does not darken on the RGB channel. (feel free to try him though!) ______ 8. LIGHTEN: Lightens the colors below. Favors lighter colors on lower layers. 9. SCREEN: Lightens the colors below, but much closer to the “glaze” analogy as above. Reduces blacks. 10. COLOR DODGE: Often used for magic-y effects, color dodge bumps up saturation and is very bright. 11. LINEAR DODGE: Much like color dodge, but less saturation. 12. LIGHTER COLOR: Once again, this is an outside RGB channel layer, so I don’t really use this. As you probably have noticed, the second two groups are opposites, so if you have a good handle on one, you probably know exactly what the second group does! I will do the remaining groups next week as they do not follow this pattern. Thanks! drawmaevedraw.tumblr.com
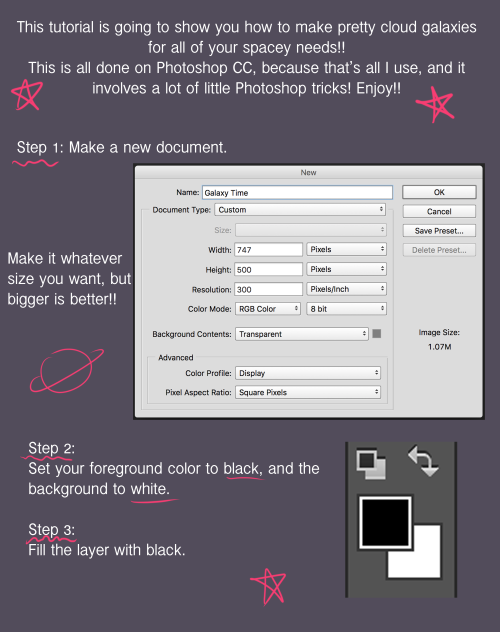

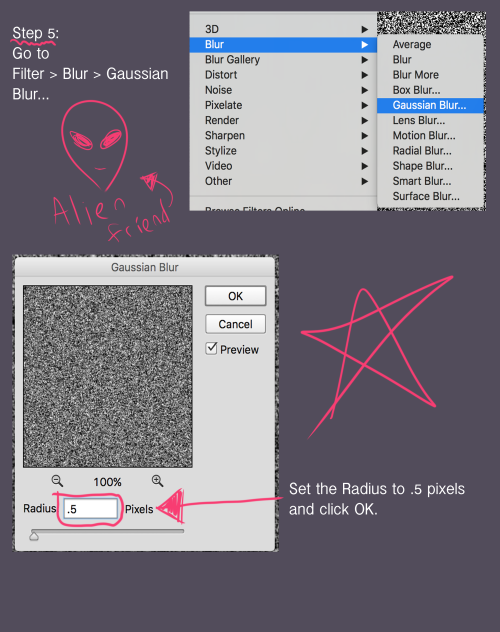
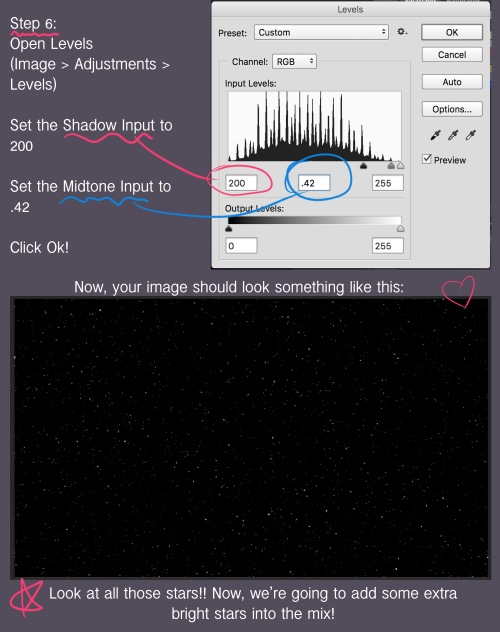

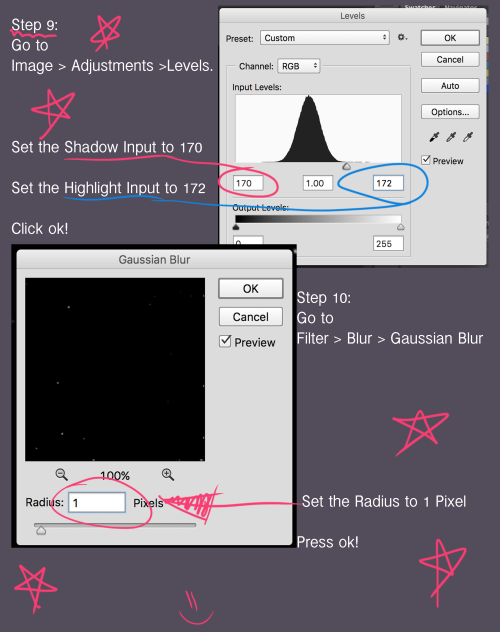
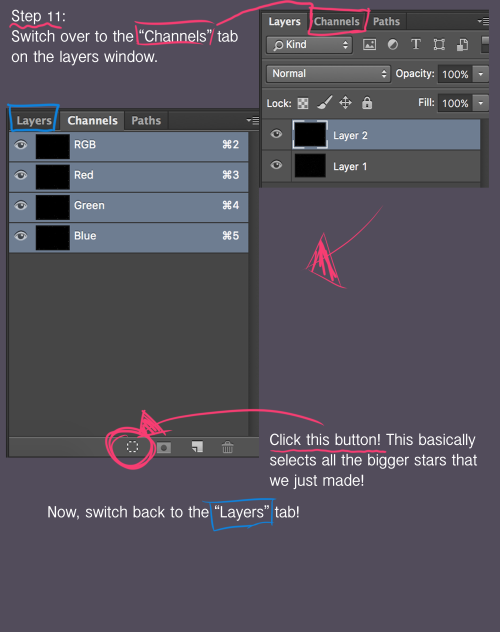
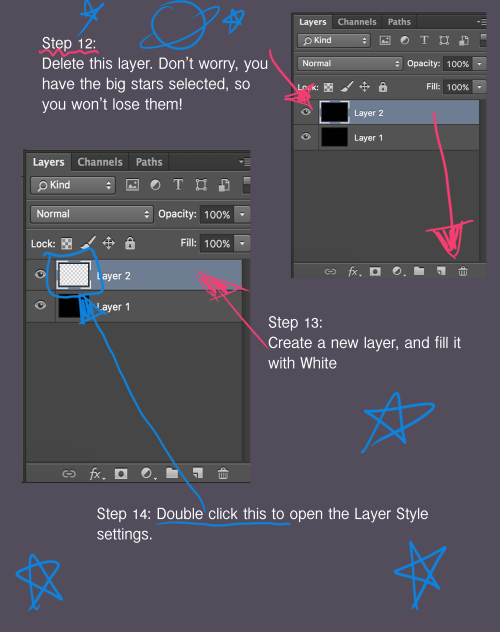


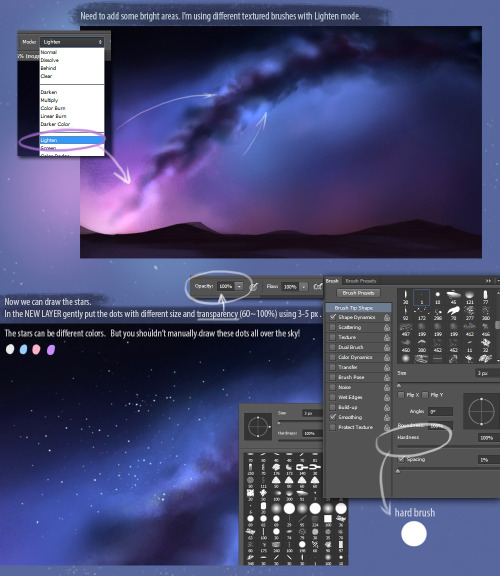
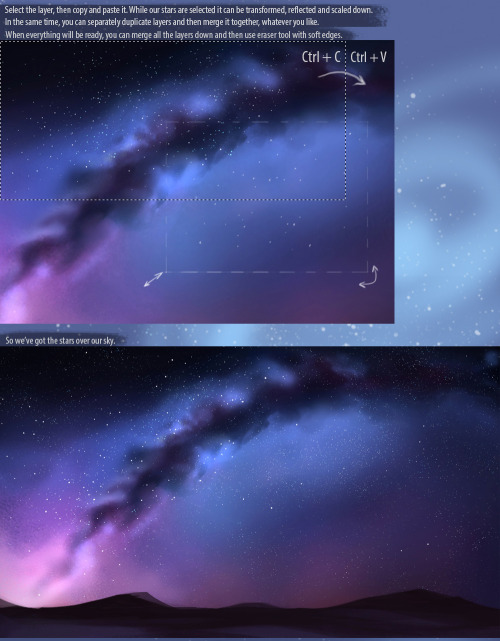
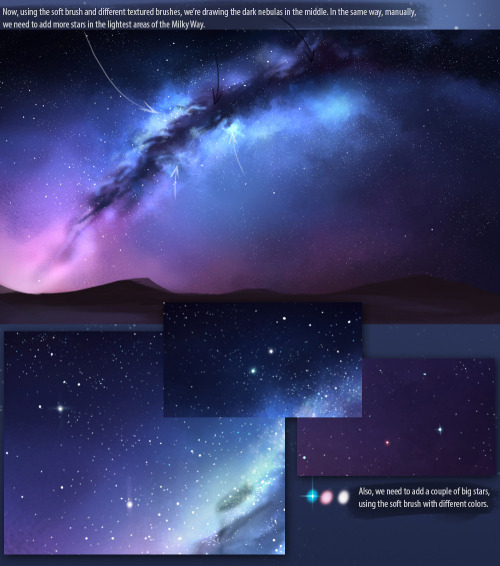
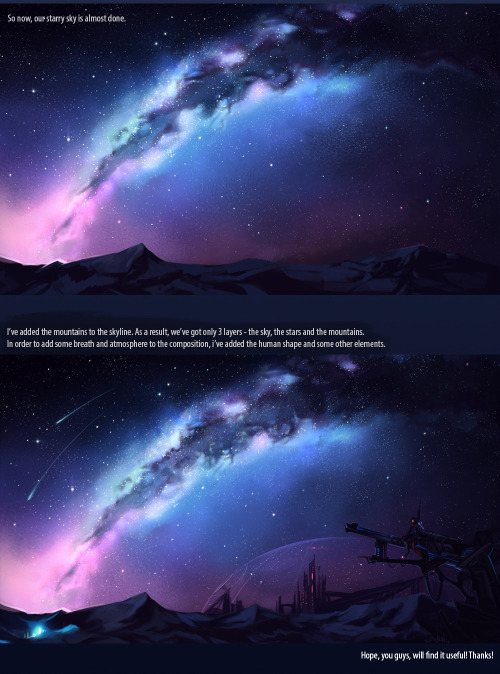
I got a request to do a tutorial on how to create galaxies! Well, here you go!! Painting galaxies is so much fun, and can be really calming. So have fun!!
If you have any questions or if I made a mistake, feel free to message me!
Do not remove caption


REEEEALLY quick quick-select gif masking tutorial, while I’m working on it and have the source files in front of me.
If you’re planning on making a gif where you place a gif with the background removed and replaced with other gifs like this:

the best tool to use is generally the magic wand but sometimes if the background is overly complicated then quick select is your only real option.
To make sure that the edges of the transparent gif are as smooth as possible, use the refine edge tool!
Basically what I do is select the whole frame and then use the quick select tool to de-select the part I want to be visible - in this case it’s Meg. If you just delete the background there will be some really ugly ghosting around the edges that are going to look like shit when you place the new background in and try to render the gif SO just click that little “refine edge” button in the quick select toolbar and then play with the “smooth” and “contrast” values to both smooth the edges and then sharpen them properly.
Delete the background and there’ll be a noticeable improvement! Just do the same thing for every frame and you’re good to go with resizing and cropping and stuff.
Just remember to use the same values in the refine edge window for every frame you do because otherwise the edges will look all jumpy and weird when the gif is in motion (easiest way to do this is use easy numbers for each one - I’ve used 50)
Aaaand ta da! The background is gone and ready to be replaced with something else, and the edges of your gif aren’t blurry and gross.


Late last year I wanted to start a series of short tutorials called Tip Jar, as a way of saying thanks to my fans and giving back to my patrons. This is the first of the series I have made, showing my technique on quickly filling in lineart so you can get to painting without coloring outside the lines faster.
Someday I hope to turn these into video tutorials when I have the income and the time, but for now I hope that I will be able to share useful tips in this infographic format.
Full tutorial image
Support me on Patreon
bec!! how do you do the inifinite loopy background thing? i dont know if youve answered this before but i wanted to do something like that too!!
I actually used a little trick that I learned years ago, but sadly I can’t find the tutorial anymore, so I’ll see if I can recreate it!
You make a new canvas with a relatively small size and make sure that it is a square! For this example, I used 300x300. And then try to cram everything in that one square.

Then you open up Photoshop and go to the Filters tab, find Other, and then select Offset (I believe CS2 and above is capable of doing this).

And then you mess with the numbers a bit.

I heard that setting the Horizontal and Vertical values to half of your canvas width and height might help (for example, 150 and 150 since my canvas size is 300x300). I haven’t tested it but you can definitely try it!
Hope this helps!
how did you do the perspective blur in your doof piece :0 ?

Photoshop’s Gaussian Blur is my savior. I’ll try to do a quick walkthrough of how I go through the process too because I use blur A LOT, and not just for perspective – I switch between Paint Tool SAI and Photoshop CS4 for reference.
This first step is a personal preference one, but I’ll include it nonetheless. I use a very hard brush for my line art/coloring, so the first round of blur goes to soften the line art.

In photoshop, go to your top menu bar, click Filter > Blur > Gaussian Blur. For softening the vanilla image i usually do 0.4 - 0.6. The difference is very slight but very important to me, it gets rid of a lot of the pixelyness. NOW the main bit.

Time to put it through another round of Gaussian. I usually bump it up to about 6 - 7. I take the super blurry image back into SAI and put it on a layer above the first softened image. Using the eraser tool set on density (under the advanced options of the tool) I start dabbing away at the top blurry layer to reveal the cleaner one underneath. I don’t have any images from before I added more lighting over Doof but this’ll give you the idea of the effect it achieves.


It gives the picture an atmospheric sort of haziness to it that I loooove. Some things need just a bit more of a push, like his leg for example, so I didn’t erase any of the top blurred layer airbrushed it with the background’s dusty color. That’s it!

Pardon me for such a long post haha but I hope I fully covered it!


Hey friends, it’s Meg!
Glad to be back at TUTOR TUESDAY, and a big thanks to Paul for taking over for two weeks! Big thanks to @wr3h for todays topic! I’m hoping to branch out more into styles/techniques in photoshop if y’all enjoy how this one went! I’m always open to recommendations, feel free to send them here or to my personal. Keep practicing, have fun, and I’ll see you next Tuesday!