Side-blog managed by someone who tends to stack resource and tutorial posts under her blogs' drafts as future references for anything useful in life. Circa 2014. REOPENED.
230 posts
How Did You Do The Perspective Blur In Your Doof Piece :0 ?
how did you do the perspective blur in your doof piece :0 ?

Photoshop’s Gaussian Blur is my savior. I’ll try to do a quick walkthrough of how I go through the process too because I use blur A LOT, and not just for perspective – I switch between Paint Tool SAI and Photoshop CS4 for reference.
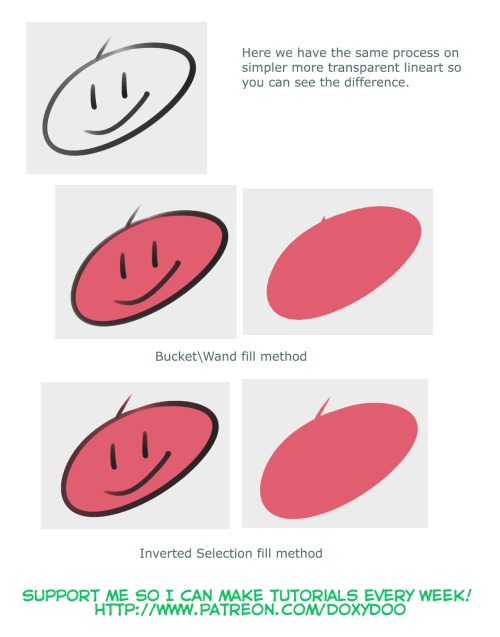
This first step is a personal preference one, but I’ll include it nonetheless. I use a very hard brush for my line art/coloring, so the first round of blur goes to soften the line art.

In photoshop, go to your top menu bar, click Filter > Blur > Gaussian Blur. For softening the vanilla image i usually do 0.4 - 0.6. The difference is very slight but very important to me, it gets rid of a lot of the pixelyness. NOW the main bit.

Time to put it through another round of Gaussian. I usually bump it up to about 6 - 7. I take the super blurry image back into SAI and put it on a layer above the first softened image. Using the eraser tool set on density (under the advanced options of the tool) I start dabbing away at the top blurry layer to reveal the cleaner one underneath. I don’t have any images from before I added more lighting over Doof but this’ll give you the idea of the effect it achieves.


It gives the picture an atmospheric sort of haziness to it that I loooove. Some things need just a bit more of a push, like his leg for example, so I didn’t erase any of the top blurred layer airbrushed it with the background’s dusty color. That’s it!

Pardon me for such a long post haha but I hope I fully covered it!
-
 starrylibraryofresources reblogged this · 1 year ago
 -
 astrologicalblues reblogged this · 1 year ago
 -
 kirbware liked this · 2 years ago
 -
 cosmic-pheonix reblogged this · 2 years ago
 -
 unleashedphoenix reblogged this · 2 years ago
 -
 tutorialeee reblogged this · 3 years ago
 -
 lordiavoloremade liked this · 3 years ago
 -
 nikorys liked this · 3 years ago
 -
 nsfwmalkie liked this · 4 years ago
 -
 milargh liked this · 5 years ago
 -
 tilamisus liked this · 5 years ago
 -
 corruptedghoul liked this · 5 years ago
 -
 gummytea liked this · 5 years ago
 -
 xerxmes liked this · 6 years ago
 -
 winterandwonder liked this · 6 years ago
 -
 ghostnebulaas reblogged this · 6 years ago
 -
 springtime-darling liked this · 6 years ago
 -
 bloominghavena reblogged this · 7 years ago
 -
 rad-puppeteer liked this · 7 years ago
 -
 zilbat liked this · 7 years ago
 -
 cumuluseel-blog reblogged this · 7 years ago
 -
 miremummy liked this · 8 years ago
 -
 dreamflyingbird reblogged this · 8 years ago
 -
dreamflyingbird liked this · 8 years ago
-
 referooni-blog reblogged this · 8 years ago
 -
 donber reblogged this · 8 years ago
 -
donber liked this · 8 years ago
-
 otaku-designs-blog liked this · 8 years ago
 -
 refvyud reblogged this · 8 years ago
 -
 valriarei liked this · 9 years ago
 -
 raehira reblogged this · 9 years ago
 -
raehira liked this · 9 years ago
-
 092832487390322 liked this · 9 years ago
 -
 rixsig liked this · 9 years ago
 -
 jejecchi liked this · 9 years ago
 -
 endofthisblog reblogged this · 9 years ago
 -
 hndwrttn liked this · 9 years ago
 -
 quirk-crate liked this · 9 years ago
 -
 lonely-and-not-alright liked this · 9 years ago
 -
 irascible-iridescent reblogged this · 9 years ago
More Posts from Starrylibraryofresources


"overlay is da bomb!" tutorial
ever wondered how to put pattern effects on stuff? this is how i do them. :P (using paint tool SAI)


*other colors will change the color of your shape. tip: brownish patterns will give your shape an antique/vintage/old effect. orz i fail at explaining haha


lol i love the overlay effect! :D i hope this helped! :3
For any other artists following me
I just found this website that has lots of free, transparent textures available to download. Useful for drawing clothes and things, or just to make a wallpaper or something ^-^
hhhhh your art is so beautiful u v u. I'm wondering if you could do some references on backs? Of course only if you have time and feel like doing so o v o;;;


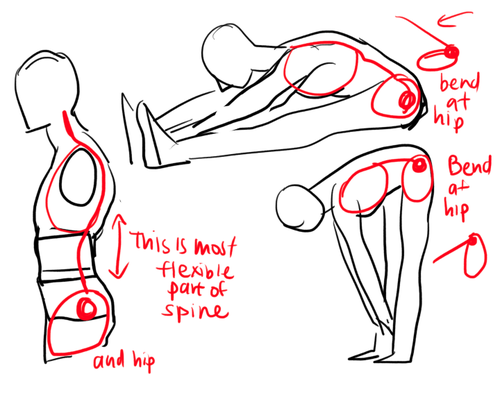

forgive my handwriting I HOPE THIS HELPS A LITTLE BC IM NOT RLY SURE IF IT MAKES SENSE also here are some pics of rl backs which you can also locate via google 1,2,3,4,5(nsfw bc butt)
SAI to FireAlpaca translations
Basically for when you see some awesome tutorials and/or brush settings for SAI and you want to try replicating them in FireAlpaca (sort of)
SAI has a bunch of brush settings that aren’t available in FireAlpaca, so if you’re at a loss, you have to make due with ingenuity until FA improves with more Brush settings D: (Some settings and effects can be created with the help of a Bitmap, Scatter, or Scatter Watercolor Brush, if you know what effect you’re going for.)
In order to edit some of these settings, you usually have to make a new “Watercolor” style brush in FA.
“Stabilizer” (drop down option) = “Correction” (drop down option)
“Blending” in SAI = “Ease of Mixing Colors” in FA “Persistence” = “Load Color” “Density” = “Opacity” (although please note that in FA, opacity with Watercolor brushes is extremely tricky to manage. Even at a low opacity, brushes can still be pretty opaque, which can yield some undesirable results.) “Min. Size” = “Min. Width”
Press: (checkboxes) Dens., Size, Blend = “Opacity by Pressure”, “Size by Pressure” (Blend by pressure isn’t available as a setting)
Also, with Watercolor brushes, the hard/soft edge of a brush is usually an all-or-nothing sort of setting in FA. So good luck, and happy customizing!