
They/them - AroaceLego MOCs and photography with a wide range of different characters and environments, every Wednesday (in theory-)
63 posts
Get Booped
Get booped
Get booped back ! Ah !
Oh, and have an actual (Lego) cat while I’m at it !

-
 rachelamorph reblogged this · 6 months ago
 -
 zoeywankenobi liked this · 6 months ago
 -
 rachelamorph54 reblogged this · 6 months ago
 -
rachelamorph liked this · 6 months ago
-
 enteroctopusdarkysilis reblogged this · 11 months ago
 -
enteroctopusdarkysilis liked this · 11 months ago
-
 attackboss6 reblogged this · 11 months ago
More Posts from Enteroctopusdarkysilis

✨Clone wars diorama !✨
Another one, technically the largest I have posted (yet~), featuring the 212th and a (placeholder) Jedi.
Of course, closeups and additional details below !
Views from directly in front/above :


Before I continue, I must confess it. This horrendous mistake, which you might spot by paying close attention to the right part of the image.
Yes. I somehow created an offset on the entirety of the wall’s height.
Overall, I’m quite happy with this one, mostly the environment, which turned out great (except for the offset….). What I’m not really sure leases with are the cheap AT-RTs from the battle packs, which are too bulky, but it works well enough for the moment, and since I’m not exposing to any connoisseur, it does the job.
Most of the minifigs are from these battle packs too, except for the Jedi, which is actually a savage oppress with a cloak, but every time I try to just remove the minifig, it feels like something is missing. The paratrooper captain has the hold grey kama and pauldron which always work well, even if it could have done with an additional visor.
Anyway, let’s get going with the closeups !
AT-RT scenes :


On the left, an engineer (my favorite kind of clone) fixing a broken down leg, with the help of one of the pilots. It was hard to get the minfigs in a 'lively' position, and the photo doesn’t render it correctly. The small white backpack is a piece I’ve stolen from the 501st specialist pack, because it’s nice.
On the right, a paratrooper with a completely inaccurate rocket launcher (the clone wars’ ones don’t look as cool, though). I quite like the way this part came together, even if it’s just a small detail.
Explosion scene :


I’ll admit it’s my first try with building explosions, and I’ll hopefully improve.
On the right, the clone says hi ! Well. No. He doesn’t, but it’s what he looks like on the photo, which I funny, I’ll admit, but not the image I wanted to convey, even if technically he’s set properly, as a projectile caused by the explosion.
The picture on the right convey the feeling of movement much better, with the clone shooting on the left, the others running along, and the paras being blown.
Other scenes :


The focus on the left is the droid ! I really like how it’s sprawled over that rock. Other droids can be found in the diorama, notably one being crushed by the rocket launcher AT-RT, partially under a rock, and part of one in the explosion.
On the right, we see a paratrooper down (but still fighting !) with, at his side, a medic applying a hypo. While it’s hard to see with this picture, he has a pouch at his side, and some chroma-black legs, because I was missing a pair of legs the medic has prosthetic legs, isn’t that awesome and convenient ? That is a lesson to learn, any lack can become lore ! Well, kind of. It’s what I also did with the Kashyyk MOC : I was missing all but the helmet of my ninth minifig, so I turned it into a grave of the missing squad member.
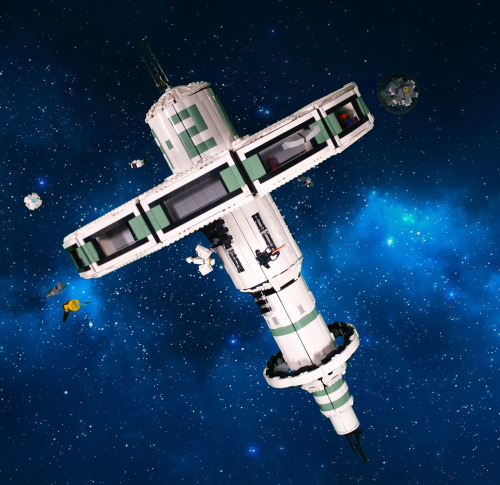
✨Trade Space Station !✨
[1/4] >Next>
Finally...More than 60 hours of work, I can present my masterpiece. I have been working and planning this project for a long time. Given the sheer amount of things to talk about, I will split all of my rambling in (at least) four posts : one about the concepts, ideas, and general aspect (you're here !); one about the technical side of things; one depicting how the project evolved (using pictures taken during the construction); and one dealing with all the smaller details, ships, and such.
Enough with planning, though. Explanations, other images and more explanations below the cut !
(less) edited picture of the build :

So. You might see, now that I got rid of all that pesky editing (or most of it) that there is a big arm holding the thing in place. It's easily a fifth of all the work of this build, because I absolutely wanted to hold this thing at an angle, and it's heavy, at around 15 kilograms (33 pounds). I'll talk about the technical difficulties of that in a later post, but it was important for it to be solid, because the station was the central piece of my second ever (very small) lego exhibition. AND it allowed me to meet the recruiter of a much larger exhibit. Long story short, in a month, I'm presenting this piece again (just before my exams, whoops-).
Anyway. Not only is it heavy, but it's also quite tall and wide. Around a meter at the highest point (tilted or not), while the diameter of the main ring is at around 0.75m. Quite a difficult thing to move around. Or is it ? Well, yes and no.

Here are all the main components (excluding the holding arm), when I move the piece around. Of course, all the ships are detachable (it allows me to move them around from one day to the other), but the dome carrying the antenna can also be removed, and then, the entire ring can be disconnected (that, too, was quite a challenge).
Removing the ring obviously makes it waaay easier to transport, because a single wooden plank can then be used (again, except for the arm, but that thing was made to be sturdy, so it can be transported with less care); and , once the dome is removed, I can just let the central cylinder stand upside-down (useful for storage). The only trouble I found with this system is that I once connected the ring the wrong way around, meaning everything in the small hangars was upside down. Quite an embarrassing moment.
Speaking of the hangars, I initially wanted to keep them all empty, to store ships inside, but it didn't really offer this piece the sparkle of life. Setting up these small decors inside most of them, with colors contrasting with the general theme of the build, was actually a really good addition.
The colour scheme as it is now is not exactly the one I had planned at the start of the project. I originally planned on using bright light orange (bricklink colour name) instead of sand green, but I found out that this colour was tough to find in large quantities, and I already had quite a bunch of the sand green, so this tragic decision was made. I think it would have offered a more vibrant colour to the build (resembling a Subnautica default palette, which I enjoy quite a lot), but in hindsight, the green works really well, appart from a small detail I'll expand on in a minute.
What's really funny for this project is that, when it started, I actually only wanted a nice way of showcasing all the little space ships that I tend to make whenever I have access to a small amount of cool pieces. Then came a long time where I only daydreamed about it and planned how I would want it to go, and only when I had a clear vision did I start the actual building process. So, taking all that into account, you can probably double the amount of time I spiritually spent on this project.
What I knew is that I wanted to get this huge ring held by beams to the station's body, which made the build both more interesting and more complicated that it would have been. But the challenge was appealing.
At first, the main body was completely flat and white, but I soon had to add texture, both because it was becoming ugly and because the 2*2 white curved slopes were starting to diminish fast. The first modifications I did were to add the sand green curved slopes instead to create stipes, then letters : the big A-2 you can easily spot. With the few bits of lore that I have created for this piece, you have to imagine that there are hundreds of these stations spread in the galaxy, which can be easily described through 3 criteria : the Letter, the Number, and the Colour. That would mean that, if you wanted to meet with someone at the exemplar I made, you would say something along the lines of 'Meet you at Sand Green A2'.
Texture-wise, the other element of the largest cylinder is the exposed bits of machinery, very classic in sci-fi, I know, but it does work well in this context. The second cylinder has much less textures, with only a few grates, and some 2*1 ingot pieces (because they look cool); but it also has its own, smaller ring (diameter slightly larger than the largest cylinder's).
Then come the smaller cylinders, which don't have much texture, except in their transition from one to another (barely visible in any of the pictures, but it exist).
Overall, I'm also really happy of how round it looks, given that circles are not my speciality.

Here is a completely unedited picture of the support arm (Lewa for scale), with a nice counterweight which might be necessary to hold the entire thing in place (it may not be, but I'm not trying to remove it. Bad idea.).
As you might notice, my studio is not a shelf anymore. I built something new from scratch with a green screen, because I thought it would make my editing job easier. And it would have, if I didn't use sand green in my build. Anyway, I'm keeping this for a few days, to snap some pictures of the MOCs which don't fit in my shelve (and are not green, meaning editing will be easier.
Here is the 'studio' from an outside point of view :

I know it's quite a mess outside of my clean perimeter, but I do as I can. You can see one light in the foreground, but there is also one (less visible in the background), symmetrical to the first one, and a third one behind and above the camera (outside of the picture).
You may also notice a lot of sorting boxes. Sorting pieces can greatly improve your productivity, if you label all your box correctly. Covered by the greenscreen is essentially a shelf full of these sorting boxes, labelled by colour and piece type, and it was really practical. Anyway. Thank you for reading until this point, I guess ? If you survived through all this rambling, you probably deserve something...
I mean- Have these pictures I took during the exhibition, I guess...


(You can notice that these are two different days because of the ships’ placement).

✨Custom water Toa !✨
Another one ! (Slightly less giant)
Details below the cut !
Front/back views


That one, too, is experimental, albeit in another style. I tried to remain closer to actual Bionicle size this time. Many fun details and technics here, so we’ll go from the feet all the way toward the head.
So, starting with the feet ! I have a complex of normal feet and Visorak legs held by a single connector. They have a wide angular range, but given that the connector connecting the socket to the feet is alone, a foot can also have a 360 rotation angle horizontally (not natural-)
The legs don’t have much special traits, except the upper legs using two socket with axle holes on top and a silver foot as armor on the side.
The body is where things get interesting. The Rahkshi silver shell is held by the silver claw above it at a chest plate, while part of the back is hidden behind a Rahkshi foot. The body is very triangular because it’s framed by these sockets with a silver piece in the middle, which gives it a nice aesthetic. The arms are an equivalent, with some tubes directly in the shoulders to offer a flexible piece which also limits the movements.
Finally, the head is not a head. I’ve made it like that because of the translucent Kanohi, that way it looks brighter, the inconvenient being that the backside of the head is quite literally an empty shell.

Now for the lower part of the arms : no socketed hand because who needs hands when you have a trident (bident ?) ! The main piece obviously comes from a Rahkshi, and the magic is wishing the silver connector. It used to be a lightsaber hilt from the larger Star Wars figs, but it looks good practically everywhere, including here !
Also, here below is a picture of the angle range of the arms (not much, oops).


✨Bouldering wall !✨
I reeeally wanted to make one of these at some point, but never took time. Incidentally, I got commissioned — is it even a commission if it’s for a relative and I’m not paid ? — so there is is !
Closeups and details under the cut, of course !
Closeups :


So ! This was a lot of fun to make, with some really interesting techniques. The first thing is that overhang with an increasing angle at the top. A large part of it is just a big plate connected to the base by hinges, while the second part is connected to the first one, instead of the based, to make sure that when something break, everything break only attach one plate to the base, to provide a thin finition. The holds have nothing particular, except perhaps that some start 'in' the wall while some are on it, which is here to pretend there are micro holds — possibly the worst invention of the story of bouldering/j. The top layer of the wall is finished by 1*1 held horizontally by the outside the plates. Speaking of, the triangular plates holding these 1*1 are not connected to the rest of the outside plates at all. Instead, they’re connected directly to the overhang, which keeps the plate at that approximative angle.
But of course, the most important detail : the minifig hanging with its bare hands ! I knew from the start that I wanted it to be in that type of position, and the choice of purple holds came easily (it’s defining one of the hardest level for the bouldering center we usually go to). Of course, I wasn’t in possession of any purple piece a minifig could grab, because that would have been way to easy. So instead, I used magic science a trick, which you might have seen if you pay close attention to the hands of the fig. The 'trick' in question is that I managed to get my hands on a thin elastic thread, which is around the fig’s wrist in a loop, and then is stuck between the purple stud and the round grey tile — which, by the way, makes for the second worst type of holds in bouldering : rings — and since these pieces are on the second overhang, the rest of the thread is hidden, and not stuck between two plates, unlike what I did in my Carrion MOC, which tends to dealign pieces, which leads to broken MOCs (not the Carrion one because there’s too much tension for it to break), which I don’t want because this is meant to end up as a gift for someone I won’t be able to visit often to make maintenance, so it has to be sturdy (and it is !).

✨Progress pride flag !✨
Yay ! Finally some colours ! This was definitely trickier to do, compared to all the other ones, because of the triangles, but I like how it looks !
See previous here.