
I print and paint minis! take a look if you want He/Him
50 posts
Something A Bit Different To What I Usually Paint, But I Saw This Model And I Just Really Wanted To Paint

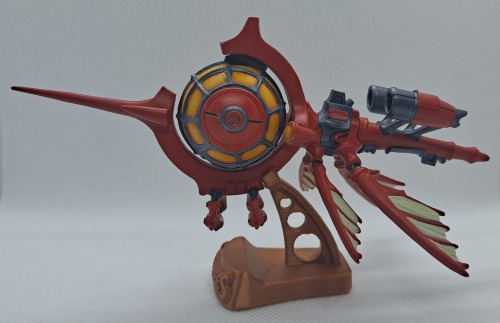


Something a bit different to what I usually paint, but I saw this model and I just really wanted to paint it! Its just such a neat little model, especially that spherical cockpit.
The model is printed in resin on my Mars 2 Pro, and the stand was done on my Prusa in a copper silk filament. I love that copper silk for decorative things, it just looks so good.
It is a bit messy in some points, mostly because painting the cockpit wrecked me, it wasn't until I actually started painting it until I realised how fiddly it was to do. My metallic covers way better than my yellow does, so every little mistake took quite a few careful coats to fix.
That said, I really like how it turned out all the same! Most of my messy points fade away once its a on a shelf rather than right up in my face at painting distance.
The model is Red Stinger by Heriberto Valle Martínez.
-
 panicedgannet reblogged this · 2 years ago
 -
panicedgannet liked this · 2 years ago
-
 dimestorehobby liked this · 3 years ago
 -
 mastermatoyas reblogged this · 3 years ago
 -
mastermatoyas liked this · 3 years ago
-
 sleepyforestbeast liked this · 3 years ago
More Posts from Gooseofthevoid


Clockwork minotaur and shield golem! Metallic paints are a lot of fun to play with.
The clockwork minotaur was a lot of fun both to paint, and to design a base for. I imagined this guy as being some sort of gladiatorial arenas trump card, for cocky fighters to get wrecked by. Its my first attempt at a base that tells a bit of a story about the mini, rather than just being an attempt at a terrain it might be found in.


Beholders! And an old gazer, because he makes me laugh. The beholders were the first thing I painted once I got my hands on an airbrush, and they made playing around with it super fun. The blue one got significantly less fun once I realised I'd commited myself to painting half a million tiny spikes though.
I also really enjoyed painting the big central eyes, particularly on the green beholder. You might recognise that eye if you look closely ;) .
The lump on the gazers tongue over on the right is from where I managed to snap it in two while painting, followed by hasty and poorly thought out superglue+baking soda repairs. I like to imagine he maybe got stung by a bee on it right there. Serves him right for licking the floor like that, the gross little eyeball :P


This hill giant was a bit of an experiment with the airbrush. I tried doing his skin by doing a zenythal prime, then spraying over it with transparent ink to get easy highlights and shadows. It sorta worked, but I'm not convinced by the skin tone and I kept having to start over because I'd try adding a wash before the ink had fully set. After the third time I had to start over completely on him I just couldn't be bothered to take another shot at it and left the skin tone as it was.
I also tried making his fur look a bit like grass, I thought it might be a cool idea if when sitting down he could be mistaken for a hill. It doesn't quite look right to me though in the end.
IDK, I'm just not totally sold on this guy overall.

A whole collection of buggy minis. Most of these are from earlier on in my attempts at painting, since the bases are all pretty plain.
It was when I was painting all those spider thingos at the back that I realised how boring it was having just a whole bunch of minis all in the same pose. Since then, I've made a concious effort to find multiple poses when I'm printing more than just 1 or 2 of a creature. It makes finding minis a bit harder, but I think its worth it for a more interesting end result.

And finally for tonight, this is either the first or second mini I ever painted, I'm not entirely sure. I've definitely come a long way since then, but I like keeping him around as a reminder of how much I've improved for when I get frustrated at a mini not turning out quite how I hoped :)

As promised, the finished Octopus, waves all dried and painted. Those bubbles are definitely in the way, but you can still make out theres an octopus in there, so its not a complete loss :).


Different angles, and next to one of my sharks. Tried doing the waves slightly different for the octopus, but I think I prefer the ones on the shark in the end. Oh well, still looks pretty nifty anyway :)
Making the resin dam: Here.
Pouring the resin: Here.
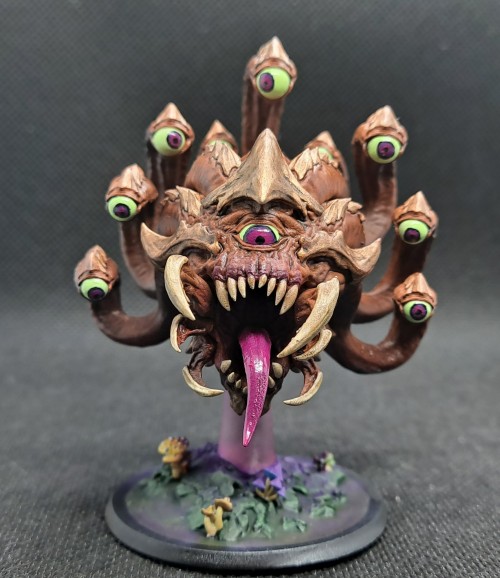


This is the third beholder I've painted.
I might have a problem :T
I just really like them. Maybe its because each gets to be unique and different.
Maybe it's because they're such iconic monsters.
Maybe it's because, unlike regular minis, the eyes aren't tiny little specks that require perfect pinpoint precision to paint.
Anyway, I really like how this one came out. I played around a bit with the airbrush on this one, and tried out doing a little bit of purple undershading in which I think turned out quite well, though it could've been maybe just a touch lighter in retrospect.
I printed the support piece separate from the mini and base, so I could do it in transparent resin and give it a purple stain. My thought is it's meant to be a sort of psionic pillar of anti-gravity or something. (because psionics are purple, as we all know).
I also had a go at making a glow effect on the base around the support, something I've been nervous to experiment with so far. I'm always worried about ruining a paint job I spent hours on, but since this base is a simple and quick paint job it was the perfect bit of low-stakes practice.
This model is Beholder by Lord Of The Print.


I painted this wyvern like two weeks ago, but my brain didn't let me take pictures of it until today for some reason ¯\_(ツ)_/¯
Which is weird, because I'm pretty happy with how it turned out in the end. Painting a well detailed sculpt like this is a lot of fun, because I can mostly just dry brush all those scales to get a really nice result. Of course, knowing that made me decide to paint this up as a 'quick' project on a sunday night. Which it was, until I realised I also had to paint all those spines. With my bone white that doesn't cover very well. Yeeeaaah, I didn't get this done in one night.
Anyway, despite my questionable project timing decisions, this is done now and I have a sweet wyvern for my collection!
This print is Wyvern by Lord Of The Print.

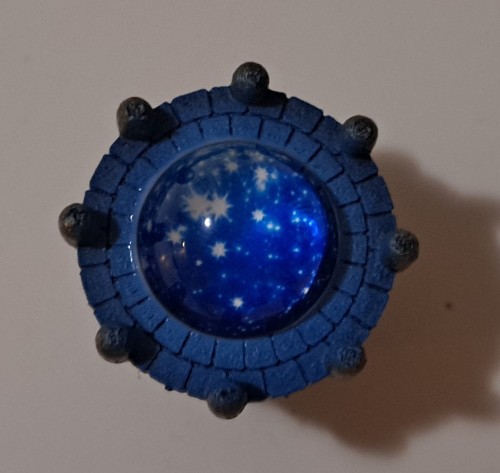

I was playing with a cheap necklace I got off wish a while back, and managed to break this starry cabachon off it (I threw it into a fan on accident, no further questions).
I thought it was a cool little piece, so I went ahead and put together a wizardy table for it in fusion360, printed it out, slapped some paint on it, and here it is! Just a quick little scatter piece. I guess the ruined portal from my last post has me in a wizardy mood.
I like using fusion360, I'm still fairly inexperienced with it, but that just means I can learn new things each time! This time I figured out how to use the sweep tool to create the swoopy tubes running up the sides of the table.
Also pictured, Edwin, my sorcerer PC from a Curse of Strahd game I'm in! He was the most wizardly character I had on my shelf. I should fix that at some point.
If you want to get the file for this, you can find it here.