Traditional To Digital - Tumblr Posts


Tv girl Vox and Radiohead alastor
Their outfits were just based on when I looked up their asthetics on Pinterest :D
based on this I’m not original with my humor

I feel a bad for Angel tho because for his BIRTHDAY I posted his abuser’s boyfriend and his boyfriend’s abuser 💀

Fun fact this started out traditional 😦
I don’t know where else I can upload this....
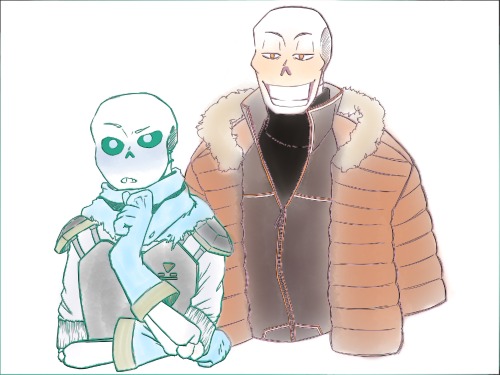
it was colder than usual in Snowdin, so the two brothers dove into their wardrobe to look for warmer clothes.
US!Sans: Paps, don’t you think it’s unusually colder today?
US!Papyrus:...
US!Papyrus: no?
Day 13 (Success)
I got delayed on uploading this because of internet problems, but I did manage to finish it. Go to my Ko-Fi to see this without the trippy lineart. But it does look pale...?
I don’t know who owns UnderSwap
FebruAU hosted by @davidthebusy and @februaus

Day 14 (Success)
I am surprised to know that Error and Geno is the same person. I mean- When was this???
THIS IS NEWS TO ME
Errortale (Error) and AfterTale (Geno) by @loverofpiggies
FebruAU hosted by @davidthebusy and @februaus
How to edit traditional art for social media
Being a mainly traditional artist myself it always irks me a little when I see sketches or even full illustrations being posted without any proper editing, making for a terrible presentation of an otherwise great piece.
So here are my tips for making your art not look shit in just a few easy steps.
You don´t need a fancy scanner for this, but if you have a digital camera at home I´d recommed you to use that instead of your smartphone. (However smartphone photos are also okay! Use whatever you have on hand)
Take a photo of your piece during the day in ambient lighting and try to make the paper lie as flat as possible. Avoid direct sunlight and artificial light as both will lower the quality of the picture. The inital photo will look something like this:

Not exactly breath-taking, huh? but don´t worry, we´ll get this prettied up.
Open the photo on your computer and turn + crop it

For the following editing I use Adobe Photoshop CS2, which is legally available as a free download, so there really is no reason not to get it. It comes with everything you´ll need for the edit.
(Unfortunately I have it set to German but I did my best to make my steps understandable)
Now, let´s get on with the edit! Select “Image” (Bild) in the top bar, go to “Adjustments” and first of all set the “Saturation” to zero (if you have a black and white drawing)


After that, pick “Brightness and Contrast” (also found in “Image” –> “Adjustments”) to brighten up your piece some more

Aleardy much better, hm? But as you can see, the bottom-left corner of the image is quite a lot brighter than the upper-right one, which prevents you from getting an even result.
Thankfully, this problem is easy to fix.


This way you can even out the brightness of the overall piece and finally use the “Brightness” and “Contrast” sliders one last time to get a clean result

This is already pretty good, but if you want to go the extra mile, you can use the eraser tool as well as filters (such as the liquify tool and sharpness) to remove little sketchy lines or fix small mistakes (classic example: adjust the position of the eyes to make them look more symmetrical)

And that´s it! With just about 5 - 10 minutes of editing you can get your drawing to look clean and presentable! (Coloured illustrations are usually easier to edit, just play around with “Brightness”, “Contrast”, “Color Balance” and “Saturation” until you manage to emulate the original look of the piece.)

I hope that this tutorial will help you level up your own editing from now on. Play around with new settings and see what works; you might discover even more useful options in the future!