Feminist, proud, strong, cosplayer...
247 posts
Eternalnight8806 - Eternalnight Cosplay - Tumblr Blog

Step 1 of Naraku build complete. Only 4.99 billion more to go! 😥😂😂
Houseki no Kuni Wig with TranspArt Tutorial

I just got back from Cosplay America in Raleigh, NC and I’m really excited to share how my Amethyst wig turned out! I watched Houseki no Kuni after seeing a bunch of lovely pictures of people cosplaying from it, and once I finished the show I started kicking around a few ideas of how I could make a wig that had a glass-like finish like the way the 3D models are rendered.
For a walk-through on how I made this wig, please read below the cut! (Header photo taken by Coffee_cat_cat on IG.)
This tutorial, as well as future tutorials, will be cross-posted to my Patreon account! It will be 100% free always, but is another way you can keep an eye on my cosplay tutorials and write-ups.
Keep reading
Omg if this ain't true idk what is! 😂😂😂😂😂
a lot of people take up hobbies to reduce stress and clear their minds
then there are cosplayers

Is the hairline of your wig causing irritation? Sometimes wigs meant to have lots of volume will have highly teased hair at the hairline. If that teased hair tends to irritate you, this wig hack is life-changing. 🌟
hello!! id really like to cosplay pink diamond from steven universe. the design is relatively simple but im completely stumped on how to go about the wig. i want it to be as voluminous as i can but im not sure how to execute jt. do you have any suggestions? ty in advance!!
Have you seen yarn tails? You use yarn to make a tail and brush it out with a cat brush to get the fibers to look like hair. The result is usually quite thick and fluffy. I think if you combined this method with a yarn wig, I think you could get that extreme volume/floof without the weight of a bunch of wefts.
I thought about an afro wig but I think it would give you the shape and volume but not the wispyness of the bangs and sides. Hmmm. Maybe you could look into the beehive hairstyle and create a similar base using foam inserts and teasing. Then style the hair around your base to get the nice floof. Or you could completely construct a base out of foam and add wefts over top, to give the illusion of floof!
Hope this gives you some inspiration!
— Duckie / Admin / Support the Blog


This is how I make my cosplay swords! If there are any questions, or if anything isn’t clear, feel free to ask me anything. The template I mentioned: sta.sh/21u4m1riua1s ((By the way, I’m going to Megacon next week!! I’ll be cosplaying as Alice Angel, Bendy, Vio Link, and Shadow Link!))
Cosplay Scaling and You
Hey guys, so I’m gonna delve a little bit into my process of planning a cosplay. Something that I think is pretty important and can be often overlooked is scaling your cosplay or prop to fit you. There are lot’s of methods on how to do this, but I’ll be sharing mine.
*For this example, I’m going to show you how I scaled my Holy Blade (from Sailor Moon) for my Serenity cosplay.
Things you’ll need:
measuring tape
a ruler or yardstick
calculator (optional)
paper and pen/pencil
reference images
Step 1:
First, you’re of course going to want reference images of what you want to scale to fit your size. Obviously in the case of your prop you want as many close up shots for detail as possible. However, I’m going to stress that you look for an image with either your character holding the prop, or if you can somehow manage, a side by side image of your character and their prop.


(Images like these are incredibly helpful)
Step 2:
Next, you’re going to want to measure the distance from the top of your head to your chin. For this example, I’m going to be saying the measurement came out to 10”. Keep your measurement written down somewhere so you don’t forget it later.

Now, using your measuring tape again, measure your characters head. Let’s say Sailor Venus’ head was 1” from her chin to the top of her head.

This means, that our conversion rate is 10” to every 1” we measure in our reference image.

Let’s say the Holy Blade measures roughly 4 1/2”, that means our sword should be 45”.

However, in my case those extra 10” would have made this ridiculous to carry around the convention floor. So in some cases you might find an accurate sized prop might be too large to work with. That’s fine, just fudge a little!
You can apply this method to scale out things other then props too. Things like wings, dress trains, tails, and other cosplay parts can be broken down with this method.I hope this was helpful, and good luck cosplaying!
☽ Sailor Moon Cosplay Resource Guide ☾
Sorry for the radio silence this is a hectic time of the year for me. If you follow my blog you know I have a resource section where I share sites or resources I think are helpful.
For a few months now I’ve been compiling a pretty big list of Sailor Moon Resources. It’s gotten to the point where I consider is a pretty good index for anyone looking to cosplay from the series, and includes things like written/video tutorials, kits, and where to buy certain things. This is a LONG list with attached links, if you know of tutorials that I’ve left out feel free to add them and I’ll update as they are added. All content belongs to their respective op’s as listed. Hope they are helpful and good luck cosplaying! Resource guide can be found under the cut ☾
Keep reading
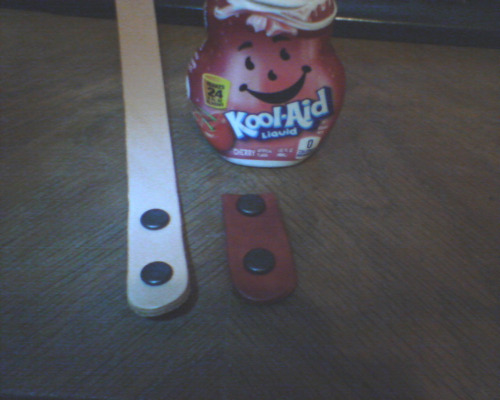
Here’s a “life-hack” for you. Apparently concentrated Kool-Aid can be used as a pretty effective leather dye. I was making a drink while cutting the snaps off some new straps for my pauldrons and I got curious, so I tried it, thinking, “ok even if this works, it will just wash out.” Nope. It took the “dye” (undiluted) in about 3 seconds. After drying for about an hour and a half, it would not wash off in the hottest tap-water. It would not wash out after soaking for 30 minutes. It did not wash out until I BOILED it, and even then, only by a tiny bit and it gave it a weathered look that was kind of cool. Add some waterproofing and I’d wager it would survive even that. That rich red is only one application too. Plus it smells great, lol. So there you go, cheap, fruity smelling leather dye in all the colors Kool-Aid has to offer.
@mangosirene She's my idol. Or my cosplay senpai... Lol ♡♡

Cosplay 101: Adhesives
This is meant as a beginner primer for adhesives (that we use [enough to know a bit about {mostly}]). This is meant as an outline that covers the general details of each kind of adhesive. The links direct to the wikipedia page on the adhesive if you want to know more about the full details.
Cyanoacrylate: CA glue for shorthand, aka Superglue or krazyglue. However, if something is marketed as a super/krazyglue and doesn’t contain cyanoacrylate, it’s not a CA glue. This is our go-to glue. It’s strong, but a bit brittle and can melt the crap out of some materials.
Pros:
Strong
Widely available
Cleans up with acetone nicely
Can glue most things together (EVA foam, paper, styrene all work well)
Many consistencies available (thin, thick, gel)
Quick dry/cure time, can be quickened with CA accelerante
Can be mixed with baking soda for an effective gap filler (CA cement)
Safe to use on EVA foam
Readily available anywhere that sells adhesives
Cons:
Fumes/strong smell, ventilation and/or a respirator required if working with large amounts of CA glue
Brittle and non-flexible
Melts polystyrene (EPS/XPS foam aka Styrofoam)
Fumes can leave cloudy residue
Rapid exothermic reaction with leather, cotton, and wool that can cause burns and even fire
Shelf life of about a year unless kept somewhere dark and cool (like the fridge)

Polyvinyl Acetate: Also known as white glue or Elmer’s glue. Useful but a bit basic and requires open evaporation.
Pros:
Pretty safe, just don’t straight-up drink it or rub it into your eyes or nose
Great for paper and other open structure materials (fabric, some open-cell foams)
Widely available
Water-soluble
Inexpensive
Readily available anywhere that sells adhesives
Cons:
Relatively weak and brittle when cured
Needs open-air evaporation to dry
Water-soluble
Long dry/cure time

Gorilla Glue: We’ve used this one a few times and it seems to work fairly well
Pros:
Strong bond
Non-solvent, won’t melt things most of the time (stable with XPS foam)
Readily available anywhere that sells adhesives
Cons:
Needs clamping/pressure to cure properly
Long cure time
Expands during cure process, can squirt/drool out of joint (might be a good thing too, though)

E6000: A strong and flexible glue, great for fabrics or gluing things to fabrics.
Pros:
Very flexible, can hold up to a little stretching even
Strong bond with a bit of surface sanding
Can glue many kinds of things together (EVA foam, fabric, styrene, paper, leather all work well)
Dries clear (though air bubbles and edges can be visible)
Readily available anywhere that sells adhesives
Cons:
Solvent-based, will eat through polystyrene, pretty pungent smell
Long cure time
Can smear easily during curing
May ooze out of the tube and glue the cap to itself (plies might be required to unscrew the cap if this happens)

JB Weld: An incredibly strong 2-part epoxy. I use this a lot to strengthen a mechanical joint.
Pros:
Incredibly strong, can be used to join engine parts together
Fairly shock resistant
Works great on most surfaces
You can drill, tap, sand and carve it once fully cured
Cons:
Very long cure time, about 24 hours
Not flexible at all
Requires a very good joint and a lot of surface prep
Can be brittle under torsion
Needs more cleanup than single-part adhesives

2-part Epoxy: This is a massive group of adhesives so I’m only going to mark the basics
Pros/Cons:
Strong
Cure time can vary from a few minutes to days
Needs more cleanup than single-part adhesives
Ranges from glass-hard to pretty flexible after it cures

Hot-melt adhesive (aka Hot glue): A craft standard and fairly material-safe way to adhere things together.
Pros:
Works on everything that doesn’t melt or [easily] catch fire
Fairly strong with a good joint surface
Pretty safe if you don’t touch the nozzle or glue while it’s hot
Safe to use on polystyrene
Great for EVA foam armor/props
Inexpensive
Glue itself can be versatile and used for filling molds.
Glue sticks can come in a variety of colors
Cons:
Can be a bit messy, nozzle keeps leaking sometimes and leaves threads of hot glue everywhere
May be visible under thinner materials if the glue isn’t smoothed out
Can straight-up melt or ignite some materials (spot test or look up the melting point of the material)
May be only semi-permanent in some cases, depending on the surfaces
Can melt when exposed to heat (don’t leave pieces glued together with hot glue in a hot car)

Contact cement: An adhesive that is applied to both surfaces, allowed to dry, then pressed together. Barge and Weldwood (US) are brands commonly used in cosplay. Rubber cement is not a contact cement.
Pros:
Very strong, practically permanent once bonded together
Great for EVA foam armor/props (the main go-to for a lot of foamsmiths)
Cons:
Fumes require ventilation and/or a respirator
Requires a ready supply of brushes for application
Shelf life up three months to a year depending on storing conditions. Throw away if the cement begins to set up in the container
Melts polystyrene
Cures in 5-10 minutes, but EVA foam may require a second coat due to its tendency to absorb materials
A beginner’s guide to choosing and working with fabrics for cosplay

Choosing the right kind of fabric and treating it right when sewing can greatly improve the finished look of your cosplay. Here are a few tips on how to decide what fabrics to buy and how to treat and work with it when making your cosplay.
Deciding what fabric to pick
So you have picked a character and decided to make the cosplay yourself and are now ready to buy fabric for it.
The first thing you need to do is to find a couple of good reference picture of your character from different angles and see how many different fabrics you will need.
The next step is to try to decide what kind of fabric you will need, this step can be really tricky if you don’t have any previous experience with fabrics.
A good way to start figuring it out is to think about what qualities you want the fabric to have. Is the character wearing a formfit catsuit? Then the fabric should be stretchy like a four-way stretch spandex or a lycra. Is the character wearing a corset? Then the fabric should be stiff and a bit thicker. Is the character wearing a light and airy skirt? etc etc Write up the qualities you want the different fabrics in your cosplay to have and start doing some research.

Look at what kind of fabrics other people used in a similar garment or what recommendations the sewing patterns of the similar clothes say.
Another tip is to think what kind of person your character is. Is it a princess? Then maybe the fabric she would wear would be a bit more expensive looking and not just a simple cotton. Is it a hobbit? Then maybe the fabric should be natural and not synthetic.
Difference between Synthetic and Natural fabrics:
There is a lot of different kind of fabrics but they all fall under two main types; Synthetic and natural fabrics.
Natural fabrics are made from either the fibers of plants or animals (wool, hair etc). Examples are: Cotton, linen, silk, wool etc.
Synthetic fabrics are made from fibers made in scientific way and are produced from chemicals. Examples are: Polyester, Nylon, Spandex, acrylic etc.
Blend fabrics is as it sounds a mix of the both fibers to create a textile that has properties from both fibers.
Buying fabrics in store vs online:
If you have access to a fabric store that sells more than just curtain fabrics then it’s a great opportunity to get to know how different fabrics feels and works. Don’t be afraid to take help of the employees of the store and ask what kind of fabric would work for the garment. Bring a photo of your character so you can check how the color looks and if you already have a piece of your cosplay ready and you need a fabric in a similar color take a sample with you so you can check so it match.
I highly recommend bringing a camera (or your phone) to the store and take photos of the fabric you are thinking of buying. Most fabric looks different with a flash and can get really shiny or change color. Since you probably want photos of your finished cosplay it is important to check so the fabric looks good both on and off camera.
This is for example photos of the same fabric taken in different lights:

If you don’t have a fabric store close to you or could not find the fabric you were looking for, buying fabrics online is a great second option. Buying fabrics online can be hard since you don’t have the opportunity to touch it, feel it and see how it flows, it can also be hard to see the exact color of it. I therefore recommend that you order some fabric samples of the fabric you are interested in before buying several yards of it. Fabric samples are often not very expensive and it is a great way to get to see how it looks and feel before deciding.
A tip is to save the fabric samples or cut out a piece of your fabric and write on a note what kind of fabric it is and where you bought it and then save it in a folder. This makes it really easy to later when you are going to make another cosplay to just check the folder and see if any of those fabrics would work for that cosplay.
Keep reading
Fake Chain
Tutorial by: scubaspook1 Tutorial Link: https://www.youtube.com/watch?v=KeXdsY1n7vg
Paper Mache Tricks and Tips

In the age of thermoplastics and resins paper mache seems a little unglamorous and low-tech, but it’s still worth considering as a material if you’re getting into prop and armor-making. If you have low budget for your project but plenty of time in which to complete it, it’s worth a thought.
Keep reading

Oh, hello. Where have you been all my life?

I saw Lindy Hemming’s work in Wonder Woman and I almost cried. Scratch that, I did cry. Lindy Hemming didn’t use fetish lingerie as her starting point, she used armor. Actual armor. Roman armor, to be specific. Romans made armor out of overlapping bands of very heavy leather. Because it was organic material, very little of it survived, but here’s a fragment:

You can see this same technique clearly on Antiope in Wonder Woman:


And you can see it here on Diana:

It’s been highly stylized on Diana, but the inspiration, the intent, is there:

Remember when I said sometimes I can tell exactly what a designer was looking at when they designed something? This is a piece of Roman leather armor made out of a crocodile hide:

This is one of Hippolyta’s costumes. I almost squealed out loud in the theater when I saw it!

All the Amazons had fantastic, warrior-based details. The folklore about Amazons cutting off a breast so they were better able to fight? (which has no historical basis, btw) Lindy Hemming gave them a metal breast plate on one side:

And, as a side note, can we talk about the casting of the Amazons? All those gorgeous, strong, athletic women of all ages… swoon!
Yes, Diana’s costume has been stylized and they made her attractive, but that costume first and foremost is armor. It’s functional:

That skirt? The shape is Roman, cut high over the thighs so it doesn’t impede movement:

Those aren’t sexy thigh-high boots:

They’re Roman greaves, meant to protect, and they buckle on. Again, ARMOR!

With Wonder Woman, the starting point, the INTENT, is everything. The reason I literally cried watching the Amazons fight is that FINALLY, somebody started at the right place. That design showed respect. The intent, right from the start, was to portray those women as warriors, and that, at least for me, made all the difference.


How I transfer from drape to parttern! (( this is not the only way or necessarily best way))
🔸1. Before you take the piece off the form LABEL EVERYTHING: what the piece is, lines to match everything up, all seam lines. 🔸2. Trim all the excess fabric to the seam lines. 🔸3. Pin to muslin and add seam allowance. Cut out. 🔸4. Use the muslin pieces to make a mockup. Try it on (and twirl ✨) 🔸5. Mark adjustments, remember to count in seam allowance. 🔸6. Seam rip and iron, add any additional allowances for linings/facings. Pin to fashion fabric and cut 🔸(optional: pin and trace the final mock up pattern piece to butcher paper for a paper pattern. (At this point I typically don’t do this because of time))


Repainting Faux-Leather bags/accessories
This is a tutorial of how I made my Weiss Schnee satchel , using a bag I got from Good-Will.(photo of Weiss Schee bag for reference)
Top photo: The supplies you will need for this project.
- Rubbing alcohol( I used 50% because its what I had on hand, but 20-90% should work just fine as well)
-Cotton balls(number needed variety depending on the size of your bag, I used three for this clutch)
-Paint, in the color’s you want your bag to be(in the photo there is tan, black, silver, pearl, and white, to achieve this look)
-Clean make-up sponges(or paint sponges, up to you)
-This wasn’t in the photo, my apologizes, but a seam ripper and/or scissors will also be needed.
-Another missing item from my photo is a sealer/finish. I used a liquid mog-podge, in matte finish, but that’s just personal preference.
Photo(s) 2-4: (2)Front view, (3)back view, (4)inside view
Steps:
1. Remove any piece that are not wanted for your bags look using a seam ripper, such as a zippers, tassels, handles, straps, etc. I would only use scissors if you have to, because you can ruin a piece by cutting the wrong seam.
2. Soak your cotton balls in the alcohol and clean you fax-leather bag completely. Make sure you get all creases, nooks, seam-lines, and over lapping fabric, any oil/dirty left on your piece can ruin your paint job.
3. Apply your first coat. Your paint needs to be either acrylic/leather paint. You will probably need multi-coats of your base if your are changing the color drastically, like from black to white. Use a very opaque color as a base( I used tan because it’s my most opaque color and its a neutral)
4. Keep layering your base coat until you can’t see the original color of the bag, using your sponges. Let it dry from between 10-15 min. in between coats.
5. Once you achieve complete coverage move on to your main color. Layer this color as well until its fully covered, then let dry over night.
6. Once completely dry apply your sealer/finish to your satisfaction/direction of your finish.
Note: Feel free to use painters tape to cover an area that you don’t want painted, such as a clip/decoration.

Foam & Sharpies: two of the biggest weapons in my cosplay arsenal! Did you know that you can use Sharpie markers for coloring plastic gems? It works beautifully, it doesn’t cut down on their translucence at all, but allows you to turn in any color you need! A super cheap way to convert gems when you can’t find exactly what you need in the right color! These are for my new NoFlutter costume that I am working on! Instagram Facebook Twitter `
Some tips to make sewing with vinyl/pleather easier.
Want to learn how to cosplay? Check out the rest of my channel! New tutorial videos every Monday and Thursday with extra bonus content sprinkled throughout the week!
My Website: http://www.koumorinohime.com/ Facebook: https://www.facebook.com/KoumoriNoHimeCosplay Tumblr: http://koumori-no-hime.tumblr.com/ Twitter: https://twitter.com/koumori_no_hime