
Theres Still Some Unused Space Left


There’s still some unused space left 👁 👄 👁
-
 julliessims liked this · 2 years ago
 -
 unnatural-sims liked this · 3 years ago
 -
 freelysassynerd liked this · 4 years ago
 -
 unusual-and-strange liked this · 4 years ago
 -
 shtvintages liked this · 4 years ago
 -
 carouseliasims reblogged this · 4 years ago
 -
 flayedsheep liked this · 4 years ago
 -
 nooobooo liked this · 4 years ago
 -
 guttersims liked this · 4 years ago
 -
 simpuke-finds reblogged this · 4 years ago
 -
 nervousinspo reblogged this · 4 years ago
 -
 lilacssweets liked this · 4 years ago
 -
 g4yr4t reblogged this · 4 years ago
 -
 bigwands reblogged this · 4 years ago
 -
 i-love-books-because-reasons liked this · 4 years ago
 -
 myeffinsimblr liked this · 4 years ago
 -
 pleasantlycaliente reblogged this · 4 years ago
 -
 siminaiwen liked this · 4 years ago
 -
 dustinbroke liked this · 4 years ago
 -
 pasket liked this · 4 years ago
 -
 boolpr0p liked this · 4 years ago
 -
 muymuysugoi liked this · 4 years ago
 -
 peachm liked this · 4 years ago
 -
 plumbbobtoggled liked this · 4 years ago
 -
 sparklystrangerdream liked this · 4 years ago
 -
 hyleneavvinter liked this · 4 years ago
 -
 sinjin-balani liked this · 4 years ago
 -
 keoni-chan liked this · 4 years ago
 -
 sacerdotalist liked this · 4 years ago
 -
 enjoji101 liked this · 4 years ago
 -
 besiderata liked this · 4 years ago
 -
 sims-for-semi liked this · 4 years ago
 -
 panicv0mit liked this · 4 years ago
 -
 lurking-lilibeth liked this · 4 years ago
 -
 merol-jpg liked this · 4 years ago
 -
 simpuke reblogged this · 4 years ago
 -
simpuke liked this · 4 years ago
-
 halveksuttava-henkilo liked this · 4 years ago
 -
 nerlika-blog liked this · 4 years ago
 -
 renfree liked this · 4 years ago
 -
 crystalvuu reblogged this · 4 years ago
 -
 maksplaygroundsims2 liked this · 4 years ago
 -
 irueone liked this · 4 years ago
 -
 anotherlazysimmer liked this · 4 years ago
 -
 simnthea liked this · 4 years ago
 -
 pikselis liked this · 4 years ago
More Posts from Vegan-kaktus
Tutorial: How to default the penguin
@grilledcheese-aspiration asked me if I had any step-by-step tutorial on how I defaulted the penguin, but I had none, so I made one! :-D (beware of long post and many pictures beneath the cut)

Before we begin, this is a tutorial on how to default the penguin and add new meshes to it, not just a simple texture replacement. If you’re wondering why I’m making a tutorial on this it’s because the penguin has too many morphs and can’t be exported out of Milkshape, but I found a way around that :-)
With that out of the way, you have to have SimPE with NVIDIA DDS, Milkshape with the plugins and the seasons expansionpack of ts2 installed. It might be possible to do this with blender or any other meshing program, but I will only be showing how I did it with Milkshape.
If you know how to extract files etc (the basic stuff), you might want to start at Part 2: Adding new meshes, 4. I would say this tutorial is fairly beginner-friendly, since I did my best to show every single step.
Part 1: Extracting neccessary files
1. Open up SimPE, search for “penguin” in finder and click on start:

(bigger image)
2. Scroll down a bit until you find the files we need: penguin_surface_txmt*, penguin_tslocator_gmdc, penguin_untagged0_shpe and penguin-surface_txtr. Double click on them one at a time to open them, then right click - extract and save them somewhere (you might want to name them txmt, gmdc, shpe and txtr so it’s easier knowing what’s what).
*I use Nopke’s penguin fix so if you do as well and don’t want your added mesh(es) to the penguin to be covered in snow, extract the txmt from his fix instead of EA’s original.

(bigger image)
3. You’ll want to double click on the penguin-surface0_lifo file if you’re planning on editing the texture as well to get the highest resolution of the texture. You're not supposed to extract it though, just right click on the image and choose export and save it somewhere.

4. Make a new package in SimPE: File - New or CTRL + N if you use any of Chris Hatch’s updated versions of SimPE.

5. Right click somewhere in the middle of SimPE and choose “Add”:

6. A window will pop up. Locate your extracted files (txmt, gmdc, shpe, txtr) and import them all, then save your file and give it a name.
Part 2: Adding new meshes
1. In my case, I’m going to show how I added the hat, but it should be fairly the same for whatever you want to add to the penguin, the only difference will be the joint assignment later.
2. Open your accessory/whatever’s mesh (in my case, the hat) in SimPE and export the gmdc by right clicking on it and choosing “extract”, then save it somewhere. You have to extract one texture as well. Open up a recolor, right click on the image and choose “export” (like you did with the penguin lifo file).

(bigger image)
3. Open up Milkshape and choose File - Import - Sims2 UniMesh Import V4.09A, then a window will pop up.

(bigger image)
4. Now, if your mesh you’re planning to add to the penguin is too big/small, you’ll want to import that mesh first and use Tools - Scale All... (it’s the third option from the bottom) and play around with it a bit until you get it the right size. I usually do it like this:
import mesh, scale and then import the penguin mesh to see if it’s the size I want. If not, I undo the import (CTRL + Z or Edit - Undo) and then undo once again to get the mesh back to original size. Then I do “scale all” again and repeat the process until I’m happy with the size.
Why you have to do it this way is bc if you have both the hat (in my case) and the penguin mesh in Milkshape when you use “scale all”, everything will scale, including the penguin mesh.
When you import the penguin’s mesh it will ask you if you want to “Create Blend Groups?” and then it will ask you “Some Skin Weights do not total 100%. Do you want these corrected?”. It doesn’t actually matter if you choose yes or no, since we will not be exporting the penguin mesh anyway so you can choose no but I clicked yes on both options bc you never know.

5. To move your mesh around in Milkshape, go to the “group” tab and double click on your mesh group to select it (it should turn red) and then go back to the “model” tab and click on “move”, then use any of the three grey windows to move your selected mesh around.
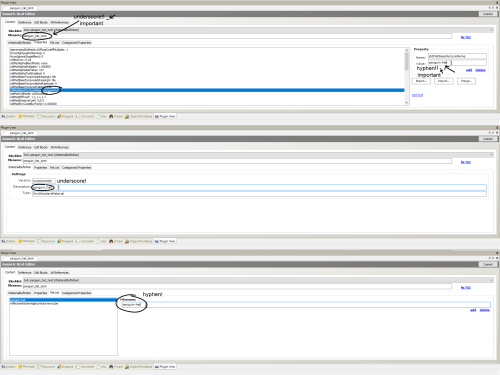
When you're happy with the size and have put the new mesh where you want it to be on the penguin, click on your mesh group in the group tab and rename it if you want. I named my hat group like this: (click on rename after you’ve edited the name, otherwise it won’t save your new name)

6. Then click on comment. A window like this will pop up:
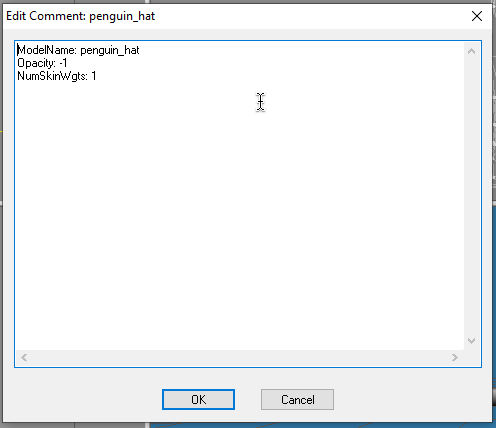
7. If you renamed the group, you have to write your new name at the top after “ModelName:” like seen in the image above. After ModelName: [insert your group name here] you should have something like: Opacity: -1 and NumSkinWgts: [a number between 1-3] like also seen in the image above. Click on OK to apply the changes. By now you’ll want to save the file as a .ms3d just in case something goes wrong. It’s always nice with a backup. You can save it by going to File - Save As... (or CTRL + SHIFT + S).
8. Now that you’re done with the mesh and has saved it as a .ms3d file, delete the two penguin_surface mesh groups and all their morphs if you clicked yes to the “Create blend groups?” (in other words: everything but your added mesh group). After that you’ll want to export it by going to File - Export. Export it as Milkshape 3D ASCII and save it somewhere.

(bigger image)
Part 3: Bone assignment
1. Before you can import the new mesh, you have to go to Extra - Preferences and check the "Advanced Mode" box then restart SimPE.
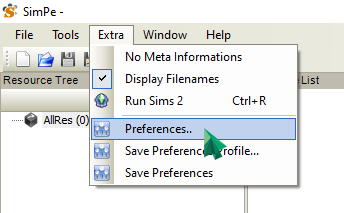

(bigger image)
2. After restarting SimPE, open up your .package file with all of the penguin extracted resources in SimPE and click on the penguin_tslocator_gmdc. Click on “import” and choose your exported Milkshape 3D ASCII mesh. It should then be added to the gmdc like this:

(bigger image)
3. Click on the groups tab, then select your newly imported mesh group. Now, you want to click on the bar under “Joints:”

(bigger image)
4. Then this list will pop up:
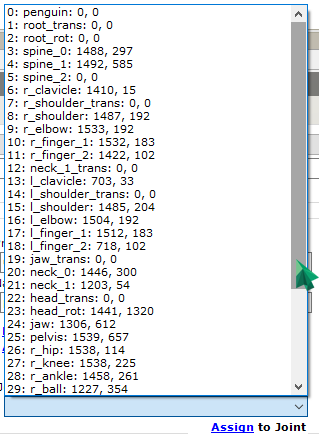
5. Now all you have to do is find the correct joint to assign your newly imported mesh to. It can be tricky to find the right joint, or perhaps it’s just me not being comfortable with joints yet haha :p I’m thinking the joints with “0, 0″ may be empty joints, in other words: the penguin doesn’t have/use them, but I’m not sure (but it makes sense, doesn’t it?). Anyway, when you’ve assigned it to what you think is the correct joint, click on “assign” and then click on commit to apply the changes.
Part 4: Creating necessary resources
1. Now that you’ve successfully added the mesh to the penguin, we need to create a txmt, add a txtr file and edit the shpe. We’ll start with the txtr.
If you want to edit the penguin’s texture, right click on “penguin-surface_txtr” and choose “Clone” so you get two of them. Open up your photo editor of choice, import the penguin-surface0_lifo_512x512.png and edit it (if you want to that is). When you’re done, save it as a .png, click on one of the two “penguin-surface_txtr”, right click the image, choose “Build DXT” and import your edited texture. Commit the changes. (These steps are shown down below if you don’t know how to import it.)
2. Click on “penguin-surface_txtr” and rename it to whatever your new mesh name is. In my case, it’s “penguin-hat_txtr”. After you’ve renamed it, click on “Fix TGI” (this is important since it gives your edited resource a new instance number so it won’t overwrite the original resource you extracted (or cloned it from). Right click on the image and choose “Build DXT”.

(bigger image)
3. Choose DXT3 or DXT5 (I never use DXT1, it completely destroys the quality. DXT3 is the one I use 99% of the time) click on “open” and find your mesh’s texture and choose it. Click on “Build” an then commit to save the changes.

4. Now it’s time for the txmt. Click on “penguin_surface_txmt” (remember you have to extract the txmt from Nopke’s fix if you don’t want your added mesh to be covered in snow during winter) and change the name to your new added mesh’s name. For me, this is “penguin_hat”. You’ll need to edit it in 4 places. After editing, click on “Fix TGI” and then on “commit” to save the changes.
(bigger image)
5. Now for the shpe. Click on "penguin_untagged0_shpe” and click on “add”:

(bigger image)
6. “Subset Name” is your mesh group name (the mesh group name in the gmdc) and “Material Definition File” is the txmt. For me it’s “penguin_hat” in both. Click on commit after editing to save the changes.

(bigger image)
7. And you’re done! Save the file, drop it in your downloads folder and see if everything’s working. If you use “boolprop testingcheatsenabled true” you can shift + click on the mailbox and under “Make NPC ...” you can choose “penguin” to force one to visit your lot. Simslice also has a penguin summoner here (<- booty link) it’s the “penguin_summoner.rar”. This is much faster than waiting for the penguin to randomly come by.
Help etc.
I think I’ve explained every step correctly, but it’s very possible that I’ve forgot something or made a mistake somewhere. Let me know if you find any! Also, if you can’t understand something, let me know and I’ll try to explain it again.
And ofc, if you need any help, feel free to comment, send an ask or message me :-)

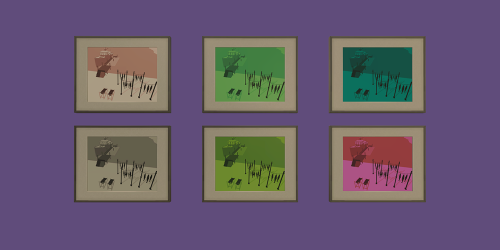
I played a bit in Photoshop with the colors and hey! It does fit very well as a painting :-D

Well, since I managed to get my game flashing a lot but not crashing at all I took the rare opportunity to admire the scenery. This one would make a pretty good painting, imo!


I’m back with another default! This time it’s for the mail delivery, and just like with my newspaper delivery defaults I have changed and fixed things in here as well. I’ll do my best to explain everything.
EA did a much better job with this clothing than with the newspaper delivery’s outfit, I’ll give them that. But once again; what was EA thinking when choosing shoes?? They are awful. Not anymore though! I shoeswapped afbodymaildelivery and ambodymaildelivery with MDP’s 4t2 shoes from here (recolored black by me) but with EA’s socks, bc.. idk. I’ll put the rest under the cut since I can’t keep it short ahah
NPC Clothing
Got rid of all shadows (AF+AM)
Made the color a bit more vibrant
Removed the logo on the shirt (AF+AM)
Improved the logo on the bag (AF+AM)
Fixed the logo on the cap (AF+AM)
Fixed the stripes on the shorts (AF)
Fixed the shirt (AM)
Fixed the belt’s “edges” to make them blend in more nicely (AF)
*Removed ribbon (AF) + added ribbon (AM)
Remapped the shirt a bit to better fit the non-ribbon version (AF) but it looks better imo with the ribbon as well so I kept it in both versions
Edited and added more details (belt etc) to the bump-maps (AF+AM)
*In other words, you can choose if you want the ribbon or not.
Another thing I’ve changed is the bag. It’s now a separate group and has it’s own texture (aubodymaildelivery-bag_txtr). I fixed the logo in Photoshop, but SimPE totally destroyed it again when importing the texture. It really bothered me, so I decided to do it like this instead so the logo can keep it’s quality. I also had to increase the size of uuhairhatballcapnpc-mblack and uuhairhatballcapnpc-fblack from 512x512 to 1024x1024 for SimPE to not ruin the logo on the cap as well. uuhairhatballcapnpc-mblack and uuhairhatballcapnpc-fblack is included in the clothing default, so it’s not a separate file.
NPC Hair
Included in the download is an optional hair default for afhairhatballcapnpc and amhairhatballcapnpc by me (replacing the hair for the mail delivery only). It’s a mashup (meshup? :p) of EA’s pixie hair and EA’s NPC cap. The male pixie hair is a conversion by Andie, and the cap on the male mesh is fansleelamb’s fixed male mesh. Andie’s TOU is to not restribute their meshes, but they haven’t been active since 2011 so I’m just going to cross my fingers and hope that they won’t haunt me down for this hahah. I had to get rid of the hair animation though, since it behaved really weird when I didn’t. I don’t have the motivation to dig into this problem deeper, so no animated hair it is. Sorry!
Unfortunately, you have to have university for my hair DR to work (I believe?). I extracted the resources from University, since I couldn’t get the hair default to work with the ones extracted from basegame (plus, de GPZS looked very different in those, and I wasn’t sure on how to edit them properly). I’m not sure though, as the files seems to have the same numbers, instances etc. So if anyone of you doesn’t have University, please try out my hair mesh replacement and let me know if it works! And if it doesn’t, anyone who wants to make it BG-compatible is more than welcome to do so, or if you know how I can make it myself I would be more than happy to learn from you.
The cap on my hair default is texture referenced to uuhairhatballcapnpc-mblack and uuhairhatballcapnpc-fblack, which is included in the clothing default.
There’s also three versions of this hair default available, which means you have to choose one. One of the files is texture referenced to EA’s afhairpixie textures from Freetime, the other one is texture referenced to EA’s afhairpixie from OFB (which I haven’t been able to test if it works as it should, so please let me know if it doesn’t!) and the last one is a custom version. The custom version is not texture referenced to any of EA’s txtrs, so for those of you who do not have OFB or Freetime or simply have a mesh default for afhairpixie you don’t want to delete, this is the file you want :-)
This means that if you have any texture default replacement for afhairpixie, my repositoried (aka my Freetime/OFB files) default will pick up that. I’ve made + listed some afhairpixie texture defaults here which are compatible with my mesh replacement. The ones I used in my preview here is deedee-sims recolors on shinasims’ alpha edit, which you can find in the link above. Since my custom version is not referenced to EA’s textures, you will have to swap textures in SimPE yourself if you wish to use any other textures than EA’s or shinasims’ alpha edit of EA’s textures (which are the custom versions I’ve included). If you don’t use SimPE and would like to get help with swapping textures, let me know! I’ll be more than happy to help you.
The female mesh pixie hair unfortunately has some small transparency issues in certain angles (which is weird, since EA’s original doesn’t have that). If anyone would like to try and fix it, you’re more than welcome to try and do so!
Bills Texture
Included in the download is also an optional, improved default replacement for the bills! Textures defaulted are:
mailbox-billsred_txtr
mailbox-billswhite_txtr
mailbox-billsyellow_txtr
mailbox-billsorange_txtr
The textures are still the same size (512x256) but I re-wrote most of the text to make it less blurry (more like, smashed random keys on my keyboard lmao). I’ve also replaced the stamps with colorful pictures. Some years ago, in Sweden we had pride stamps and I really liked those, so I thought it would be nice to have them here as well! I’m not part of the LGBTQ+ community (or at least, I don’t think so. But I mean, Bae Doona has tbh got me questioning my sexuality, not gonna lie) so I hope I don’t offend anyone by using it here. I totally support the LGBTQ+ community! Therefore I hope this comes accross as me being an ally, not “using” the flag or anything :-)

@itsdiamondeyesuniverse has a mod here which randomizes the mail delivery’s hair (+ others) and there are two bills mod here and here, which migh be of interest to you. None of these are required for my default, but they are compatible!
As usual, if you have any default(s) in your downloads folder defaulting the same thing as any of my defaults, you have to remove those before installing mine. Hopefully the anon who sent me this sweet ask a month ago sees this, and I hope you like this as well! :-)
All files have been compressed to reduce file size. Let me know if you stumble upon any problems, or if I messed up anywhere.
DOWNLOAD: SFS | MTS
Credits: @mdpthatsme for the shoes, @fanseelamb for their improved male cap mesh, Andie for the ftm pixie hair, @hafiseazale for their preview of the Bella statue I edited a bit and used as a stamp, iconfinder for the leaf icon and pngio for the blue crown icon.
I think that’s all? Happy simming!


I genuinely can’t decide if I like my textures or not, hmm. I’m also not sure if I want them to be so clean. I now remember why I didn’t finish them last year, ha-ha..
(These are the kids homework only, I haven’t started yet on the teen ones. Also, not my illustrations!)
[insert surpised pikachu face here]
I released a dollhouse default replacement last year, and I think it’s awful haha so I’ve been planning on re-doing it for a while. Anyway, EA’s dollhouse texture looks like this:

and this^ is the highest quality (aka the lifo file). However, I stumbled upon these when I looked around in SimPE:

it seems EA originally had plans on making the dollhouse's objects/walls etc have its own texture file. All of them have lifo files and they are in surprisingly high quality. Here are some of them:


Look at the RUG. Ahhh the quality! It’s so nice and sharp, compared to what EA decided to go with, yikes. So guess what! I’m planning on extracting, re-mapping etc to try and re-create EA’s original idea. I mean, the textures are already there, so why not actually use them! :-D