Materials - Tumblr Posts
Hobbies
Hobbies: listening to music, hanging with friends, going to the store to buy art supplies then putting them next to my other untouched art supplies. :)
Uses for cat whiskers in spells
-getting out of tight situations
-guidance
-spell bags for balance
-spell bags for travel
-put them in your car to escape accidents “by a whisker”
-spells relating to eye health
**please don’t cut/forcibly remove the whiskers from your furry friend. Just keep a lookout for them in kitty’s sleeping space or on your floor, they fall out quite often**

Special Mama Von Recipe for Samhain!
Black Salt, a powerful little ingredient for your spells, hexes, charms and more! Here’s my personal recipe for:
a) Protection
b) Banishing
c) Bad Luck Hex
You’ll Need:
Self-igniting charcoal
Plants/Resins that correspond to your intent
Salt
Pestle & Mortar
Optionally, pen and paper
Recipe 1: Protection
For my protective black salt, I used: Camphor, Benzoin, Angelica, Ash, Rose, Clove and Birch.
However, you may use your own combination. Use as many or as little as you like.
You may draw a sigil on a small piece of paper that states your intent and will help formulate your salt to aid you better.
Next, light the charcoal and place the incenses on first (Camphor and Benzoin). Next, burn the plants one by one, and the piece of paper with the sigil. Place the charcoal outside if you don’t want the smoke in your house.
Once all the plants have been burnt to ash, put the remains of both the charcoal and the ashes in the mortar and grind to dust.
The proportions I used were 4 part Ash/Charcoal and 10 part salt, but use whatever works best for you.
Add the salt to the mortar and mix until the salt is black. If it doesn’t reach its desired colour, add charcoal to the mixture.
Always remember intent is key, so concentrate on what you’re doing.
Recipe 2: Banishing
This is the recipe I use to banish unwanted things, especially negative influences and spirits.
I used: Opononax, Frankincense, Arabic Gum, Birch, Elder flowers, Mint, Marjoram, Anise and bay.
But you may use any plant that’s good for purification, cleansing, change, positivity and protection.
Same process as the first one. Intent is key and sigils really help to get that across.
Recipe 3: Bad Luck Hex
I don’t hex, but a friend of mine requested that I make it for him. So here, the sigil was really important, since I was more reluctant to put bad intentions in my craft. (I’m not the hexing types, but you may be as wicked as you please, lovely lil witches. I have nothing against it, it’s just not my witching style.)
I used: Mandrake, Nettles, Onion, Lime, Angelica and Vervain.
As usual, use your own recipe if you must!
I tried to muster up malice and bad thoughts. Hopefully the salt will work for him.
I hope you enjoyed my black salt recipes. They’re all useful for samhain, so tell me how it goes!
Witch Tip: Stock up on coffee filters
Especially those round ones that you can lay out flat. Seriously, they’re the cheapest and most versatile store-bought tool I use.
-Easily sewn into tea bags for homemade tea blends -Completely biodegradable and safe to bury -Quick and cheap sachet material -Perfect for herbal bath mixtures so you don’t have to clean up after (in my experience you should use two for this since they might rip if overstuffed) -Rubber band one over a jar to filter herbs out of herbal water mixtures, or clean dirty rain water (I still wouldn’t drink it, but it’ll look nicer) -Collect the rain water with one on it from the start to keep bugs out -Use one as tracing paper on your screen if you’re not good at copying sigils or symbols -They look completely mundane in your cabinets if your craft is a secret -A pack of 100 is like $1.50 at most
There’s probably a lot more I haven’t thought of. I just love these little things.
Using Soda in Witchcraft
Sometimes you don’t have the perfect kind of water to do the job. Fortunately, you can substitute in a soda and it’ll do the trick.
Coke:Use to break down a barrier or disintegrate something. Good for curses/hexes/removing anything.
Pepsi: Use to “Sweeten” someone up, butter them before asking them of something. Good for offering due to high sugar content, making it sweeter than Coke.
Mountain Dew: Give a spell a jolt of energy/power.
Ginger Ale: Settle an argument, calm something down. Also good for grounding yourself, since it comes from a root.
Root beer: Also good for grounding. Use in a mixture to add the element Earth to your spell.
Cream Soda: Use as a replacement for vanilla extract, good with love-related spells and money.
Orange Soda: Good for love, luck, and divination. Drink before/during divining.
Grape Soda: Use to add a “sour” note to something. Good for hexes, curses, etc.
Witchcrafting Supplies at WALMART - Witches choose Walmart
Okay, so this is a much-needed clapback at someone who commented on a recent post of mine with “Real Witches don’t shop at fucking Walmart”. I’m not going to even address the faulty start of the phrase ‘real witches…’
But let me explain what can be found at Walmart for my friend stuck in the dark ages of elitism and “I only shop at exotic witch shops for everything in my life.”
LET’S TALK ABOUT
WHAT WE CAN FIND FOR WITCHCRAFTING SUPPLIES AT WALMART
Candles
Tea lights
Essential oil diffusers
Wax warmers
Himalayan Salt Lamps
COURSE SEA-SALT!
The entire Garden Center for all your witchy garden needs
Mirrors
Sketchbooks for mere dollars make great Grimoires
The entire craft department for you know… witchCRAFT
Glass jars and bottles in their kitchen section and their craft section
Pins, fabric, stuffing, thread, and needles to make poppets
Shelving for your hundreds of witchbottles and potion bottles and herbs
Shelving for all your books on magick
Awesome pillows/boho decor/curtains for your sacred spaces
Incense burners
Firewood for your firepit
The ACTUAL firepit
Wooden boxes to woodburn, stain, or paint for witchy materials
I honestly could go on and on. You know why? Because most witches were NEVER rich. They lived in cottages, because people didn’t pay for their services in gold. They paid how they could. And witches were never elitist… they used what was available. Well you know what is available to MOST witches today? That’s right - WAL-MART. So, take your elitist shit, and go spend hundreds of dollars for things we can conveniently find at the local superstore for less than $20.
@the-gay-viking. YES. Real witches DO fucking shop at fucking Walmart.

Properties of Sands
By Rainy-Day-Witchcraft
⌲ Beach Sand: Use for calming or anxiety spells to gradually wash away and smooth out fear/negativity, for spells of change, or in magick for motivation or strength
⌲ Desert Sand: Use for cursing to “dry out” your target of wealth/luck/happiness/etc, or add to a resilience spell for the capability to grow through hard times or situations
⌲ River Sand: Use for spells that are focused on moving on physically or mentally, or for change and/or healing magick - Can also serve as an elemental water offering
⌲ Volcanic Sand: Use for destructive spells or curses, in magick to reveal deeper or hidden meanings/feelings, or for banishing magick - Can also serve as an elemental fire offering
⌲ Heavy Mineral/Crystal Sand: (Sands with significant presence of Quartz, Garnet, Olivine, Hematite, etc.) Use in magick for personal growth, focus, or motivation. If you have a sand heavily composed of a specific gemstone (quartz, for example) usable as a substitute for that gemstone in spellwork.
⌲ Black Sand: Use for protection, banishing, or negativity-based spells
⌲ Biogenic Sand: (Sand composed majorly of bioorganisms - shells, skeletons, bones, corals, etc.) Use in magick for healing or protection
This is a great resource! Thank you for posting this up!!! XD
It’s very possible that one day you’ll want to write a runaway, or someone living on the streets, or someone who is just up to no good, or all of the above! You need some good old research. Well here; I did some of that work for you!
Obviously not all of these...


The Secret Commonwealth - Philip Pullman
The Secret Commonwealth – Philip Pullman
Amazon Synopsis: The second volume of Philip Pullman’s The Book of Dust sees Lyra, now twenty years old, and her daemon Pantalaimon, forced to navigate their relationship in a way they could never have imagined, and drawn into the complex and dangerous factions of a world that they had no idea existed. Pulled along on his own journey too is Malcolm; once a boy with a boat and a mission to save a…

View On WordPress


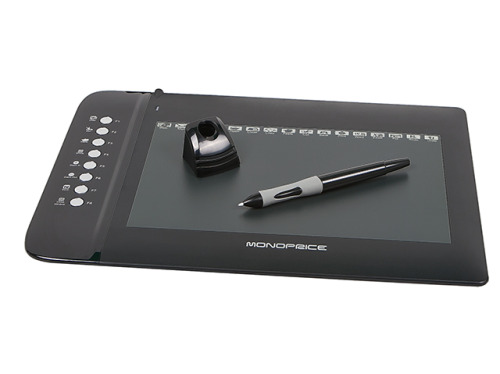
Ray Frenden reviews the too-cheap-to-be-true Monoprice graphics tablets. How do they stack up to industry standard Wacoms?
After spending a week with the 6.25“x10” Monoprice, my Yiynova and Cintiq remain unplugged and I gave my Intuos away to a friend. The Monoprice tracks subtle pressure variances and small movements with less lag and more crisp fidelity than any of the others. It is, put crudely, fucking awesome, in both OSX Lion and Windows 7 x64.


if you’ve ever wondered what it’s like to live in the midwest, this is it.


Thermoplastic Pricing Guide and Behavior Cheat Sheet
-These prices are based off of US stores and shipping rates. These prices are consistent across many websites and discounts are offered on bulk orders. Prices vary depending on shipping country.
*Sintra is offered in many sizes and shapes. The prices listed are from CosplaySupplies.com . More sizes than these exist. Sintra is a company name for foamed PVC. You can often find cheaper sheets of “sintra” by looking for “foamed PVC” or “extruded PVC”
* Worbla
- The most well-known thermoplastic in the cosplay community. Available from multiple vendors online and from a few physical stores. - Thermoplastic capable of multidimensional shaping - Has no internal mesh - Can be heated with a hair dryer or heat gun (better results from heat gun) - Capable of reusing scraps by reheating them - Smooth adhesive side/rough exterior side – can adhere to itself - Relatively thin, often requires a supporting material in armor (craft foam sandwich) - Most expensive of the thermoplastics - Requires priming (wood glue, gesso, ect.) to remove texture
*Terraflex
- Only sold by Tandy Leather. If you live near a store this product has the benefit of no shipping costs and the ability to pick up same day its needed - Thermoplastic capable of multidimensional shaping - Has no internal mesh - Can be heated with a hair dryer or heat gun (better results from heat gun) - Capable of reusing scraps by reheating them - Smooth adhesive side/rough exterior side – can adhere to itself - Relatively thin, often requires a supporting material in armor (craft foam sandwich) - “knockoff” of Worbla, if you have Tandy Leather membership cards, it makes it a fair bit cheaper than Worbla - Requires priming (wood glue, gesso, ect.) to remove texture - Has a scent, smells like graham crackers when heated
*Wonderflex
- Contains an internal mesh - The mesh provides additional stability to thermoplastic - Can be heated with a hair dryer or heat gun (better results from heat gun) - Smooth adhesive side/rough exterior side – can adhere to itself - Internal mesh prevents multidimensional shaping without puckering - (mesh can be picked out- extremely work intensive) - Relatively thin, often requires a supporting material in armor (craft foam sandwich) - Requires priming (wood glue, gesso, ect.) to remove texture
*Sintra
- Comes in a variety of thicknesses - A UNIDEMNSIONAL material. Is incapable of making compound shapes – i.e. can only bend in one direction without cutting darts. - Can be brittle if cut when cool or across large pieces of material - Needs to be heated with a heat gun or large heat source like an oven to work with uniformly - Does not adhere to itself. Requires glue to bond pieces together - Smooth texture doesn’t require priming like Worbla, Terraflex, or Wonderflex - Due to variety of thicknesses, it can be used on its own for armor pieces (no foam sandwiches) - Cheapest of the thermoplastics, but limited in some areas. Great for things like pauldrons and vambraces, not so much with breastplates and curves. - Because it is PVC, it is strongly recommended to wear a respirator and have ventilation when heating this material due to fumes.
* Transpa Art
- Transparent thermoplastic - Needs to be heated with a heat gun and only workable within a small temperature range - Does not adhere it itself like other thermoplastics. Requires cyanoacrylate glues to stick pieces together. - Not a strong as Worbla, Terraflex, ect. - Cannot be reformed with scraps - Great for accents and LED applications - Elemental Photography and Design, and Kamui Cosplay do excellent videos showing more of how Transpa behaves
Do you have any suggestions on what fabric to use for superhero/villain cosplays? I am a cosplay noob and don't want to just go pick things willy nilly that dont work or work together lol. Any help is greatly appreciated!
hoooo boy do I ever
I assume we’re talking your traditional comic book bodysuit type deal? Because the answer begins and ends with spandex - but knowing what type of spandex you want is the tricky bit
Thankfully, it’s not actually that tricky, it’s just kind of hard to find info on.
Your typical spandex is also called milliskin, and sometimes you’ll find it in both matte and shiny varieties. The shiny stuff isn’t actually metallic or anything, it’s just a tiny bit sparkly. I probably wouldn’t personally use the shiny stuff for large parts of a bodysuit, but for details that need to stand out it’s great.
Milliskin is super useful because it’s very stretchy, not extremely expensive (or at least, it shouldn’t be), and comes in a ton of colors, but if you don’t need something in an odd color, moleskin is the same basic material, but thicker. If you want to wear a catsuit but are a bit self-conscious about wearing a single layer of stretchy bullshit, this is what you want. it also comes in matte and shiny, and also something called “rough.” I’m not exactly sure how rough differs from the others, except that it must be…rougher. Moleskin is what they use to make football players’ pants; it’s a sturdy material.
There’s also something called “jumbo spandex,” which I haven’t actually used; I think this is even heavier weight than moleskin. I wouldn’t recommend it, because as the thickness increases it’ll get harder to work with, but it exists.
…so that’s your basic stuff. That’s what I would recommend for, say, an old-school Superman costume. But then it gets weird.
There’s also “wet look spandex,” which I think usually compares in weight to milliskin, but has an odd sheen to it…like it’s wet. It’s hard to explain, except like that. It’s a little bit shiny, but without the aggressive plasticness of PVC, which can be a really nice effect.
Stretch PVC/stretch vinyl is the devil. For someone with no experience, I cannot recommend strongly enough against it. It is very shiny and looks impressive when used well, so people do use it, but it looks very tacky when everything doesn’t lay perfectly flat, and it doesn’t stretch as much as normal spandex, so it’s very hard to make it fit right. AND it doesn’t breathe AT ALL so it’s even obnoxious to wear.
Matte stretch vinyl is a little bit better, but I may just be saying that because I like how it looks. I’ve used it for accent pieces, but I definitely would not try to make most of a suit out of it.
Metallic spandex is kind of cool. It looks almost-but-not-quite like metal when laid flat, and shines beautifully when draped. Unfortunately, the metallic finish tends to rub off the spandex backing after a while, so I wouldn’t recommend it for anything that’s going to get a lot of wear. But I used it for the lining of a cape once and it was awesome. It’s usually much easier to work with than PVC, and it’s also great for gluing over simple foam armor pieces instead of painting.
Nooooow you probably need to know where to get all of this. Don’t go to Joann’s; their selection is extremely limited and they have a bizarre range of quality, from disgusting to the touch to diminishing returns levels of niceness. You don’t need Joann’s $17 spandex; no one does. I use two websites almost exclusively, spandexworld.com and spandexhouse.com. You can also find some decent stuff on Ebay, and I did once have to get a specific galaxy pattern custom-printed on Spoonflower, but 90% of what you need is at one of those two sites.
One last reminder is to watch out for whether fabric says two-way or four-way stretch. Two-way will only stretch across the grain, and four-way stretches both across and along it. One isn’t necessarily better, but for most superhero stuff, four-way is a safer bet. It makes the fit a bit more forgiving and it’ll be more comfortable to wear.
….good luck. That may have been more information that you really needed.

The next set of write ups is finished! This time we move on to looking at what our props are commonly made of.
Check out Props 101: The Basic Materials


So you wanna wear a cape?
(God, this new uploading system is balls. It took me forever to arrange them in the right order, because according to Tumblr, despite the pictures being both numbered and uploaded in order, they should just go where-ever they please.)
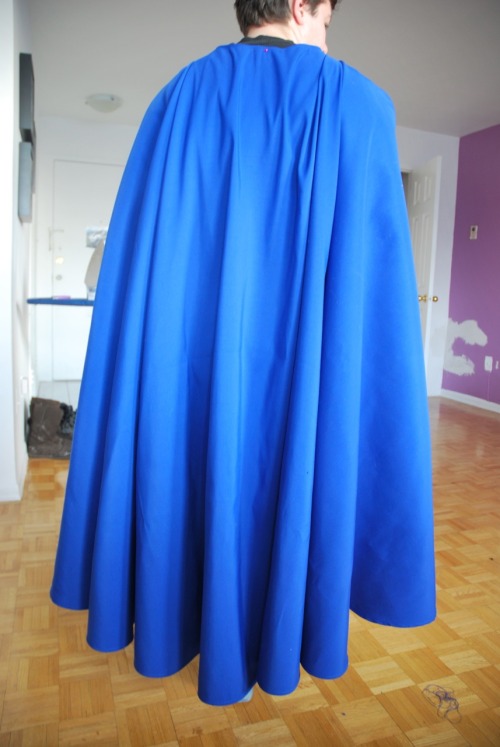
In this tutorial you’ll be learning to make a basic single-layer cape that attaches from the collarbones. It is patterned as a circle so that it drapes and flows, giving it a lot of body and “flow” when you walk. It has a hand-rolled hem on all sides to give it a clean, finished look without any raw edges.
It works for characters with “trimless” single-coloured capes, such as Superman, Mon-El, or Thor. I will be doing tutorials for trimmed capes or double-layered capes (or capes that have different coloured layers) at a later date, as well as a proper tutorial on collared capes.
What you will need:
Basic sewing equipment (pins, tape measure, scissors, sewing machine)
Sufficient fabric; a half-circle cape will take roughly 120"x60", but ideally you just need a rectangle that is double in length as it is in width. You also want this fabric to be light-medium weight and made of polyester so that it is easier to care for and IRONS WELL. A tiny bit of stretch is alright, but be aware that the more stretch there is, the more your cape will desire to be as close to the ground as possible… and who likes a droopy, sad cape?
An iron and ironing board.
To make things easier, you may also want:
A flexible ruler makes life easier to do the curve of the neckline.
A friend to help play “compass” with you.
If you have the physical constitution of wet paper towel (as I do), you may want to pop an Advil, because you’re going to hemming for fucking hours.
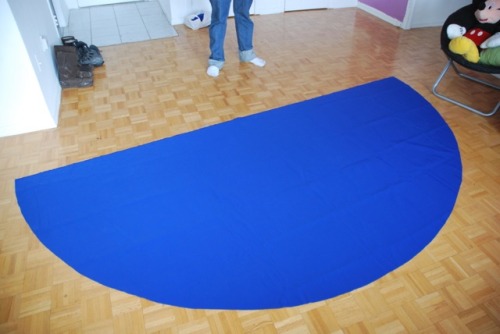
Ready? Here we go.
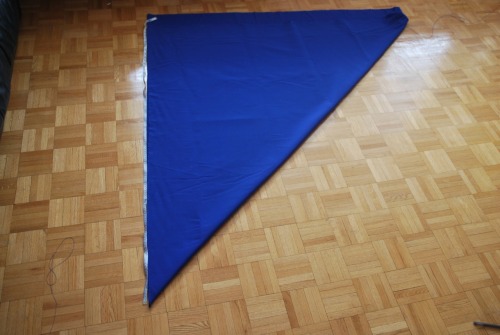
Spread your fabric out on the nice, clean floor. Fold it in half down the middle so that you have a square. Then fold it diagonally, so that you have a “slice”; the third and fourth pictures demonstrate this, but you basically want to have something that will open up to be one piece. This is going to save you a lot of time pinning the bottom curve of your cape.
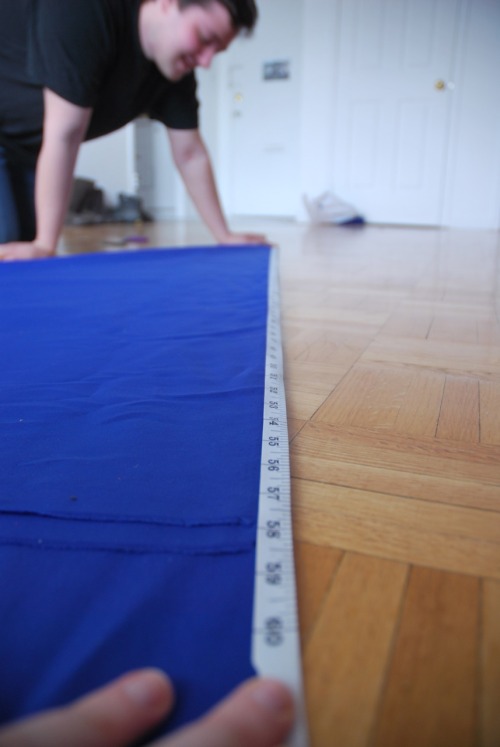
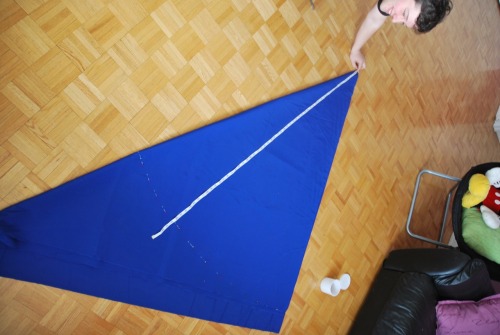
Once you have your fabric laid out nicely and the edges lined up beautifully, take your measuring tape and decide how long you need this cape to be. Josh here is 5'7" or so, and we cut the cape to 57.5", this way the finished cape will land just around his ankles from the back of his neck.
Remember compasses? Not the kind you use to save your lost ass from the wilderness and find “North”, the kind you used in sixth grade math class like twice and thought was really cool but had no practical use for. Well, now you get to do something Similar. Line up your measuring tape with that top “point” of your fabric, so it sits nicely in the middle. Have your friend put their finger on it, with enough pressure to keep it from sliding but still leave it room to “swing”. You’re going to use this to draw a large curve across the fabric, using whatever length suits you – if you want to cut a 58" long cape, then use the 58" mark on the measuring tape to pin across. You can see us doing this in picture six.
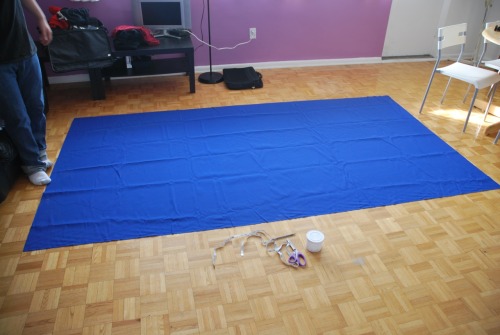
Finish pinning the whole way across and then cut just below the pins. When you open it up, you have a big ass cape! (Picture seven.) But it doesn’t have a neck curve yet, and you’ll want to add that so it hangs around your neck nicely. Fold it up again in half (don’t worry about the pizza slice this time) and measure your neck to see how wide you want this neckline to be. We picked 20", which means we needed to cut an arc that spanned 10". Now, I’m impatient with math, so I just bent my flexible ruler into a curve and used my measuring tape to make sure it was equal distance away from the corner, but if you’re better at math than I am, you can figure out how many inches you need to “swing” just like you did to cut the bottom of the cape. (A 10" half-circle needs about a 6" swing, for the record.) When you’re done that, cut.
And now you have a cape!
But it’s not finished yet.
If you’re fancy, you may have something called a “rolled hem foot” that lets you do stuff like this easily, but a) I find those things more trouble than they’re worth and b) what am I, a wizard? I’m not fucking around with a foot when I can do it manually. You might be a wizard, though, so if you want to explore this magical sewing foot, you can read someone else’s tutorial here.
But if you’re cool and want to stick with me and learn how to do it manually, that’s cool, too.
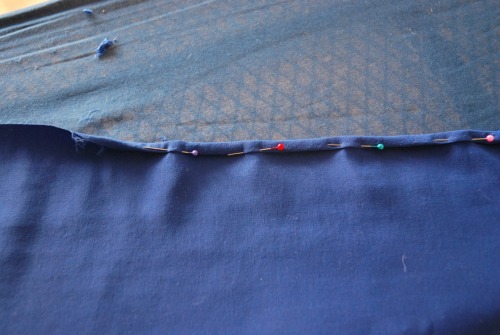
Now, if you just folded over the edges once and sewed it down and called it a day, your cape might still be okay. But you don’t want fraying –– that stuff is ugly, and you’ll appreciate the extra work of doing a rolled hem, which is just a fancy way to say “fold that shit over twice.”
Picture 9 shows this pretty clearly, I think –– fold over the edge you want to hem once, iron it, and then fold it over again, so that the ugly raw edge is trapped inside. Pin it all. You’re going to want to pin it very evenly and close together, and TAKE YOUR TIME. If you rush it, you’re going to end up with an ugly, uneven hem, and it’ll bubble up in weird places because you’re hemming a big curve, here. This can be very tedious and take a long time, especially if your cape is huge. (This is why it is usually faster to just make a double-layered cape. UGH, HEMMING.) But the results are worth it; a single-layered cape with beautiful hems is gorgeous and usually less bulky than a double-layered one, so they fly better.
Once you have everything pinned (taking care to pin down the corners neatly, too) you can sew it all. Take your time and make sure the fabric is tight/flat when you sew over it, lest you end up with weird bubbles and misplaced hems. Stay close to the edge of the hem, so that you don’t end up with overhang.
Speed will only sabotage you.
Once you’re done sewing it all down, take out any remaining pins and give the whole thing a good ironing. This should smooth out any remaining warps in your fabric, as you’re using a polyester and they can be warped back into line a little with some heat.
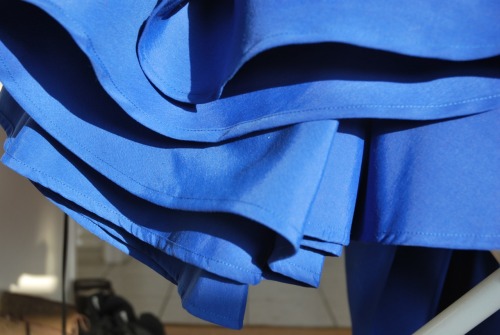
And then enjoy your cape. You earned it.
Go race some airplanes.
Your new favorite cosplay tool: the hot knife
Let’s take a few minutes to talk about our new favorite tool for finishing fabric edges…. the hot knife! For those who are unfamiliar with this product, a hot knife is similar in size to a soldering iron with changeable tips. Once plugged in, the tips will heat up so that you can use the hot end to cut or heat various materials. Hot knives are pretty cheap too - the below set will run you $22 on Amazon.com.

Many cosplayers already use hot knives to cut foam and other prop materials, but you can use a hot knife on fabric too! So long as your fabric is made from unnatural material such as polyester, a hot knife will melt and slag the raw end of your fabric, turning it into a hard, plastic-like line. However natural fabrics like cotton will not melt and slag - instead these will simply burn away if you try to light them on fire or use a hot knife. To test your fiber and perform a burn test, follow these steps.
But why would I ever want to melt my fabric??
There’s a few reasons!
Edge finishing. Is your fabric edge an odd shape, or something that can’t easily be rolled or serged? Slagging or cutting with the hot knife prevents your fabric from fraying, and allows you to create whatever shape your design calls for.

Distressing. We used the heck out of the hot knife for our Sakizou costumes, since it required so many raw and distressed edges. Holes and rips can look a little strange if your fabric is the kind that frays easily - what looks great now may not look so hot in a day or two when threads are beginning to unravel. Sealing the edges of your fabric with a hot knife guarantees that the edge will not fray, no matter how much you wear your costume. We used the following methods while creating our Sakizou cosplays:
Slagging while cutting - on satin, I first traced out my distressed pattern while using chalk. I then chose one of the tips that came to a point, and “cut” along that pattern with the hot knife. The heat from the knife burned through the satin and sealed the edge in one go. A heavy piece of cardboard should be placed under your work so that you do not accidentally cut or burn your table. This method is great for weightier fabrics or ones that will not roll under the knife.

Slagging after cutting - on chiffon, the above steps were difficult to do since the fabric was so prone to sliding. Instead I first cut the basic shape I wanted with scissors. I then used a flat tip and ran the hot knife along all edges of the fabric to seal. Be careful of the heat setting and how long you stay in one place while using this method, as light fabric can melt easily.

Some general hot knife tips:
Don’t over-heat your knife. Test first to determine which temperature is best for your fabric; something too hot can melt away your fabric more than you intended.
Don’t leave your hot knife unattended or around animals/children. It’s really hot!
As always, make sure you use your hot knife in a well-ventilated area since you are in essence melting plastic, and different polyesters can give off fumes.