aka @rmgrey-author | Rowan Grey • writer • graphic artist • mix maker • tutorial maker • ABSOLUTE STEREK TRASH • multiship af
441 posts
COLORFUL CAP TUTORIAL
COLORFUL CAP TUTORIAL
Showing you how to make a colorful pastel-ish cap for use in graphics and picspams.


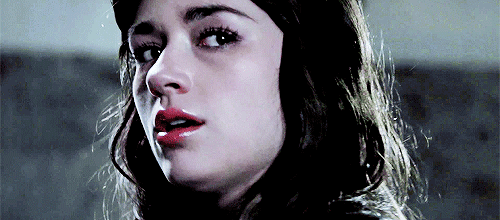
First download or pick a cap that you want to use. Here is mine of the beautiful crying Malia:

I would suggest picking a cap with light base coloring and blurred or simply-colored background. After you pick your cap, duplicate the background layer and Filter > Smart Sharpen using these settings:

Now a Color Balance layer to tone down the redness in the cap, it’s a correctional layer for the PSD I am about to add. I used midtones only with the settings as -6, 0, +9.

Next download and load in this gorgeous psd by Mila. I adjusted the Curves layer a little for the first cap in this tutorial, tones it down to these settings 114, 83.

I also masked the SECOND Color Balance layer to mostly miss her face since the psd white-washed Malia’s beautiful tan skintone. I dropped the opacity of the layer to 47%, and here’s the mask.

And use the same mask for the THIRD Selective Color layer. Here’s how the cap looks right now:

I also masked the final Selective Color layer for the eyes, I wanted to take the layer’s shadow from the eyes so they’d stand out a little more. So mask it to only effect the rest of the layer and not the eyes.
Next make a new layer, set it to Soft Light and grab a nice peach-pink color (#b65a5b) and paint her lips. I then selected the mask for the layer and added a Levels (0, 0.86, 255) and a Color Balance, midtones (-10, 0, -2).

I made another new blank layer and used a brown-blonde tone (#9f724d) and colored her hair. I then duplicated the hair layer and realized I wasn’t totally happy with the color I chose, so I added a Color Balance midtones (-48, 0, +17).
I added a Vibrance layer next (+25, +17). Next a new blank layer set to Soft Light again, this time with an off white color. I use this one to paint lightly over the parts of the face and hair that the natural light of the image hits.
In this case I touched on her cheek, forehead, nose, the corner of her mouth, ears and her hair. I dropped the opacity of the layer to 66%, and I duplicated this process on another layer, but this time focused on lighting the background like so:

So far so good! Next we focus on color. Make a new blank layer again, Soft Light blend mode again. I colored the background and some of her sweater with this purple tone #b87fab. Next I added a Selective Color and used this to eliminate the yellow and green tones in the background.
Next another blank layer this time with the blend mode set to Color, using this tone #be7caf and masked to the background selection. Now another one this time with a Normal blend mode and using this color #fddcf5 to color only the right side of the image like so:

(This eliminates the stuff blurred in the background on that right side)
Add another blank layer, #e8a7d9, this one set to Color and use it on both sides of the background. Yet another blank layer, set this one to Color Burn and use this color #b856a1. I used this very lightly in the corners.
Add another Vibrance (+10, +3) and a Color Balance midtones (+9, 0, -6) and mask it to only effect her face. Then another blank layer with the Soft Light blend mode with this color #b856a1 and color only the sweatshirt on the left.

This will lighten the right side and darken some of the left. Add another Vibrance (+11, +7), then a Selective Color reds (-5, +4, 0, 0) and second to last I added another Selective Color to drown some of the over-saturation and pastel the colors. Magenta -13, -100, -7, 0.
Lastly I stamped the layers, shift+alt+ctrl+e, and Smart Sharpened again.

And that’s it! As always here is the PSD, and a cap using the same methods as above, and the PSD for the second one too while I’m at it.

-
 crazybollywood liked this · 2 years ago
 -
 citizenmoffat liked this · 3 years ago
 -
 gustavorodriguesmar9 liked this · 4 years ago
 -
 bi-alinaoretsev liked this · 4 years ago
 -
 achilleius liked this · 5 years ago
 -
 drmh2020 liked this · 5 years ago
 -
 kbobrian reblogged this · 5 years ago
 -
kbobrian liked this · 5 years ago
-
 clairvoyantz liked this · 5 years ago
 -
 in-the-shadow-of-a-wolf reblogged this · 5 years ago
 -
in-the-shadow-of-a-wolf liked this · 5 years ago
-
 peraltiagoicons liked this · 5 years ago
 -
 hyewooj reblogged this · 6 years ago
 -
 superdanys liked this · 6 years ago
 -
 rresources reblogged this · 6 years ago
 -
 oceanodedoces liked this · 7 years ago
 -
 forever-in-transit reblogged this · 7 years ago
 -
 ohkawas reblogged this · 7 years ago
 -
 zacksoldiers liked this · 7 years ago
 -
 shholmes liked this · 8 years ago
 -
 usernameunavaliable liked this · 8 years ago
 -
 honeycomb-resource reblogged this · 8 years ago
 -
 verysmallclown liked this · 8 years ago
 -
 musicianbp liked this · 8 years ago
 -
 pastelldean liked this · 8 years ago
 -
 magical-mei liked this · 8 years ago
 -
 nicky-at-night reblogged this · 8 years ago
 -
 ulric-nyx liked this · 8 years ago
 -
 myphotoshopstuff reblogged this · 8 years ago
 -
 nekrofilth liked this · 8 years ago
 -
 nephilimcriss liked this · 8 years ago
 -
 kctherinee-blog liked this · 8 years ago
 -
 sanzochan liked this · 8 years ago
 -
 tima520 liked this · 8 years ago
 -
 dandelion-lute reblogged this · 8 years ago
 -
 natatrps4ever reblogged this · 8 years ago
 -
 demon-bela reblogged this · 8 years ago
 -
 starfishride liked this · 8 years ago
 -
 memphisz reblogged this · 8 years ago
 -
 saintlaurcnts liked this · 8 years ago
More Posts from Lycaens
TEEN WOLF AU || the alpha pack au
After the Nemeton’s reawakening, the town becomes a literal Beacon for the supernatural. The Alpha Pack stows their differences as they prepare for the arrival of a rogue pack of creatures coming to town.


This is so accurate!
For more please see my page at:
Fandoms Are My Life
“You can control it Stiles“ “I can’t, he’s stronger than me“ “You are stronger and you have something he doesn’t“ “What?“ “An anchor”


dean winchester + 05. bruised & battered requested by anonymous