Coloring Tutorial - Tumblr Posts
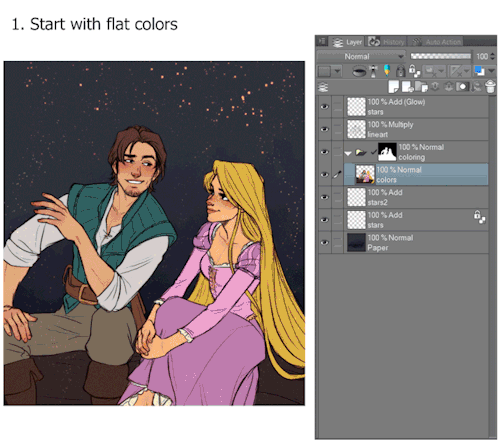
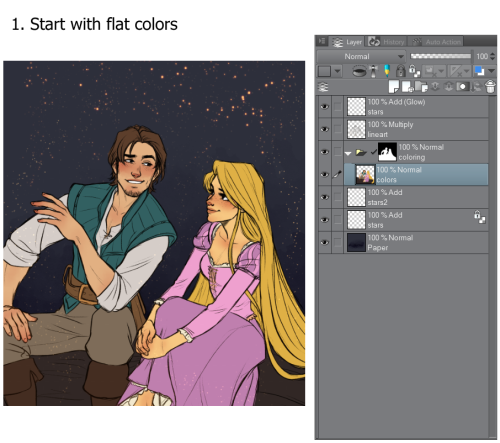

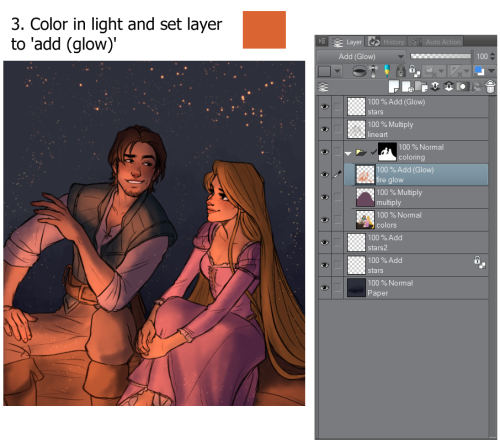
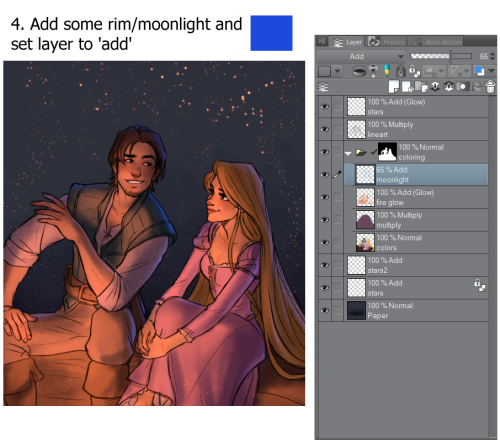
A simple step-by-step process of my coloring by request ~
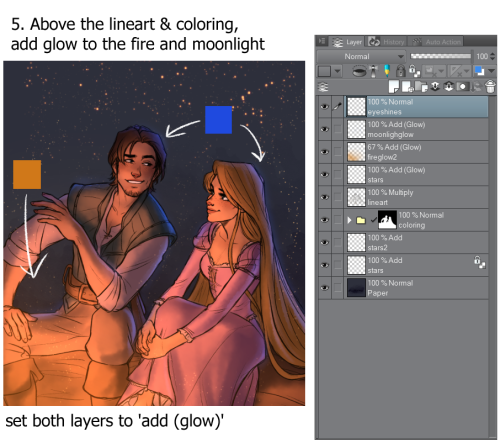
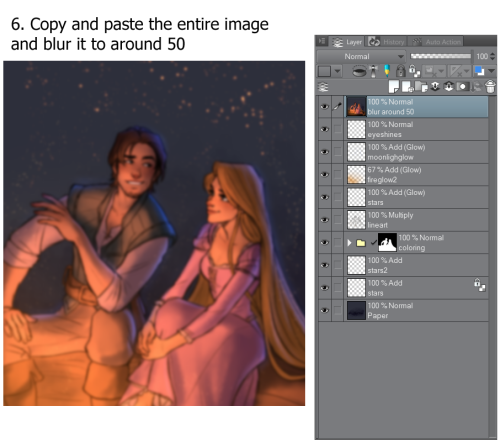
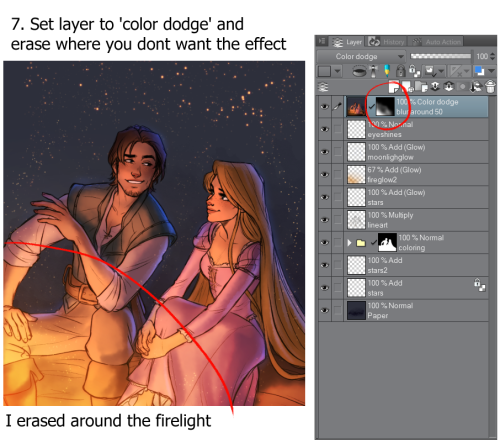
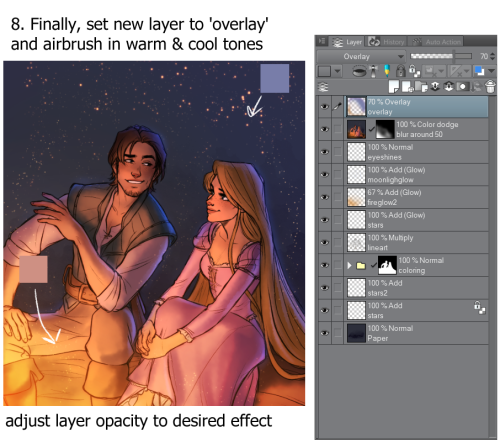
I would recommend reading this tutorial as well for a more in depth explanation of my process. It’s essentially the same as this one, so I didn’t find it necessary to repeat the steps in detailed text.


ive never really made a tutorial before but i thought i’d try!
all my portrait paintings are done on a 2000-3000 pixel canvas with 300 dpi using the two brushes shown above with varying opacity
(note: a flat steak brush texture can be found in many basic deviantart paint tool sai brush downloads! don’t worry if it’s not the exact one im using, i have several from different sources and they all generally do the same thing with the right settings)


drawing process + brush settings
aka i talk as if i know what im talking about
how to: colouring east & southeast asian celebs
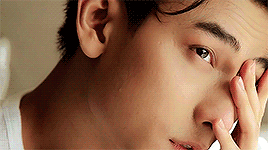
tbh idk what to title this but here we go!! i keep seeing gifs (especially gif icons) that whitewash east & southeast asian fcs so i’m gonna. tell u. what’s good and what’s bad since some of you don’t seem to know. or just choose to do what you’re doing which is… shitty. anyway. some asian people may have lighter skin tones but surprise!!! asian people are not white so u can still whitewash. also half the time celebrities you see are not nearly as pale as you think they are (especially when it comes to k-idols).
ok (my colouring from scratch):
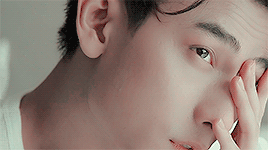
not ok (some psd i found for a kdrama):
i’m obviously no expert at colouring like i really have minimal colouring skills but that’s just proof that not whitewashing isn’t even hard since i can do it. anyway. here we go!!
warning: very text heavy. i wanted to explain how to do stuff and why to do it instead of just “do this but don’t do this” so hopefully it can be educational maybe.
Afficher davantage
Coloriser une photo avec Photoshop et les neural filters
Version requise : Photoshop CC 2021 minimum
Exemple de photos colorisées : avatar 1 ; avatar 2 ; avatar 3
Durée de la video : 9.40min avec 4 photos testées
Vidéos avec explications sonores mais non sous-titrée. Tutoriel écrit ci-dessous.
Afficher davantage

The piece I did for my recent coloring tutorial video, as well as the video itself!
@searkboy
COLOR TUTORIAL #2
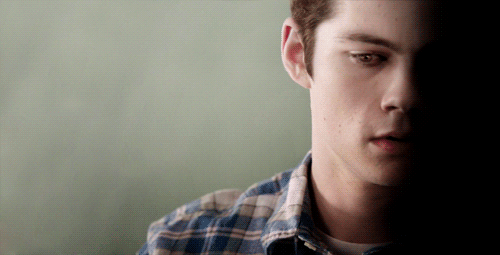
Color Porn Stiles.
Another tutorial similar to this one, but with a few differences. This time I am focusing on changing colors for the background to blend well and match a palette coloring scheme or just to make color porn picspams.
I am using Photoshop CS5, and this is not a beginner tutorial, but it isn’t too hard either.
I will be showing you how to turn this:

into this:

First start with a duplication of the background layer, then resize and crop how you want. Next I sharpened, then duplicated again and set the new duplicated layer to screen.
Here are the smart sharpen settings I always use.

Next add these two gradients. Flip or move as needed.


If you’re using a different cap than me then you’d place the first one depending on where you’re best shadows are. You can use that first one twice at a lower opacity too if you need more shadows.
Now a blank layer, with a large soft brush (#000000) and just shade the side of the image with the most shadow. My selection:

I added a black gradient fill on top of that, rotate from right (being the black) to transparent (toward the left). Then add another blank layer on top of that and add more shadows using a large soft brush, again in black.
Next I wanted to add some shadow and contrast to parts of Stiles’ face. I used levels. Here are the settings and my finished mask.

(0, 0.70, 255 / 0, 223)

Here is the comparison gif.

Next I stamped the cap (alt+ctrl+shift+e) and moved it to the right; then I used the clone stamp tool to fill in the left side with the background. Like so:

Then add yet another selective color (black +4) and a black and white gradient map on top of that. Set the gradient map to soft light with a 20% opacity; or higher if you need more contrasting.
Now the eyes. Make a blank layer, set to soft light blend mode. Using a small round brush of a light brown color (#864514) and color the iris. Then I added some more details; like curves layers to brighten the reflections of his eyes. Then a color balance to dull the brown a little, more blue so it looks more natural. Then another curves layer to shadow near the corner of his eyelids.

I did another layer, color fill (#4c3422), this time for his hair; mask it and color with the black brush to fill it in. I did some light coloring for his eyebrows too. Set it to soft light blend mode. Here’s the mask:

Next some more toning.

(whites: -7,+5,-1,+31 / yellow: -27,+100,+70,0)

(reds: -32,+17,0,0 / yellows: -100, +100, +100, 0 / greens: -84,-100,+100,0)

(cyans: -33,-100,+100,0 / blues: -100,-100,+100,0)
Here’s the mask:

Here the comparison.
Next add a vibrance adjustment, vibrance +10, saturation +4.
Now colors! Finally right?
Make a blank layer and with a large round soft brush paint in the left side, but don’t fill in the whole left side. It should be careful! On the first layer I lowered the opacity to 55%.
Then another layer set to soft light (#b6a83e), color more toward Stiles with this one, again keep the stuff toward Stiles softer.
Repeat this step as needed with different colors of similar tones; all with the intention of carefully moving toward Stiles’s form with your bright colors. Make sure that if you do add any onto the skin, that it’s with a low opacity brush.
(upper left to lower right: #ff9f40, #b6a83e, #dd9236 & #fe9f40)

The trick to these is using lowered opacity for the brushes; keeping everything bright and vibrant on the far left and fading the color as you move toward Stiles.
I added some more selective color next, with the purpose of drowning unneeded tones and balancing the yellows and oranges. It’s a lot!

(yellows: +20,-11,-68,-20 / greens: -17,-37,-100,0)

ANOTHER selective color. This whole tutorial is basically selective color right? This one though, you need to mask.


Next a color fill (#ff9f40), soft light with opacity 16-20% on top. Now, create another blank layer, same color as above with soft light blend mode again and opacity 66%. This one is so we can match the color of Stiles’ shirt, to the background.

Color what I selected and it’ll blend better with the bg. It’s even better when you add another (guess what?) selective color.

(reds: +32, -32, +28, +50. yellows: -63, +40, +21, 0)
Now stamp the whole thing again (alt+ctrl+shift+e) and add a vibrance (+15, -1) and a curves layer (output 135, input 124)
Progress gif.


And we’re are technically done. But hey there’s a little more.
Now I can show you how to change the orange to green, purple, and even blue. Green to start with.


(reds: +100,-100,+100,-31 / yellows: +100,-83,+100,+100)
You’ll want to keep this one masked, so it barely effects Stiles. His skin will be corrected by the color balance.

Then color balance.
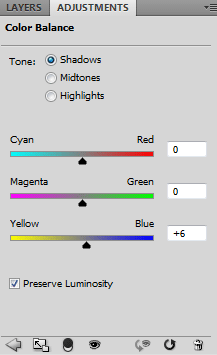
(shadows: 0,0,+6 / midtones: -3,+9,-16 / highlights: -10,+12,0)

(reds: +42,-68,+100,+16 / yellows: +9,-16,-1,-7)
This one should be masked too, but softer, less detailed.

Lastly add a blank layer, set it to the blend mode color. Take a green brush (#c8e740) soft round and color most of the left side, especially near Stiles’ neck, shirt and hair. Here’s my selection.

Now purple.


(reds: +100,+100,-100,+100 / yellows: +100,+100,-100,-19 / magentas: +2,+2,0,0 / neutrals: -53,+31,-62,0)

(shadows: 0,0,+6 / midtones: -2,-13,+15 / highlights: -10,+12,0)

(reds: +31,+100,-51,-3 / yellows: +100,+100,-100,-7 / neutrals: +30,+7,-9,0)
Lastly make another blank layer and use a nice purple color to color where we did with the green. Make this one’s blend mode color (#be5eec).

And blue. Same drill, start with selective color.


(reds: +100,-100,-100,+100 / yellows: +100,+100,-100,+100 / cyans: -36,+2,0,0 / magenta: -65,-16,0,0 / whites: -19,0,0,0 / neutrals: +100,-18,-17,0 / blacks: +100,0,0,+5)

(shadows: 0,0,+6 / midtones: -37,-10,+19 / highlights: -10,+12, 0)

(reds: +100,+100,-20,-3 / yellows: +100,+12,-88,-7 / cyans: +26,+24,0,0 / blues: -58,0,0,0 / magentas: +100,-100,-100,0 / neutrals: +26,-2,-13,0)
Mask all of the selective colors like you did for the green and purple.
Finally you’ll need two blank layers, one at full opacity, set to the color blend mode select or mask it for the background. This one is for the blending portion of the background.

The other is the same blend mode, but this one is to color only the shirt and needs a lower opacity, I used 45%. Both colors for the blending layers I used are (#2f97bb)

And that’s it! I know longest tutorial ever. But it won’t be my last. Also here’s a Scott version of the cap using the same methods.
DOWNLOAD THE PSD HERE.

COLORFUL CAP TUTORIAL
Showing you how to make a colorful pastel-ish cap for use in graphics and picspams.


First download or pick a cap that you want to use. Here is mine of the beautiful crying Malia:

I would suggest picking a cap with light base coloring and blurred or simply-colored background. After you pick your cap, duplicate the background layer and Filter > Smart Sharpen using these settings:

Now a Color Balance layer to tone down the redness in the cap, it’s a correctional layer for the PSD I am about to add. I used midtones only with the settings as -6, 0, +9.

Next download and load in this gorgeous psd by Mila. I adjusted the Curves layer a little for the first cap in this tutorial, tones it down to these settings 114, 83.

I also masked the SECOND Color Balance layer to mostly miss her face since the psd white-washed Malia’s beautiful tan skintone. I dropped the opacity of the layer to 47%, and here’s the mask.

And use the same mask for the THIRD Selective Color layer. Here’s how the cap looks right now:

I also masked the final Selective Color layer for the eyes, I wanted to take the layer’s shadow from the eyes so they’d stand out a little more. So mask it to only effect the rest of the layer and not the eyes.
Next make a new layer, set it to Soft Light and grab a nice peach-pink color (#b65a5b) and paint her lips. I then selected the mask for the layer and added a Levels (0, 0.86, 255) and a Color Balance, midtones (-10, 0, -2).

I made another new blank layer and used a brown-blonde tone (#9f724d) and colored her hair. I then duplicated the hair layer and realized I wasn’t totally happy with the color I chose, so I added a Color Balance midtones (-48, 0, +17).
I added a Vibrance layer next (+25, +17). Next a new blank layer set to Soft Light again, this time with an off white color. I use this one to paint lightly over the parts of the face and hair that the natural light of the image hits.
In this case I touched on her cheek, forehead, nose, the corner of her mouth, ears and her hair. I dropped the opacity of the layer to 66%, and I duplicated this process on another layer, but this time focused on lighting the background like so:

So far so good! Next we focus on color. Make a new blank layer again, Soft Light blend mode again. I colored the background and some of her sweater with this purple tone #b87fab. Next I added a Selective Color and used this to eliminate the yellow and green tones in the background.
Next another blank layer this time with the blend mode set to Color, using this tone #be7caf and masked to the background selection. Now another one this time with a Normal blend mode and using this color #fddcf5 to color only the right side of the image like so:

(This eliminates the stuff blurred in the background on that right side)
Add another blank layer, #e8a7d9, this one set to Color and use it on both sides of the background. Yet another blank layer, set this one to Color Burn and use this color #b856a1. I used this very lightly in the corners.
Add another Vibrance (+10, +3) and a Color Balance midtones (+9, 0, -6) and mask it to only effect her face. Then another blank layer with the Soft Light blend mode with this color #b856a1 and color only the sweatshirt on the left.

This will lighten the right side and darken some of the left. Add another Vibrance (+11, +7), then a Selective Color reds (-5, +4, 0, 0) and second to last I added another Selective Color to drown some of the over-saturation and pastel the colors. Magenta -13, -100, -7, 0.
Lastly I stamped the layers, shift+alt+ctrl+e, and Smart Sharpened again.

And that’s it! As always here is the PSD, and a cap using the same methods as above, and the PSD for the second one too while I’m at it.

How did you pick your primary color palette? :00 its so unique and pretty, I love it!!
genuinely i just really like using neutral colors! im not very good w working with saturated colors (i’m working on it tho!!)
my secret: i only use pale yellows and reds and everything else is filters slapped on top GAHAH
here’s a kinda old walk thru of how i color!!


also tip: if ur having problems w making color palettes look nice together, set a base color (i usually use skin tone since i draw ppl a lot). then, lower the opacity of ur brush whenever u go to add any new colors (hair, clothes, etc).
this can help tie things together a bit!! at least until u get an eye for it :3