How-to - Tumblr Posts - Page 2
becoming an adult cheat sheet!
learn to coupon
what to do when you can’t afford therapy
cleaning your bathroom
what to do when you can’t pay your bills
stress management
quick fix meals
find out if you’re paying too much for your cell phone bill
resume workshop
organize your closet
how to take care of yourself when you’re sick
what you should bring to a doctor’s appointment
what’s a mortgage?
how to pick a health insurance plan
hotlines list
your first gynecology appointment
what to do if the cops pull you over
things to have in your car in case of emergency
my moving out masterpost
how to make friends as an adult (video)
how to do taxes (video)
recommended reads for surviving adulthood (video)
change a flat tire (video)
how to do laundry (video)
opening a bank account (video)
laundry cheat sheet
recipes masterpost
tricks to help you sleep more
what the fuck should you make for dinner?
where should you go for drinks?
alcohol: know your limits
easy makeup tips
find seat maps for your flight
self-defense tips
prevent hangovers
workout masterpost
how to write a check
career builder
browse careers
birth control information
financial management software & app (free)
my mental health masterpost
my college applications masterpost
how to jumpstart a car
sex ed masterpost

Cute, lil' fae girl for the timeline. I actually love this one a lot! Just posted the painting process for this piece on my Youtube Channel, so please don't forget to check it out!
Art by me - @thistle-fae -

DO NOT REPOST. DO NOT REUSE. DO NOT REMOVE WATERMARKS. I have the final say on all my art. Please respect artists and the hours of work they do. See more of my art on my gallery.
ok so let me start by saying that I don't have the slightest idea what I'm doing or if this is in any way helpful but @forceofconviction and @spiciestmarinara asked for a pattern for the ace dragon embroidery so here's my attempt at explaining what I did

This is the basic dragon shape I use for everything. I try to vary it by making the dragon more hunched over or give the tail a different direction to swoosh in. I also like to make it so the wings follow the curve of the embroidery hoop
(the wings are supposed to be somewhat equally big but I messed up and now it's to late to fix so ignore that)

The amount of stripes on the wings varies depending on which (pride) colours you want to lose. For this I went with four for the black, grey, white and purple of the ace flag. In my embroidery piece I added a couple more stripes bc I tried to give it some more shading but the sketch for that looked like a mess so four stripes it is. The weird lines in the middle of the top (black) stripe isn't necessar, but I like to put a little lighter shading there to indicate where the bone of the dragon wing would be

Now we add stripes to the body. I always use the colour of the top stripe on the flag for the spikes. For the ace dragon I used grey and white where the normal scales are and then for the scales down the dragon's front I used light and dark purple.
For the lesbian dragon I used the top stripe colours for the spikes and the rest for the normal scales. The front scales were just the lesbian flag repeated. For the bi dragon I used a base of pink, purple and blue for the whole body without giving the dragon that front stripe down. And then I used different shades of these colours to go over the base. (I wouldn't recommend that. It got a bit messy)

When embroidering I mostly start with the head, then do the body and lastly the wings. I don't know if there's a difference but I just think the wings are the easiest part so I like to keep them for the end, when my patience starts to dwindle. The arrows show the direction of the stitches. For the front scales I think it's easiest to go from side to side instead of up and down. For the spade part of the tail I used something kind of like a leaf stich but starting at the broad part, so pretty much a leaf stitch reversed (I have no idea if there's a name for that)
For the shading of the head, I honestly don't know what I'm doing. I think I like to take a light shade of the colour from one of the middle stripes and use it for the stripe going from nose to the eye. Then above that I use a slightly darker shade. Below the light stripe goes a the same darker shade and then below the mouth, you use an even darker shade. But really I still haven't figured that out. For the non-binary dragon I used dark yellow for the top of the head and light yellow for the beneath-the-mouth-part.
I fill the eye up with black or a dark shade of whichever colour is the darkest of the pride flag you use and then I take the brightest colour of the flag and do the tiniest french knot in the middle of the eye. For that it's best to split the thread in half or use only a single strand of the thread.
And just because I personally like the pose of the aro dragon more than the one of the ace dragon:
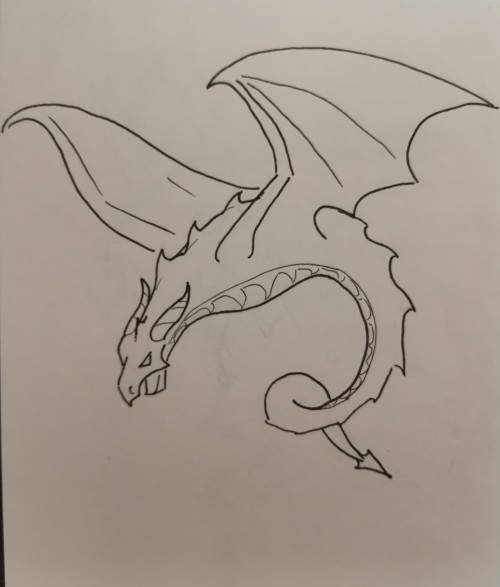
So you can fill in as many stripes as you need for your flag (or other colours you fancy). With this dragon shape everything is exactly the same except the direction of the left wing stitches go from bottom left to top right and I'd only use a darker shade of the top stripe colour bc the wing is angled so we only see the top part
I hope this helps and I hope that those who know how embroidery patterns really work aren't judging me too harshly lmao


Visible Mending
Introduction:
Visible mending is a decorative way to fix up an item. Instead of trying to make your mend as invisible as possible, the idea is to make it part of the garment's design.
Visual mending is not a single technique: it's more of a mindset. If you've got an item you love, it deserves to be mended, and if you're going to put that love into stitches, why not show them off?
That being said, there are some specific techniques that are popular with visible menders. Let's take a look!
Sashiko:
Sashiko is a type of traditional Japanese embroidery that is used to both decorate and reinforce fabric. In visible mending, sashiko is often used to cover up holes with patches or to reinforce thinning fabric. This technique uses a variation on the running stitch.
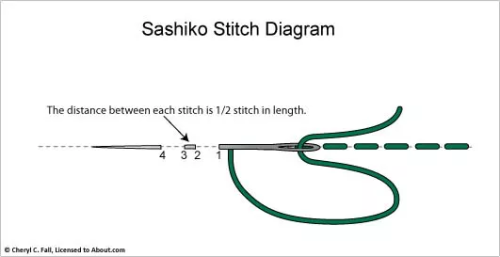
(Image source) [ID: sashiko stitch diagram: the distance between each stitch is 1/2 stitch in length.]
Some resources on sashiko:
SashiCo on YouTube: sashiko livestreams and information on the cultural aspect of sashiko.
Written tutorial by Upcycle Stitches.
Free sashiko templates by TheSpruceCrafts.
Fixing jeans with sashiko by Soluna Collective.
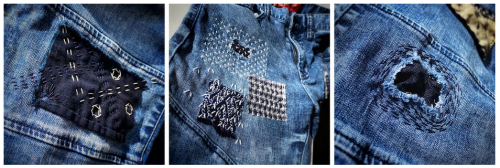
(Image source) [ID: three examples of sashiko embroidery on jeans fabric.]
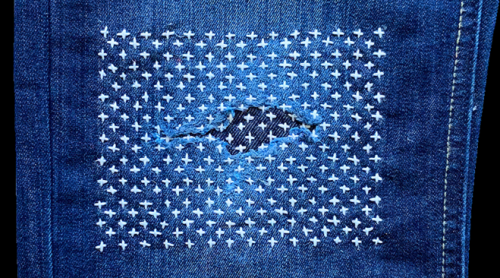
(Image source) [ID: sashiko embroidery with white thread on blue jeans fabric.]
Embroidery:
Regular embroidery is also a popular technique to accentuate your mends. Check out my embroidery 101 post to learn how to get started. You can embroider patches, or use embroidery to hide or accentuate any stitches you've made to fix holes. Embroidery's also a great way to cover up stains.
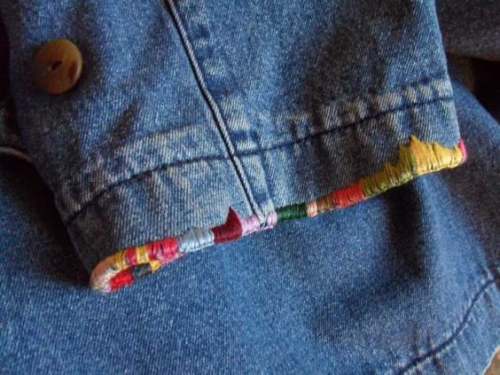
(Image source) [ID: colourful embroidery floss covers a worn sleeve edge of a jeans jacket]
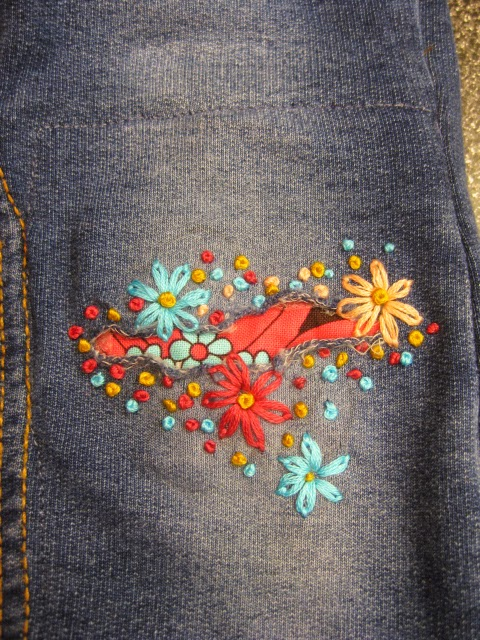
(Image source) [ID: colourful flower embroidery surrounds a hole in a pair of dark gray jeans. Fabric with a red and black flower print peaks out of the hole.]
Patches:
There are many ways to add patches to a garment. My tutorial on patches is a good place to start if you want to make custom-shaped patches to sew on top of your fabric. You can also sew your patch on the inside of your garment and have it peek out from beneath the hole you're trying to fix. Fun ideas for this are lace or superheroes.
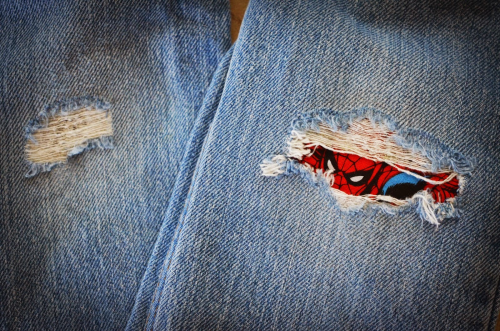
(Image source) [ID: Spiderman peaking out of a rip in a pair of blue jeans.]

(Source) [ID: a red flannel heart-shaped elbow patch on a gray knitted sweater.]
Darning:
Darning is a technique used to repair holes in fabric by using running stitches to weave extra fabric over the hole as to fill it up again. While traditionally darning is done in an invisible way by using the same colour of thread as your fabric, you can also use contrasting colours to accentuate your fix. Check out this written tutorial on darning by TheSpruceCrafts.
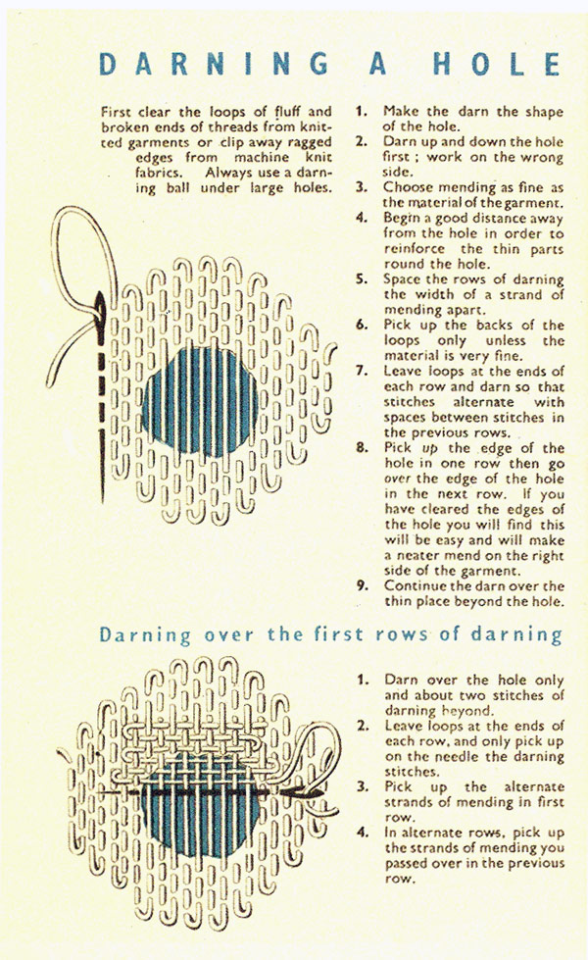
(Image source) [ID: vintage instructions on how to darn a hole.]
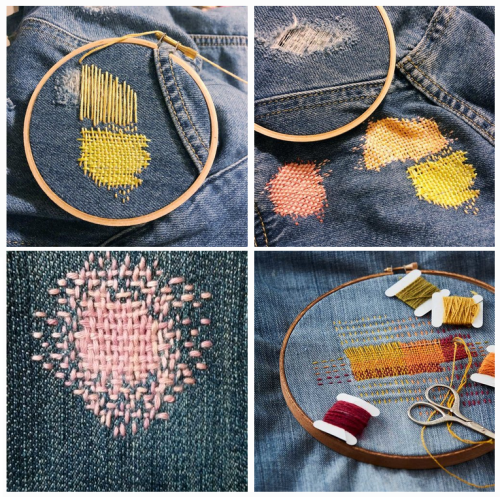
(Image source) [ID: four examples of darning on blue fabric with colourful contrasting thread.]
Conclusion:
Visible mending is a creative way to fix up your clothes and give them some personality at the same time.
You should be proud of the fact that you took the time and learned the necessary skills needed to mend your clothes! Show off what you did!
A fun side effect of wearing these obvious mends is that people will notice them. They'll remember your fixes the next time they're faced with a hole in their wardrobe, and it will make them more likely to try it for themselves.
These are just a few ways to visibly mend your garments. Want more inspiration? Check out Pinterest or r/Visiblemending on Reddit.


3-needle bind off
I received a lot of comments on my post showing how I crochet the sleeves onto a cardigan.
Apparently, opinions are divided on whether sewing or crocheting is better.
Here’s another way of joining knitted pieces: the 3-needle bind off. I like to use this for shoulders, where I want a sturdy join, since the shoulder seam in essence holds up the whole garment.
What is your preferred way of joining knitted pieces?
German short rows
My favourite kind of short rows, because they are the easiest, require the least movement and are the same no matter which side you are on or whether you are knitting or purling.
After you turn, you make a double stitch, which is subsequently treated as a simple stitch.
To make the double stitch, slip the “pivot” stitch purlwise without bringing the yarn in front. This is the equivalent of a purlwise slipped stitch and a yarn over. In practice it is done in one movement and the result looks like a double stitch. Make sure to pull the yarn to get a tight pivot stitch.
Schau dir "How to draw Kenma Kozume from Haikyuu!!" auf YouTube an
Me drawing kenma