Line Of Action - Tumblr Posts
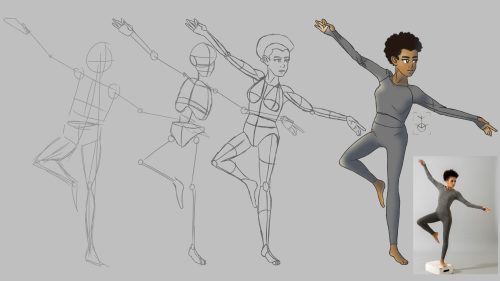
A test of the process. Reference image from https://line-of-action.com/
If you do more tutorials maybe poses?
How to do better poses:

a few things to think about when doing poses, just from the top of my head so it’s not very thorough. Hope it helps!
@icequeenabby and @pageofheartdj sorry this got long and I had to make a whole new post >.<
ok so! first of all here's the site I mentioned (highly suggested, you won't regret the hard work).
then for a small tutorial (I hope I make sense)
The line of action is not the curve of the spine, but the path of the movement of the body. More like a guide of the force and movement of an action. You can use more than one on a single pose of a figure, eg for the torso and for the arms or one for an arm and one for the rest of the body.
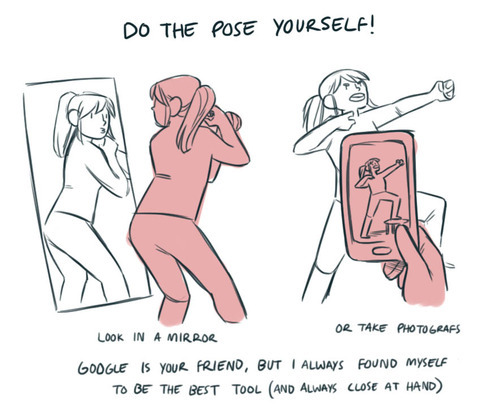
First thing you wanna do is find the movement in the pose you wanna create. every pose has movement, even "static" ones like sitting, sleeping etc and even if you're only drawing a bust.
(for this,as with all drawing, the best advice is to observe real life, even before starting practicing drawing poses)
so, step 1: draw a line

the human body mostly moves through S an C shapes, an S shape is good to start with because we are usually starting with a core movement, so the torso is the main character here.
I said that the line of action is not necessary the spine, but it can happen to be similar or close to it as it is our core. just do not let that constrain you.
step 2: head, rib cage and pelvis
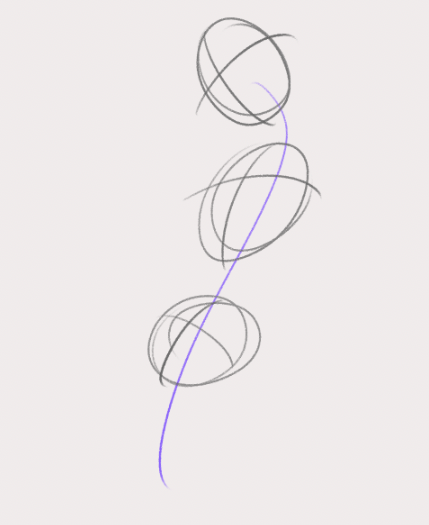
using the first line we're placing these three along it and marking what direction they're facing with those cross lines.
you can already see the movement.
step 3: secondary lines of action

be loose and go with the flow! Remember: ACTION FIRST, STRUCTURE SECOND! that means that the anatomy comes after the movement you are trying to depict. build the structure on top of the action.
(of course that does not mean anatomy is less important, they work in tandem, and a better learning of anatomy gives you also a better grasp on portraying movement)
step 4: legs, aka more Lines of action


the line of action is not necessarily a curve, it can also be a straight, and creating a visual contrast using both types makes the pose more interesting.
Of course there isn't a single way to do the same thing
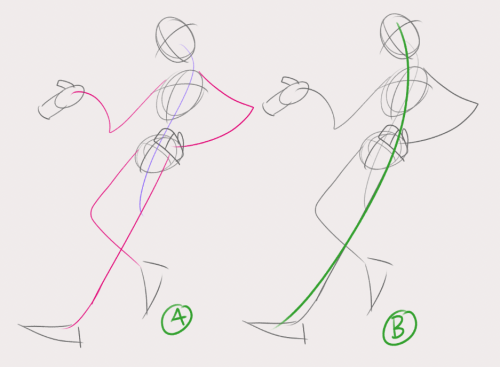
a single line of action (B) would have also worked to start with!
Here's 2 examples of more dynamic poses I drew:
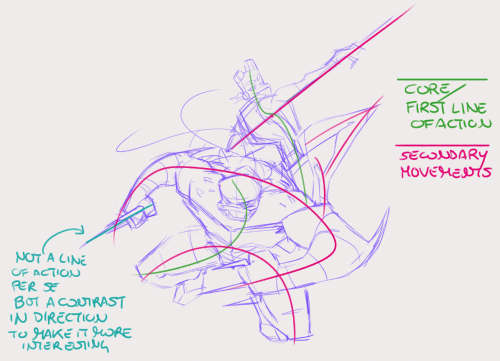

with more dynamic and extreme poses the main line of action is more often a C shape as the body compresses. (objects can have lines of action too! notice donnie's bo and mikey's nunchaku)
As I said, learning anatomy goes hand in hand with practicing poses and lines of action, as you will notice how the single parts of the body move and the way they all have their own intrinsic movement.
To start is useful to take some pictures of people/animals and just draw the lines of action on top. Start with just one line of action and after you've practiced a bit, move on to photos of more complex poses and find the secondary lines.
☆ I hope this can be useful! ☆
☆ ko-fi ☆ | ☆ patreon ☆ | ☆ instagram ☆


rip the art block<3
practicing some figure drawing, line of action i love you


participated in my friend’s twitch draw along thing yesterday !
also gonna promote him eheh he deserves it and more https://www.twitch.tv/erwanchannel
Hello, just want to say I love your art, do you have any suggestions on how to draw poses?
I guess three things I think of when it comes to poses are line of action, straight vs curved, and weight. I’ll use this quick awkward doodle to demonstrate:

You probably know this one if you know animation. Everything in the drawing doesn’t necessarily have to stick to it, but its a good basis for the overall silhouette. Most examples I’ve seen stick to one line, but sometimes I experiment with two if I’m going for a more action-y, dynamic pose. Its best not to go over two (two is risking it) as that would just get too visually confusing.

This one is more for smaller details, such as the arms and legs. Its good if you want to go for a more stylized look, since real life humans never have completely straight lines anywhere on their body. It’s basically contrasting a straight line with a curved one so you get a clearer idea of where the volume is going. Check out this video if you want more info, which is where I referenced from!

An easy one to forget in my experience. A little trick we learnt in life drawing class is that in real life the nose should generally be parallel to where the most weight is, to make it look more balanced. You’ll notice too that the body gets more compressed where the most weight is, ie the left leg here.
Some of my own (colour coded) examples, although I’m still learning to apply these things ~

(Sometimes if the nose doesn’t line up with where the body is leaning, you have to balance it out with the limbs or other body parts. The amethyst one would not work if she wasn’t holding another character on her back)
I recommend looking up these techniques online or in art books as you’re bound to find more in-depth tutorials and examples. But overall I hope this helps!
Preston Blair
now most people don’t know who he is, but know his work. He is basically the animator who perfected the cartoon movements in animation.


he’s also done lots more in cartoon animation but if I’d drag the post if i type any more of his work

El Dark doing some sketching 😝


figure studies from line of action
Hello, just want to say I love your art, do you have any suggestions on how to draw poses?
I guess three things I think of when it comes to poses are line of action, straight vs curved, and weight. I’ll use this quick awkward doodle to demonstrate:
You probably know this one if you know animation. Everything in the drawing doesn’t necessarily have to stick to it, but its a good basis for the overall silhouette. Most examples I’ve seen stick to one line, but sometimes I experiment with two if I’m going for a more action-y, dynamic pose. Its best not to go over two (two is risking it) as that would just get too visually confusing.
This one is more for smaller details, such as the arms and legs. Its good if you want to go for a more stylized look, since real life humans never have completely straight lines anywhere on their body. It’s basically contrasting a straight line with a curved one so you get a clearer idea of where the volume is going. Check out this video if you want more info, which is where I referenced from!
An easy one to forget in my experience. A little trick we learnt in life drawing class is that in real life the nose should generally be parallel to where the most weight is, to make it look more balanced. You’ll notice too that the body gets more compressed where the most weight is, ie the left leg here.
Some of my own (colour coded) examples, although I’m still learning to apply these things ~
(Sometimes if the nose doesn’t line up with where the body is leaning, you have to balance it out with the limbs or other body parts. The amethyst one would not work if she wasn’t holding another character on her back)
I recommend looking up these techniques online or in art books as you’re bound to find more in-depth tutorials and examples. But overall I hope this helps!