Progression - Tumblr Posts
I decided to attach the process to this girl!


sketch -> lineart -> flats -> lighting :)

Trying out some new techniques with my work, as I'm feeling my current artwork feels outdated.
Drew my Bulbasaur Harry, gave her golden pothos parts because I love golden pothos!

Dallon Weekes going from emo teen to literal Father™

Ordered too many meals.. who’s gonna force me to take the next photo? 😈
Giving Into Greed
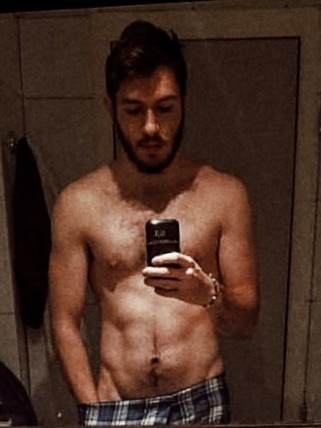
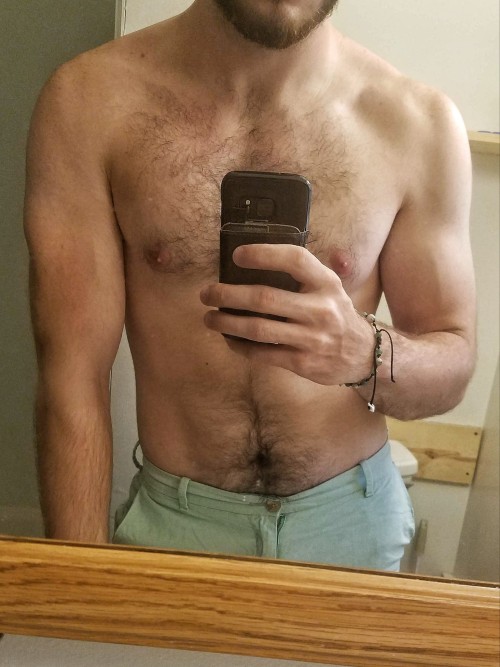
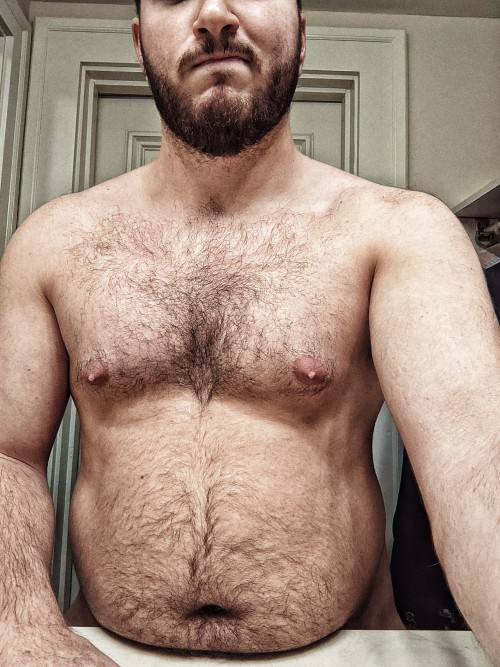
College made him a little too greedy... What started as a couple extra fries each meal, turned into a couple extra platefuls... He became a frequent flier in the cafeteria buffet line, and his waistline rapidly expanded as a result... Before he knew it, his waist size had gone up from a 32 to a 40... Recently graduated, this exjock has started a new desk job, leaving him little free time to use that gym membership. He's already put on another 15lbs and counting... slowly succumbing to his inactive, greedy lifestyle...


Here's how I make my chainmail dragon tails. You can see it starting as just a few scales linked together, and growing to be a full piece. Along the way there are some shots of the interior tension supports I put into them to keep the tail from folding flat, and also some detail shots of the belt loop attachment. I use the large sized scales from The Ring Lord, linked together with 16 gauge 5/16" inner diameter rings.
I fairly regularly get people asking for pointers or instructions for these tails, and I give what advice I can, but I've avoided doing something too specific. I prefer to leave the messy details as a learning exercise for the reader. After all, I sure learned a lot about chainmail construction from figuring these out.
But there's a consistent point of confusion for people, which I'll try to clear up. Most people seem to start out thinking of it like a sewing project: they make a big flat triangle of all the scales in the project, then they try to connect it up the back. This is Hard, for a variety of reasons:
Because of the diagonal nature of the scale weave, you can't just join up two symmetric edges--either you have to make the piece asymmetric, or you have to add in the center-most column of scales in between the mirrored edges.
Joining it up like that means the expansions happen along the same seam as you're joining together. Keeping track of all these things is hard, especially because the naked edge of the scale weave is floppy and messy.
It's difficult to get your pliers in there to close up the tip.
You can't really get in to the center of the tube to do anything useful like building the tension supports that I do.
Instead, think of it like a knitting or crocheting project. If you've ever seen someone knit in the round, this may make sense. Basically, I start out with a (tiny) ring of scales, and build rows above that one. So it's a tube the whole time, and I only ever have one edge active. But people tend to stall out on how to build a tube.
Oh, and I guess my weave direction for scales may be different from other people's. All the instructions I've ever seen for weaving scales weave from the top to the bottom, with you looking at the underside of the weave the whole time. This is fine for learning, but I found that I greatly increased my speed by instead weaving from the bottom to the top. I look at and interact with the top edge of the weave, and link each scale down to two below it. After all, it doesn't matter if it's hard to see the rings from previous rows, because they're already there, and I don't need to touch them anymore. Anyway, I could go on about the advantages of weaving in this direction, but it'll just get preachier than I'm already being.
I hope this helps anyone who's thinking of trying their hand at making a scale tail! And for non-maillers, I hope the pictures were fun to scroll past on your feed!
Oh, and here is this tail finished. I made this one a while ago, but kind of forgot about posting the progress shots.


The last few weeks were pretty darn busy for me partly because I was working to complete a large order of these horned crowns. The customer needed 40 of them for a youth theater performance. Since hand work is only marginally sped up by parallelizing, I did them in series, shipping them out in batches of 5 as I completed them. The one thing I was sad about was that it meant I couldn’t get a photo with a huge pile of all 40 of them, as I never had more than 10 at a time.
This was easily the largest order I’ve received. It was tiring, but exciting.


Just some shots showing assembly of a leather spade tip for my dragon tails. I pack the inside with layered leather to give it extra thickness and stiffness. These leather pieces are laser-cut out with everything else, then glued together like a double-sided ziggurat and inserted between the outer pieces before sewing it all together. I neglected to get any photos of it while I was sewing them together, but oh well.


This dragon head is the big project that I’ve had underway for a while. Modeled in 3D in Rhino, then instead of laser-cutting it I printed it out at full scale and hand-cut the pieces. I went for a pre-finished black leather that I got a couple hides of (initially to make a costume for a LARP which ended up getting cancelled). Mostly riveted together, with a little bit of stitching around the spots that need finer detail, namely the eyes and where the horns are gonna go.
Current status is: sitting in my room nearly finished. I’ve got the horns almost completed, but I need to find a belt sander to use for 5 minutes before I can actually get them done. Or spend another hour or two by hand with a piece of sandpaper and a flat board.
I’m happy I got the sizing correct such that it fits over my glasses. I try to do that any time I’m making something of this scale. If I hadn’t done that I could’ve made the snout a bit shorter and closer in to the head, but for a dragon like this I think the longer shape works well.
I did make the neck a bit longer in the front than I maybe should have, so I might go back and trim it down to increase range of motion. I may also go back and swap the clear acrylic eye lenses for something a bit harder to see in through, because seeing my glasses inside the mask is A Bit Odd. I might still have some half-mirrored acrylic around somewhere...


Here’s the process of constructing my paladin’s armored corset. I started from measuring myself, designed to those measurements in Rhino (3D CAD program), printed out the pattern, and then built the whole thing by hand. I put a bit more detail in the captions if you’d like to follow along.
Here’s the photo from the night I finished it up:

Making a corset had been on my projects wish list for a long time, and I’m glad I finally was able to tackle it. I was really worried it wouldn’t fit properly or something would be wrong with the design and I’d have no way of knowing until I’d gotten to the end, but thankfully it all came together cleanly and fit really well! On top of that, this was the first time I tooled a leather project, so it was cool to work that process out.
Next up is making accessory pieces for this to flesh it out to a full costume. Current plan is armor for shoulders, shins, and arms. For expediency’s sake I’ll be buying some patterns for those and modifying them to match this style, rather than designing them from scratch (which would probably take a couple rounds of prototyping). If all goes well, I should have the set ready to take good photos before the end of Magic Meat May!

I haven’t had as much time as I would like for cosplay things due to school and work lately but here is the beginning of Amara’s sash waist thing! #borderlands3 #borderlands #borderlandscosplay #cosplayinprogress #handpainted #sewn #handmade #cellshading #amara #cosplay #painted #craft #crafts #handcrafted #progression #2k #gearbox #gearboxsoftware https://www.instagram.com/p/CESJu5RJEGz/?igshid=j4o5e8h6m97j

Threw together a basic gif showing the geographical/lighting progression in my most recent Maya project. Probably gonna be working on a neo noir piece next :)

Redrew my Insecurity Emotion Creature I did for my final project in college (3 years ago). It was the first time I tried my hand at digital art so it’s a really good comparison to see how far I’ve come. I’ve come really far with my colour choices which is pretty surprising.
Original from inktober 2017 ▼

Found my previous artwork on my old computer for a bit of comparison. Crazy how much I’ve changed.
This was my first experience doing digital artwork hence why it’s so limited. It was actually my final major project for my first year at college, somehow I got a distinction for it, probably because of all the research I did for the project.


Decided to redesign my recipe card illustration from like 5 years ago? I’m a much better illustrator now and this recipe was really good so it’s nice to update the look.
Painted a kit version of my mascot which came out looking great. Mainly because I tried out painting the outlines a bit differently than usual. Also tried a looser style with the food illustration which looks real good :)
Keep reading
And people say the world won't get better
i love how humanity has moved from “suck my dick” to the gender neutral term “suck my ass”


Weekend finally! So I did some updates on my robot. I am learning a lot of stuff in 3d, I might put that to use this weekend as well. This robot is inspired by Tokusatu I watched when I was a kid and the art of Niklas Jansson.


Finally the other one is done. And by request I did a Robocop face on the other one. Next thing Dirty Bomb fan art.


#bloggeralert #Contemplation: Exercise & limits in recovery from breast cancer treatment. Post treatment/operation there are three things that the trainer & client definitely have to contemplate: #Patience, #Progression & #Practice. Check out the rest of the quick blurb: http://dbodyarchitect.blogspot.com/2015/10/contemplation-exercise-limits-in.html Like, tag, share. #dbAthinkpinkseries #thinkpink #pinktober #breastcancerawareness #dbAfam #dbAextendedfam #teamdbA #dbAfitness #teamjusbrandit #bgaffiliate #teamagilitysportstt Big up @rebelusian for the photo!


Also I don’t quite appreciate the very clear racism and dehumanization in older comics regarding Wong’s standing as manservant, but I can appreciate how Stephen actually corrects his mistakes when he speaks ill of him and realizes just how much he needs his friend. Him calling him old friend is heartwarming. How their relationship has grown from master-servant to master-master over the years is much better.
(And to be fair he’d been having quite a rough day/night. Though it’s not exactly an excuse.)
Marvel Premier #4 (1972)