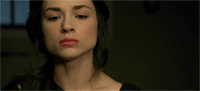
Gif Tutorial - Tumblr Posts
how do you do those gif images? the ones with dividers and moving images i hope you get what i mean
🍨 Hey anon<3 i make them myself by compiling the pics one after another in alight motion ( its an editing app ) and export it into gif format. Hope this helps 🌸 Here's a tut. I hope you understand i suck at explaining just follow my steps shown here:
ty for the tut! you dont have to answer this question and im so sorry if im being annoying but how do you do it with the dividers and the tiny image? (you can ignore this again in sorry)
no you're not annoyinggg lemme help you with the dividers. 🩷Here's a tut ;) i used PicsArt to make dis divider 🍥

Masking Gifs in Photopea (Guide)
Recently i noticed some edit blogs wonder how to mask gifs, and ive seen ppl reccomend EZgif...and theres nothing wrong with that! BUT i've recently found a way to mask gifs in Photopea and PERSONALLY to me they look way way better than masking in EZgif.
So heres a step by step on how i made the masked gifs of my holohawk edits on my hololive edit blog.


IMPORTANT FOR STEP 1: if you end up using ScreenTo Gif, DO NOT CLOSE THE APP UNTIL IT FINISHES PROCESSING THE GIF! You can see at the top right of the app how the process is going. It'll say "Completed" when its done!


Aaaand!!!!! You're done! ୨୧(o´∀`o)୨୧
Final product:

Hope this guide helped you all <3 Have fun editing !!!!!
hiii ik you got an anon a while back about converting apngs to gifs, and i was wondering the same thing? whenever i try it scuffs up the quality a lot :(
-🍭
hi! i'm not sure whether the quality thing is because of the original image size or if there's a conversion issue, so i'll give a walkthrough of how i go about it and see if that helps! stickers are usually no larger than 300px, so that may be the reason that they appear blurry.
(1) Add Line Stickers Packer extension to your Chrome browser
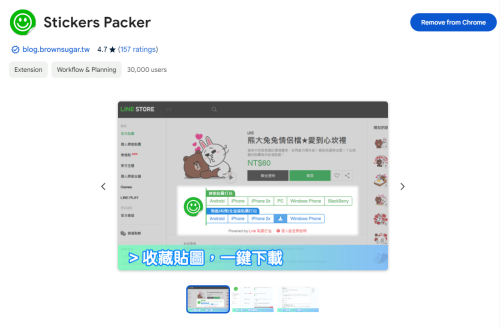
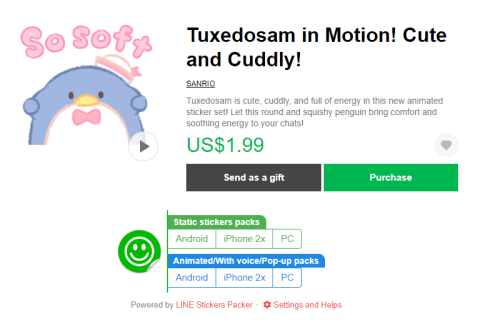
(2) Go to the page of the animated stickers you want to download, and click on the "PC" button underneath "Animated/With voice/Pop-up packs"
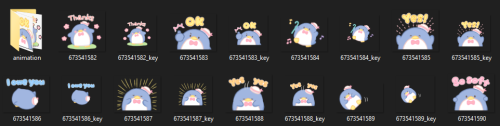
(3) Extract your files! The .apng files for the animated stickers are located in the "animation" folder.
(4) Upload the sticker you want to convert into a gif to Ezgif's file converter & click on "Convert to GIF!"
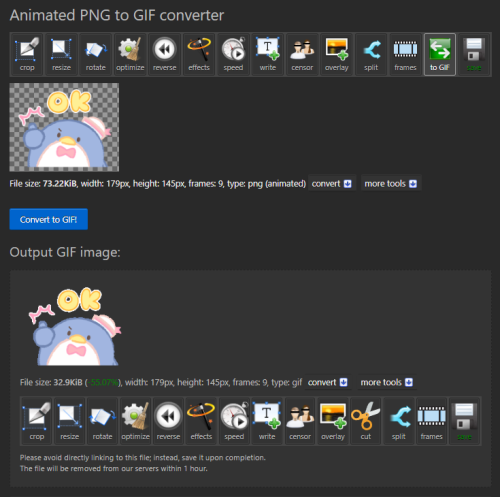
(5) Click on "frames," then set Delay time to 0, check "don't stack frames," and click on "Make a GIF!" This will make your gif loop forever instead of only playing once.
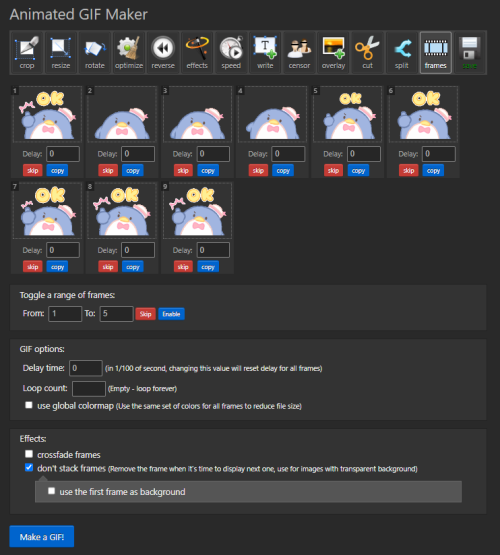
(6) And now you have a gif :-)!

(Bonus) The creator of the sticker packer also wrote a program to batch convert gifs into apng, which you can download here. This is helpful since a lot of batch convert sites like freeconvert have limits on how many files you're allowed to convert at once. You can follow the tutorial to learn how to use it! It's in Chinese but the translation tool is accurate 👍
my gif making routine (without load files into stack)
you don’t need any knowledge about making gifs, that’s pretty much the point of this tutorial, so if you’re new to photoshop, this tutorial might be helpful
it would be really nice if you could like this post if you like this tutorial or find it useful
this is the result:
Keep reading
Hello i love your posts!!!! elmer's adventure and artificial planets, the vibes you created is beautiful and i especially love the gifs! i wonder if you can share how you create the gifs or if you refer to any tutorials? :)
Hello! Thank you so much for your message and Thank you again for loving them!!💖 Now, I'm so crazy that I can't stop delusions about them. And if I notice it, my hand is making GIF without permission. There may be some strange sentences, but the steps is easy. It is as follows.😅
How to create the GIF?
First, prepare a video. I'm recording using NVIDIA GeForce Experience. In Settings, enable in-game overlays. Then start recording with Alt + Z during the game. I use this tool only for recordings, and I using ReShade to add effects to images. Besides this, I think it is possible with the recording function of Windows 10. You can tap Windows + G on the keyboard to record.
All you have to do now is convert your video to GIF using ANIMATED GIF MADE EASY from EZGIF.COM.! It's here.

Select the video file you want to convert to GIF here and click Upload Video.

After conversion, set the Size to tumblr.

Please try to keep the file size within 3.0MiB. If no so, you should not be able to upload to tumblr. It was possible to upload even about 6.0MiB. (I'm sorry. I don't know the upper limit it.)
Finally it's done!!🤣
Please enjoy making GIFs❤ And I would be happy if you could share your fun GIFs with us. Have a nice day!🌈
could you please do a tutorial of your game of thrones 'so much for stardust' gifs where it has the ripped paper textures? it's so pretty, and i'd like to learn how to do one with just the texture in the middle and two gifs on either side, like half and half and just having a rip in the middle. it's so cool how you did a gif in the middle though so i wanted to ask as well! all of them are so cool looking. you are extremely talented. if you don't want to though i understand :) thank you
TORN PAPER EFFECT + BLENDING TUTORIAL

thank you so much for your sweet words, dearest anon and i'm sorry it took so long to answer but it's here now so i'll try my best to explain <3 disclamer: this is the first tutorial i ever made, it's very screenshot heavy and it assumes the basic knowledge of ps and gifmaking. if there's something you don't understand, don't hesitate to ask <3 so, let's get to it!
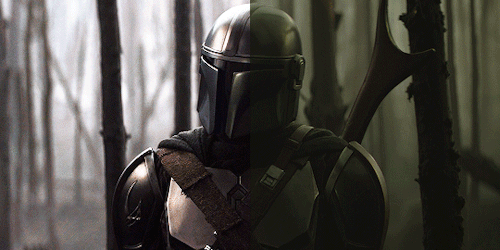
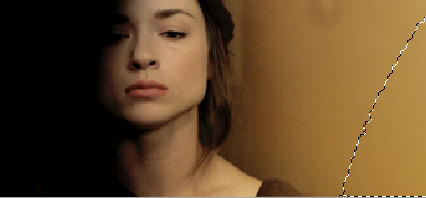
1. PREPARING THE BASE As you can see in this shot there's a lot of space between Rhaenyra and Alicent and that makes it perfect for the ripped paper overlay without hiding much of the base gif. So the first thing i did was to crop it like this:

Also you want to make sure that the highlighted box (delete cropped pixels) is unchecked! After taking the usual steps for the animation (creating frames from layers, reversing the frames, setting frame delay) you continue with the video timeline and convert your frames into a smart object. psa: if you don't have the motivation or the time to play around with coloring here are some psds i recommend: 1, 2; as for the sharpening i think this one is the best.
now that you have your smart object sharpened and colored what you want to do next is drag it to the end of the canvas and duplicate it. after that you move the copy on the other end like the original and make sure it's under the coloring layers, like this:

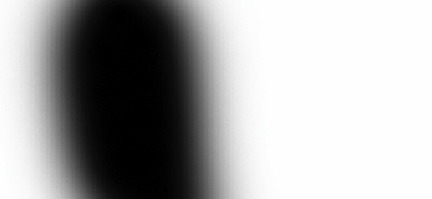
After that you have to create layer masks (the highlighted icon above) for both smart object and the copy and change the blending option of the copy to screen or lighten (whatever looks best!). So this is how it looks now:

pls ignore that there are no layer masks on the smart objects i just added them after changing the blending rip </3 Now, as you see both gifs are like fighting eachother for their rightful place on the canvas. (fgfgfdf) To fix that you have to use a soft round brush to delete the parts you don't want. (feel free to play around with the brush however you want to get the result you want!) Here's my result:

2. THE OVERLAY
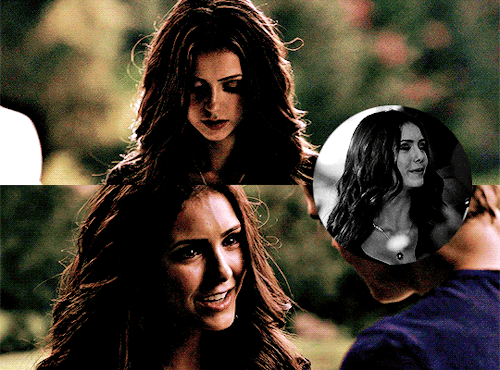
Now for the both gifs you want to use for the ripped paper effect you pretty much apply the same steps as the ones you did with the gifs for the base. Here are the two gifs i chose:


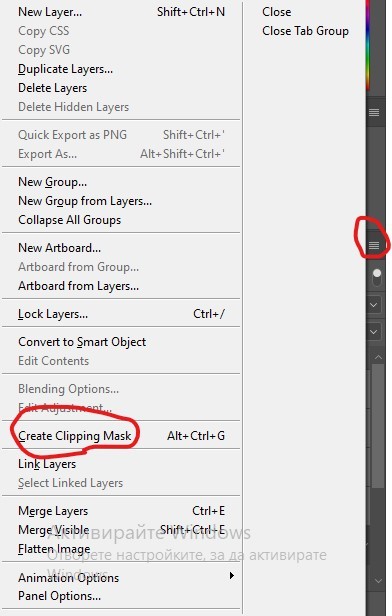
Before blending both gifs however you want to create a clipping mask for each of the smart objects coloring layers, like this:
And now you're ready to blend both gifs together! You choose the group with one of the gifs and change the blending again to screen or lighten and place the said group on top of the other. So this is how it looks now:

optional: if you feel like the base gif doesn't pop out enough you can always add a gradient map on one of both gifs and play around with the opacity and the color you think fits best.
Then you add a layer mask on the overlay gif group and again play around with the brush to delete what you don't want. So this is the final result:

ps - don't repeat my mistake by placing the group with the layer mask under the other group. it should be on top and the blending option should be lighten or screen.
After blending both gifs together, you're ready to place them on the base. So first thing you want to do first is place both groups of each gif in one single group together. Then you duplicate the said group in the psd of the base gif and create a layer mask. This is how it should looks:

Now, in order to create the ripped paper effect, you'll have to download a ripped paper brush pack. This is the one i use. After loading the brushes in ps (if you don't know how here is explained) you're ready to begin! Change the size and angle however you'd like to make it look how you want. And if you want you can move the overlay gif by choosing both groups in case you aren't happy with the adjustment. This is how it looks like so far:

We're almost done! Now you have to find a paper texture, (i got mine from google) place it between both groups of your gifs and create a layer mask, like so:

What you have to do here is pretty much the same thing you did with the overlay gifs. Still, make sure there's enough space for the text you want to write in. However, if you think that the space isn't enough you can just delete a bit more of the overlay gifs. Here's mine:

3. THE TEXT
You're finally ready to type out the text you want! If you're having troubles with choosing the right font and size, here are my text settings:

You can always play around with the angle and if your text is too small, zoom in so you can place it just how you like it. And since i'm a bit lazy to deal with it later, i choose to add the highlight color while it's still zoomed. You just have to add an layer above the text and use a soft round brush with opacity from 70-75% and flow from 15-18%.
For the repeated text you want to make sure you create a big space for writing so it can contain the whole space of the torn paper. Also, write where the text will be seen only and use the tab button to skip the space where the gif is. This is how it looks:

Once you're done with writing the repeated text, you want to select all the character layers and the highlight layer and move them under the overlay gif and on top of the paper, like this:

With the layers still selected and in order to contain the text within the paper the last thing you want to do is create a clipping mask. And that's It. You're done! This is the final result:


I’ve found that I often work with weirdly tinted scenes which are sometimes challenging to colour, so I’m here to share how I tend to work around them.
There is no one way to colour gifs, and something that works for me may not work for you! This post just contains some things I wish I’d known when I started making gifs years ago.
To understand this, you need to:
already know how to make gifs on Photoshop
have basic knowledge of different adjustment layers
I personally use Photoshop CS5.
Keep reading
NEW VIDEO TUTORIAL: a tutorial on how to make multiple gifs in one canvas (as requested)
this is what I’ll be teaching you this time:
What you’ll need for this:
Basic understanding on how to make gifs. (Check out my other giffing + coloring tutorial for reference.)
Photoshop CC.
Patience <3
If you have any remaining questions about anything, my DM is always open! Either here or on @lizzies, just let me know what I can help you with and I’ll try my best!
~
as some of you may know, all of my resources and content are made for free, and i work with commissions. but if you feel like supporting a content creator, this is my ko-fi. all of my income comes from supporters so this is always extremely helpful. <3 let me know if this tutorial helped you, and if there’s any specific video tutorial you’d like to get from me, just let me know and i’ll try my best to deliver!
Coloring Tutorial
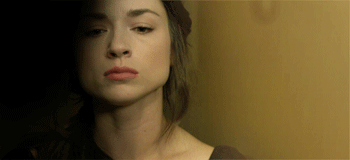
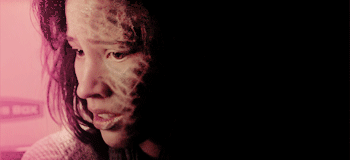
Hello, this tutorial is for the wonderful @djoharrington and those of you wondering how I colored this set. I’m going to be talking about how to color the first gif only to keep this tutorial from getting too long. The other two used the same coloring method with only minor adjustments made to keep them looking similar.
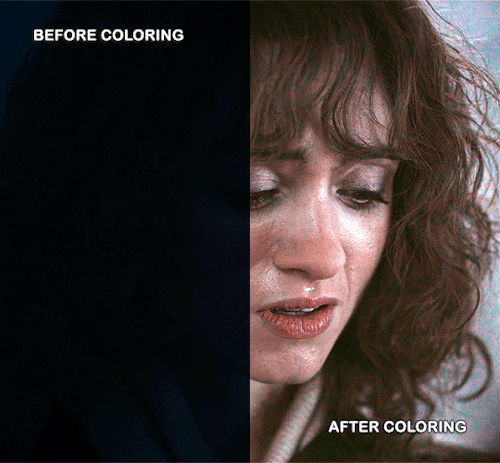
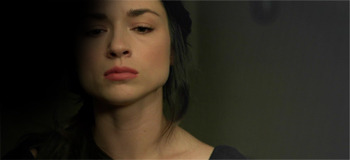
Yes, this scene really is that dark before coloring.
Quick notes on what I’m using:
mpv player for screencapping — not mentioned in tutorial
Photoshop 2021 for editing
I mention mpv player because I’m giffing 4k, and it’s one of the few players I’ve come across that take continuous caps that don’t end up looking washed out. It makes for easier coloring.
Keep reading
COLOR TUTORIAL GIF #1
Another tutorial this time for gifs. A really easy guide for dark gifs and color porn backgrounds. This isn’t a beginner tutorial; for how to make gifs and details on masking an image refer to the links in the post.
I’m teaching you how to make the background a different color than the rest of the image on a gif:


First open up the gif you want to use. I am using this one for this tutorial. I made it myself using this method.
Next some light and color. Make a curves layer output 175, input 77. Levels, 0,1.28, 255, output 0, 206.

Then lots of selective color. I ended with four layers of selective color total.

(blacks: 0,0,0,-13, cyans: +100,-39,-66,0)

(cyans: +100,-36,-30,0; blues: +49,-19,-100,0; yellows: -16,-27,-100,0)
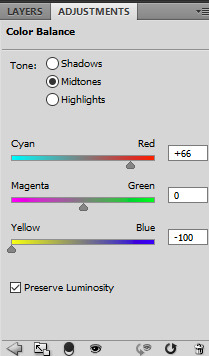
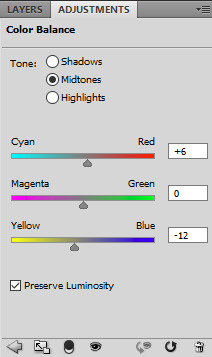
Add a hue/saturation, with saturation set to +12. Then a color balance, midtones: -27,0,+30. Another selective color on top, set for:

(reds: +21,+64,-31,-52; yellows: -50,-34,0,0; cyans: -6,-58,-58,+4)
Here it is so far:

Now the hard part, which isn’t really hard just incredibly tedious.
Make another selective layer, make sure it’s all the same selective layer and the coloring is set to ABSOLUTE. Here are the settings:

(yellows: -2,-4,-47,0; cyans: +83,0,0,0; whites: -19,+32,0,0; neutrals: +56,-20,-90,0)

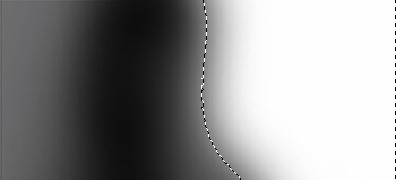
Now we mask it, make sure the selective color layer is selected, then press ctrl+i. Use a black brush, soft round to fill in the parts of the background you want in color. For those of you who don’t know how to use mask, please go here for info.
Here is my first mask:

Make sure that selective layer is visible for animation frame 1. If that was super confusing to you, the look below.

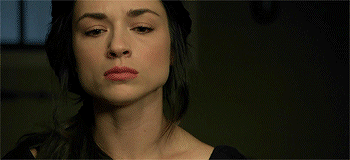
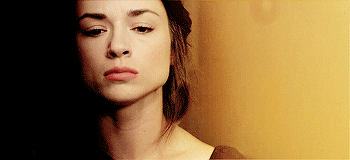
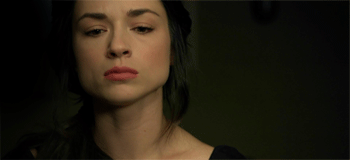
Make sure the selective layer you just masked is hidden for all the other frames. Next click frame 2 and duplicate the selective layer from below and erase the parts that are on Malia’s hair and face.
*The secret to it looking natural at the edges of her hair, is to use lower opacity for the brush when you’re erasing the color on Malia.
Rinse and repeat for all 32 layers. I said it was tedious.

And you know what? That was it. As always, DOWNLOAD THE PSD here. If you were confused at any point then definitely download the PSD.
Also here are two gifs with the same editing style.


COLORFUL GIF TUTORIAL
Another tutorial! This time I’m showing people how I make colorful gifs, like the ones in my latest giset of Allison Argent from Teen Wolf. The tutorial is for doing it with gifs, but of course you can also use this as a ref for screencaps too.
Just to remind you all I do not do beginner tutorials, so you have to have some knowledge of Photoshop before you try this. And this, refers to turning this gif:
Into this:
First off, you’ll need a gif to use. I’d suggest just starting with the one I am using since that’s the best starting point. If you want to make your own and don’t know how, try this tutorial or this one.
Now we edit. First thing I do is make a group called PSD and for this gif I made a few blank layers and colored black on the left side of the picture to erase the window in the background.
Next a Gradient Fill to add some light on the right side. My ending mask:
Subtle, but important.
Next add a black and white Gradient Map over the top at 35% opacity, set the blend mode to soft light.
Then a Levels adjustment layer, with these settings:
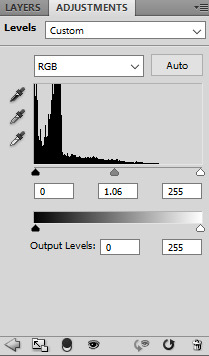
(0,1.06,255 - 0,255)

Download all of those, or just make the gradients yourself. When you add them to the gif make sure to set the blend mode to soft light.
Now make a new blank layer, pick the color you want (I used #c09f5e), and color lightly with a soft round brush on the right side. Here’s my selection:

Make sure to drown the opacity (60-75%) and set the blend mode to soft light.
Now either use hue/sat or just a b&w adjustment layer with 12% opacity and soft light blend mode. And add a Color Balance adjustment after that. I only subtly changed the midtones for this one.
This is how it should look so far:
Now enjoy a gif of adjustments:

blacks, 0,0,0,+11 - yellows, -27,+10,-8,0 - vibrance +9, saturation +6 - yellows, -16,-6,+12,0 - blacks, 0,0,0,+17 - reds,+3,0,0,0 - yellows, +5,+7,-31,0
Using this color #cdab64, with a new black layer, paint over some of the image. Lightly near the bottom of Allison’s chest and shoulders. Stay away from the black areas on the left, and make it light! Here is the end result, selection and mask.
This is meant to add more vibrant color to the right side.
Move on to more color balance, masked and colored like this:
Then I added some Curves, Brightness/Contrast and another Selective Color.
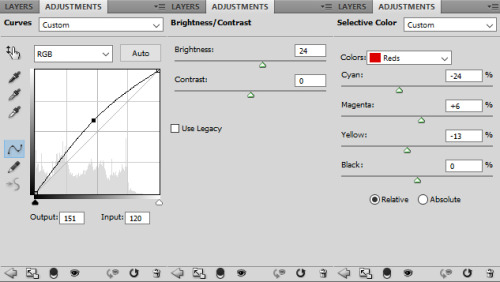
curves, 151,120 - brightness/contrast, 24,0 - reds, -24,+6,-13,0
I also noticed that third black layer from the top of the tutorial was too much black on Allison’s face, so I removed it.
Here’s FINAL GIF!

back and forth preview ↓↓
(I should mention that I added some more shading on the left, specifically around her skull near where the window is, and the difference it subtle, but really great)
And that’s it!
As always, here is the PSD, and another few examples of other colors.
ALPHA STILES GIF TUTORIAL
Another one? So soon? Yeah, well I originally made a werewolf!Allison gif tutorial, and it kind of sucked. So I revamped it for just a color porn gif tutorial and now I am making a much better werewolf eyes tutorial. Featuring the glorious and badass Alpha Stiles. Also, it’s the top gif from my most recent post.
MUST HAVE: knowledge of Photoshop and adjustments and of course know how to make gifs. This isn’t a super difficult tutorial, but it does require a lot of time and patience.
I will be showing all of you non-beginners, how to turn this:

into this:

First step, I extended the background. The end size should be 500 x 220, and you should be cropping to get rid of some of the top and bottom parts.

The white on the right side is blank space because I moved the layers over.
Next I picked a color from the background, for the background. It’s much easier to do it this way and then manipulate the color of the BG later on using adjustment layers. Make a new, blank layer and start filling in the right hand side with a round soft tipped brush. The color I used is #d2ccb4.

Looking good right? I ended up with four layers for the background coloring alone by the way. So don’t be afraid to use a few.
Next some actual toning and coloring. I almost always start with a black and white gradient layer, set to the soft light blend mode. I kept the opacity at 100% for the contrasting.

I actually duplicated that gradient, and put the opacity to 14% on the copy.
Now a curves adjustment, output 143 and input 93. And selective color to mess with the background coloring. Focusing on Whites; the settings are cyan -1, magenta -8, yellow -9, black +15, set to absolute.

More selective color! This time, reds and yellows. Reds, cyan -13, magenta +10, yellow 0, black 0. Yellows, cyan -28, magenta -24, yellow -31, black -52. Set to relative, instead of absolute this time. I also added a black focused selective color, +4 on blacks and nothing else.

I wanted to make the reds pop in this gif, so I made another selective color but this time I masked it only for his shirt. Reds, cyan -100, magenta +100, yellow +100, black +100. Set to absolute.

Yet another, selective color. Yellows, cyan -10, magenta -18, yellow -37, black 0. Relative setting; Cyans, cyan -38, magenta -7, yellow 0, black 0. Neutrals, cyan -8, magenta -12, yellow -12, black 0.

Make another selective color, separate from the last one; again focusing on Whites & Cyans. For the Whites, cyan -8, magenta +3, yellow +10, black 0; absolute setting. Cyans, cyan -100, magenta -100, yellow -100, black 0.
I made another selective for the blacks again and masked it for the left side of his face. Adding deeper shadows and more contrast overall. (Black +12)

Next a vibrance adjustment; vibrance +11, saturation +18. Another selective color; Reds, cyan -12, magenta +15, yellow +17, black -20. Set to absolute. And another curves; output 126, input 109.
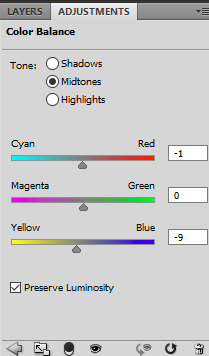
A subtle color balance next; 0, -3, +3. Another selective color; Reds, +10,+6,+5,0. Hue and saturation, 0,-7,0.

So far so good!
I love the coloring as is, but now it’s werewolf time. I used this screencap from season 4, because the eyes are perfect for what I was planning. (the link is too a cropped and lighter version of the one below)

Make sure to color the image first, before copying and pasting the part of the eye you need! I used a few layers to do this, some curves and a gradient. After I changed the coloring it looked something like this:

Now using the lasso tool, I circled and copied the left eye and pasted it as a new layer onto the gif of Stiles.

Now select the very first frame of the gif, and make a new group. I just called it EYES. Then paste in the eye layer and transform (ctrl+t) it down until it’s the right shape and size for Stiles’ eye. I started with the right eye, just because it was less shadowed and easier to place.
You may need to erase parts of the eye layer; don’t be afraid to do so, but be careful not to get rid of too much.
DO NOT MERGE THE LEFT AND RIGHT EYE LAYERS! Just don’t, it will make everything so much harder and it won’t look as good in the end either.

Duplicate the layer for the eye and place the other one over the other eye.
Now the first frame is good to go, but if you play the gif you will notice only the first one has the eyes. Or, all of them do, but on the other frames the eyes aren’t where they should be. So the cool and easy thing about this, is that you can go to frame 2, then click the layers and move them how you need them. Then go back to frame 1 and they didn’t move!
Keep doing that until you can’t anymore, which for me was frame 10 when he starts to blink and look down. With that one, go to the eye layers for the red eyes and duplicate them both.
Now, I named the layers, left and right just to make it easier on myself, and I suggest you do the same. So I ended up with 38 eye layers, all duplicates and you will probably end up with about the same amount. There is a method to the madness though.
Basically with the closing eyes parts I needed to duplicate the original layers so I could erase the top parts of the eye layer. That way it’s not overlapping on his lids.

Here is a super slow down to show you just how natural it looks. ^^
If you just tried to move the layers like before it would have worked, but you would try to erase the top parts of the eye to make it look better and it would erase those parts on every frame. Not good. So make sure to duplicate as needed and keep the eyes for the next 30-ish frames as separates so you can and make sure to manipulate the parts you need to without screwing the other frames over.
I always, ALWAYS save the PSD and of course sharpen. Best way to do this, and the fastest way, is to press the three line thing in your frames box (upper right corner, it’s a drop down) and convert to timeline. Then select all your layers, right click and convert to smart object; then filter > smart sharpen. Amount > 500, Radius 0.3, Remove gaussian blur, and make sure the More Accurate box is ticked.

A lot of time and effort later and you’re done! I’d say the end result is worth all that time wouldn’t you? As always, here is the PSD DOWNLOAD, and more examples of the werewolf eyes below:

